User Manual
28 Pages
Preview
Page 1
Digital Ultra™ User Manual
• Flushmount • Flexmount • Digital Newport
1
INDICATIONS FOR USE To be used in nitrous oxide-oxygen sedation systems for delivering to a patient a mixture of nitrous oxide and oxygen gases with a maximum nitrous oxide concentration of 70%.
CONTRAINDICATIONS Contraindications for use of nitrous oxide/oxygen inhalation may include: 1. some chronic obstructive pulmonary diseases; 2. severe emotional disturbances or drug-related dependencies; 3. first trimester of pregnancy; 4. treatment with bleomycin sulfate; 5. methylenetetrahydrofolate reductase deficiency. Whenever possible, appropriate medical specialists should be consulted before administering analgesic/anxiolytic agents to patients with significant underlying medical conditions (e.g., severe obstructive pulmonary disease, congestive heart failure, sickle cell disease, acute oritis media, recent tympanic membrane graft, acute severe head injury.1 1
American Academy of Pediatric Dentistry. Clinical Guidelines: Guidelines on Use of Nitrous Oxide for Pediatric Dental Patients. Pediatr Dent 2009;31(6):148-151. Available at: “http://www.aapd.org/media/policies.asp”. Accessed February 23, 2010.
WARNINGS To be used only by a professional trained in the use of nitrous oxide. Patient should always be closely monitored during nitrous oxide use. If patient has an adverse reaction, reduce or stop the flow of nitrous oxide as needed. The O2 flush button can be used to rapidly purge the lines of N2O. If patient does not show signs of quick recovery, remove nasal hood and treat with pure oxygen from either the O2 resuscitator fitting or an auxiliary oxygen tank using a demand valve, oxygen assisted manual resuscitator, or equivalent. Call for emergency assistance if rapid response is not achieved. Do not use this device for the administration of general anesthesia or as part of, or in conjunction with, a general anesthesia administration system. For use with 100-240 V AC, 50/60 Hz only. Use only hospital grade power cord connected to an equivalent receptacle marked “Hospital Only” or “Hospital Grade.” For emergency power shut-off and isolation, unplug power cord from wall outlet. Unit is calibrated at the factory to ±5% per industry recommendations. Verify that the correct gases are being delivered to the correct ports on the analgesia gas machine before initial use. This can be done by shutting off the oxygen cylinders in the tank room. If the lines are crossed, the unit will immediately go into an Oxygen Failure fault mode when turned on. Correct before using.
2
CAUTIONS Federal (U.S.) law restricts this device to sale by or on order of a dentist or physician. Do not attempt to repair, alter, or calibrate this device. Unauthorized repair, alteration or misuse of this device is likely to adversely affect the performance and will void the warranty. Safety features contained in this notice should be routinely checked to assure proper function. If any of these safety features are not functioning properly, contact your dealer or Accutron and arrange for the necessary repairs before reusing the machine. Always use clean, dry medical gases. Introduction of moisture or other contaminants into Accutron analgesia gas machines may result in defective operation.
3
Table of Contents
Page
Warnings and Cautions... 2 I.
Control/Display Features... 8
II.
Digital Flowmeter Models Flushmount... 10 Flexmount... 12 Digital Newport... 14
III.
Safety Features... 18
IV.
General Instructions... 18
V.
Directions for Use... 19
VI.
Periodic Equipment Checks... 20
VII.
Troubleshooting Guide... 22
VIII.
Technical Specifications... 23
IX.
Warranty... 24
X.
Warranty & Returned Goods Policy... 25
XI.
Repair Service Policy... 25
XII.
Assistance... 25
XIII.
Ownership Information... 26
© June 2010 Accutron, Inc. Part No. 26256 - Rev. 03 - 06/2010
7
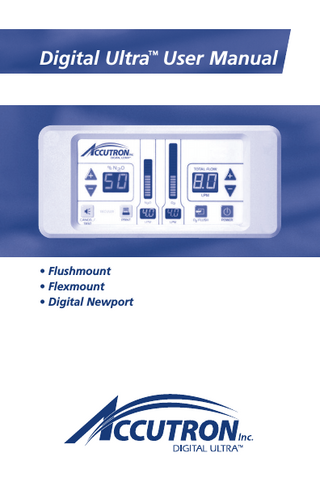
I. CONTROL/DISPLAY FEATURES Front Control/Display Panel % N2O Display
N2O Bar Display
O2 Bar Display
Information LEDs Total Flow in this area Display
Increase Total Flow
Increase % N2O
Decrease Total Flow
Decrease % N2O
Cancel/Test Vacuum LED
N2O Display
O2 Display
O2 Flush
Remote Control
Increase Total Flow
Increase % N2O
Decrease Total Flow
Decrease % N2O
Power (On/Off) O2 Flush
8
Power (On/Off)
Front Control/Display Panel & Remote Control Control/Display Panel – Easy-to-use control panel allows setting Total Flow and N2O concentration with the touch of a finger. Bright, color-coded displays make it simple to monitor status, even from a distance. Optional hand-held Remote allows functional control at patient chairside. Total Flow Control – Allows setting of Total Flow in either (.1) LPM or (.5) LPM increments. Once set, the Total Flow will remain constant even if % N2O is changed. Total Flow Display – Shows Total Flow in numeric LPM format with yellow LEDs. % N2 O Control – Allows setting of N2O concentration in either 1% or 5% increments up to a maximum of 70%. Once set, % N2O will remain constant even if Total Flow is adjusted. % N2 O Display – Shows % N2O in numeric format with blue LEDs. Power – Turns unit on and off with the push of a button. Flush Control – Ceases N2O Flow and provides a minimum of 20 LPM of pure O2 as long as button is pressed. O2 Flow – Two green LED displays show O 2 Flow in both LPM numbers and graphic bars simulating standard flow tube. N2 O Flow – Two blue LED displays show N2O Flow in both LPM numbers and graphic bars simulating standard flow tube. Print – When optional printer is installed, provides printout of current conditions. Cancel/Test – During an alarm mode, turns off audio alarm for one minute. During normal mode, performs self-check of all displays. Information LEDs – Informs administrator of failures with O2 supply, N2O supply, O2 flush, or mixed gas line to patient. Also indicates if remote vacuum is connected.
9
II. FLOWMETER MODELS FLUSHMOUNT MODEL
Two piece design for easy installation into a cabinet or a wall. Thin control module located away from main module, power, and gas lines, requires remote outlet.
Flushmount Remote Outlets Options Sample Installation
a) Standard (Contains mixed gas outlet and O2 resuscitator connection)
b) Remote Flow System (RFS) (Contains mixed gas outlet, O2 resuscitator, and vacuum controller with gauge display)
O2 15 10 20 in Hg 5 0 30
25
VACUUM
Green Light
MIN
MAX
VAC
MAX
O 2
c) Accu-Vac (Contains mixed gas outlet, O2 resuscitator, and vacuum controller with LED display)
Cabinet Mounting
10
Remote Control
Remote Vacuum 12 V DC Out
RS232 Printer
N2O In
O2 In
100-240 V AC Inlet IEC/EN 60320-1 C14 with two fuses. (Accepts IEC/EN 60320-1 C13 connector)
Mixed Gas Out (O2/N2O) – Connects to remote bag tee outlet
O2 Out – Connects to O2 Resuscitator fitting on remote outlet
Flushmount Main Module Utility Connections O2 Inlet – Labeled O2 IN – Equipped with male CGA 1240 DISS fitting to prevent gas mix-up. N2 O Inlet – Labeled N2O IN – Equipped with male CGA 1040 DISS fitting to prevent gas mix-up. O2 Out – Labeled O2 OUT – Equipped with male CGA 1240 DISS fitting, provides oxygen for resuscitator. Mixed Gas Port – Equipped with male CGA 1160 DISS fitting (Medical Air) Power Cord Inlet – Clearly labeled 100-240 V AC, 50/60 Hz and protected by two fuses for added safety. Fuses are 240 V, 0.5A, slow-blow. RS232 Printer Connector – Clearly labeled and designed for use with optional Accutron-approved printer. Remote Control Connector – Remote Control connection. Using the Remote Control, general adjustments can be made from a distance of up to 10 feet away from device. Remote Vacuum Valve Connector – Clearly labeled and designed to actuate a vacuum valve in the Accu-Vac Automatic Vacuum Scavenging Port (PN 56955). O2 Out Connector – Direct connection to oxygen for use with resuscitator. Provides minimum of 100 LPM of oxygen. 11
FLEXMOUNT MODEL
Can be mounted on a number of different devices.
O2 Resuscitator Fitting Mixed Gas Port for Bag Tee
Flexmount Mounting Options
4-Cylinder Portable System
Mobile Stand
9" Wall Arm
Telescoping Wall Arm (Extends 12"-17")
16" Bi-fold Wall Arm
12
Remote Control
Remote Vacuum 12 V DC output
RS232 Printer
N2O Inlet
O2 Inlet
100-240 V AC Inlet IEC/EN 60320-1 C14 With 2 Fuses (Accepts IEC/EN 60320-1 C13 connector)
Mixed Gas Out (O2/N2O) – Connects to bag tee port on front of unit
O2 OUT – Connects to O2 Resuscitator fitting on front of unit
Flexmount Utility Connections O2 Inlet – Labeled O2 IN – Equipped with male CGA 1240 DISS fitting to prevent gas mix-up. N2 O Inlet – Labeled N2O IN – Equipped with male CGA 1040 DISS fitting to prevent gas mix-up. O2 Out – Labeled O2 OUT – Connects to oxygen resuscitator fitting on front. Mixed Gas Out – Connects to bag tee port on front. Power Cord Inlet – Clearly labeled 100-240 V AC, 50/60 Hz and protected by two fuses for added safety. Fuse ratings are 240 V, 0.5 A, slow-blow. RS232 Printer Connector – Clearly labeled and designed for use with optional Accutron-approved printer. Remote Control Connector – Remote Control connection. Using the Remote Control, general adjustments can be made from a distance of up to 10 feet away from device. O2 Out Connector – Direct connection to oxygen resuscitator fitting on front. Provides minimum of 100 LPM of oxygen.
13
DIGITAL NEWPORT
Regulators and E Yokes
Line Pressure Gauges
Gas Cylinders
Remote Control Port (Optional) O2 Resuscitator Fitting
Tank Restraint
Removable Bag Tee
If printer option is installed, printer cable will extend from cover at this point.
Handle Warning: Do not hold handle when opening cabinet.
10’ Hospital Grade Power Cord
Power Socket Note: Power Cord must be either unplugged from socket or unwound from storage cleats when opening Newport.
14
Digital Newport Setup and Connections View – When looking at the front of the Newport cabinet, Nitrous Oxide is on the left as shown by the blue Nitrous Oxide gauge. Oxygen is on the right as shown by the oxygen gauge. Opening Newport Cabinet – Open the Newport cabinet by placing one hand on the front cover and the other in the handle on the side. Pull handle back all the way. Make sure the power cord is unplugged from the socket in the skirt first. Install Gas Cylinders – 1. Undo Velcro straps 2. Angle tank into position 3. Strap tanks loosely 4. Remove regulators from accessories box 5. Attach regulators to tanks by loosening yoke handle, verifying seal is in place, aligning seal with gas opening, aligning pins with holes in yoke, tightening yoke onto cylinder NOTE: Regulators are pinned to match gas cylinders. Connect gas hoses to regulator outputs. NOTE: Hoses and regulators use DISS fittings to prevent mix up. Rotate cylinders so that regulators fit inside. Open Gas Cylinders – Pick one tank of each gas to be “in use“ tank and attach “in use” label to cylinder. Open these cylinders using the cylinder wrench provided in accessory box. Close Newport cabinet. Connect Power – 1. Plug cord back into skirt outlet 2. Plug other end of cord into receptacle NOTE: System will operate from 100-240 V, 50-60 Hz. Internal power supply will switch automatically. Scavenging Circuit – - Install bag tee from accessories box into front of Newport. - Attach scavenging circuit to bag tee. - Connect vacuum hose to system vacuum. - Install nasal hood into scavenging circuit and start vacuum flow per scavenging instructions. Start up – See Section V, Directions For Use
15
Digital Newport: Managing Gas Supply Note: Power Cord must be either unplugged from socket or unwound from storage cleats when opening Newport. 1. 2. 3. 4.
5.
Identify the two in-use tanks (N2O and O2) by attaching “in-use” identification tags to them. When one of the in-use tanks is empty, close the tank by turning the valve clockwise. Leave the empty tank in place. Move the “in-use” tag to the appropriate reserve tank, which now becomes the in-use tank. Replace the empty tank with a new tank, which then becomes the reserve tank. Open the valve of the new in-use tank by turning counterclockwise. Note: Do not open the reserve tank until the in-use tank is empty. When changing gas tanks, make certain both same gas cylinders that are involved in the exchange are closed. Always remember to switch the “in- use” tags over to the new tanks. Contact gas supplier to request new gas cylinders as needed.
Digital Newport: Changing Gas Cylinders Always use clean, dry medical grade gases. Introduction of moisture or other contaminants into Accutron Analgesia gas machines may result in defective operation. The Digital Newport Flowmeter System is designed to operate with a 50-55 psi line pressure on each gas (O2 and N2O). The line pressure can be determined by reading the O2 and the N2O line pressure gauges that are located on the front panel of the Newport. The Newport has features incorporated to make cylinder change-out easy. To assure proper operation of the system, 4 cylinders must be properly installed at all times. Please review the following cylinder replacement procedures before attempting to change cylinders. Note: Power Cord must be either unplugged from socket or unwound from storage cleats when opening Newport. 1. 2. 3. 4. 5. 6.
Open the tank enclosure by sliding the cover to the rear. Close the valve on the empty tank (clockwise). Release the Velcro restraint on the empty tank. Tilt the empty tank out slightly. Loosen the round handle on the regulator yoke. Remove the regulator from the empty tank (make certain that the regulator is not dropped or damaged while it is off the tank). 7. Lay the empty cylinder down on the floor (cylinders should only stand upright when properly restrained as they can easily fall over). 8. Pick up the full replacement tank and place the bottom of the tank onto the floor of the Newport, leaving it slightly tilted outward for easy replacement of the regulator. 9. Check to assure that the sealing gasket has remained on the regulator’s E yoke. 10. Reattach the regulator to the new full tank by sliding the yoke (attached to the regulator) over the top of the tank post aligning the index pins with the corresponding holes in the tank post. 11. Tighten the round handle on the regulator yoke. 12. Push the tank into an upright position. Attach and tighten the Velcro tank restraint.
16
Digital Newport: Control Module and Main Module Locations
Control Module is behind shield at front of unit.
Serial # Label
Main flowmeter module is behind shield at rear of unit. Fuses are located in fuse tray at power cord socket on back of flowmeter.
17
III. SAFETY FEATURES O2 Fail Safe System – Offers assurance that N2O ceases if the O2 supply is interrupted or reduced. Two separate sensors provide redundant safety. Alarm will sound, failure LEDs will light, and N2O flow will cease. N2 O Supply Warning – Triggers an alarm if the N2O supply cannot keep up with user’s needs. Mixed Gas Flow to Patient – Monitors pressure in mixed gas line and triggers an alarm if flow to patient is obstructed. Emergency Air Valve – Automatically provides patient with ambient air if gas flow is interrupted. Located on remote bag tee. Directional Check Valve – Prevents re-breathing of exhaled gases and protects against CO2 buildup. Located on remote bag tee. O2 Resuscitator Connection – Direct connection to O2 for use with resuscitator. Port is always open and provides 100 LPM minimum of pure oxygen.
IV. GENERAL INSTRUCTIONS 1. Warranty Unpack Digital Ultra and inspect to make certain that the unit has not been damaged during shipment. The unit’s serial number is located on the back of Digital Ultra (see page 17 for Digital Newport's serial number location). Record the serial number in the area provided at the back of this booklet. Once Digital Ultra Flushmount is mounted into a cabinet, the serial number will no longer be visible. Always reference the serial number when corresponding with Accutron. Complete the warranty card supplied with Digital Ultra and mail to Accutron. Completion of this step ensures proper device warranty coverage. Accutron Digital Ultra analgesia machines carry a two-year limited warranty (see Warranty on page 24 for details).
2. Gas Supply Connection Always use clean, dry medical gases. Introduction of moisture or other contaminants into Accutron analgesia gas machines may result in defective operation. After device installation, connect the oxygen and nitrous oxide supply lines to the Diameter Specific Instant fittings or DISS fittings located on the back of the device. See pages 15 and 16 for information specific to the Digital Newport. It is important that the regulators for both gases be set to give pressures in the range of 50-55 PSI. Verify that the correct gases are being delivered to the correct ports on device before initial use. This can be done by shutting off the O2 cylinders and turning the unit on. The unit should immediately go into an oxygen failure fault mode. If unit indicates O2 gas is flowing, lines are crossed. Correct before using.
18
3. Power Connection Device is designed to run on 100-240 V AC and 50/60 Hz. There is no need to flip an external switch; the unit automatically adjusts for any power. A medical-grade power cord is supplied with the unit and must be used to ensure proper grounding. It is important that the power cord be plugged into an outlet marked “Hospital Only” or “Hospital Grade.” The power cord is plugged into the AC entry, which contains two fuses and is located on the back of the device. International power cords are offered for most countries. Use only 240 V, 0.5A, slow-blow fuses. Fuses can be ordered from Accutron as part number 26456-FRU.
4. Auxiliary Connections Plug remote control into remote port on back of Digital Ultra or on front cover of Newport if ordered as option. Plug Accu-Vac signal line into vacuum connector on back of Digital Ultra (Flushmount only). Vacuum LED should light when Digital Ultra is powered indicating vacuum is flowing. Plug printer cable from Able printer, if used, into RS232 printer port. Do not use this port for any other devices. If printer is ordered on Newport as option, printer cable will extend from front cover. Note: Use only Able printer supplied by Accutron.
V. Directions For Use Read instructions completely before operating Digital Ultra device. Note: The steps listed below provide a basic functional description of the Digital Ultra usage. A training course that emphasizes a practical, hands-on approach combined with instructions on safe techniques for administration of nitrous oxide-oxygen conscious sedation is recommended before use of this flowmeter. Do not use this device for the administration of general anesthesia or as part of, or in conjunction with, a general anesthesia administration system. Unit must be connected to O2 and N2O gases at 50-55 PSI. Unit must be plugged into 100-240 V AC, 50/60 Hz power outlet. Power button will shut off Digital Ultra normal functions (reference diagram on page 8). For Emergency shutoff, unplug power cord.
Digital Ultra User Instructions 1. 2. 3. 4. 5. 6. 7. 8.
Open valves to O2 and N2O supply. Push Power button on Front Panel or Remote Control. (Flow starts at 5.0 LPM Total Flow and 0% N2O) Set Total Flow using Total Flow Up (+) or Down (-) buttons on Front Panel or Remote Control. Set % N2O using % N2O Up (+) or Down (-) buttons on Front Panel or Remote Control. If 100% O2 flush is needed, push Flush button on Front Panel or Remote Control. To print, verify that optional printer is plugged into RS232 port and press Print button. When procedure is finished, turn off Digital Ultra by pushing Power button on Front Panel or Remote Control. At the end of the day, turn off gas supply at tank.
Setting Step Size of Total Flow and % N2O 1.
To set the % N2O step size to 5%: Plug in Digital Ultra and leave off. Press and hold % N2O Up (+) button until beeps (approx. 5 seconds). 19
2. 3. 4.
To set the % N2O step size to 1%: Plug in Digital Ultra and leave off. Press and hold % N2O Down (-) button until beeps (approx. 5 seconds). To set Total Flow step size to 0.5 LPM increments: Plug in and turn off Digital Ultra. Press and hold Total Flow Up (+) button until beeps (approx. 5 seconds). To set Total Flow step size to 0.1 LPM increments: Plug in and turn off Digital Ultra. Press and hold Total Flow Down (-) button until beeps (approx. 5 seconds).
Setting Date and Time 1. 2. 3. 4. 5. 6. 7. 8.
Plug in Digital Ultra and leave off. Press and hold Print button down until beeps (approx. 5 seconds). This will start year setting. Display will show 20 in % N2O box and flashing display in Total Flow box. Adjust to current year using Total Flow Up/Down buttons. Push % N2O Up (+) button to store value and proceed to next step. % N2O box now displays months. Set the month with Total Flow Up/Down buttons. Push % N2O Up (+) button to store value and proceed to next step. Total Flow box now displays dates. Set the date with Total Flow Up/Down buttons. Push % N2O Up (+) button to store value and proceed to next step. N2O box now displays the hours. Set the hour with Total Flow Up/Down buttons. Push % N2O Up (+) button to store value and proceed to next step. N2O box now displays minutes. Set the minute with Total Flow Up/Down buttons. Push the cancel button to save value and exit program.
VI. PERIODIC EQUIPMENT CHECKS CAUTIONS Do not attempt to repair, alter, or calibrate this device. Unauthorized repair, alteration or misuse of this device may adversely affect the performance and will void the warranty.
IMPORTANT Safety features contained in this notice should be routinely checked to assure proper function. If any of these safety features are not functioning properly, contact your dealer or Accutron and arrange for the necessary repairs before reusing the machine. Fail Safe Test
Check Before Each Use
Turn on Digital Ultra and set Total Flow to 5.0 LPM and 50% N2O. Turn off O2 supply at tank or wall. Audio alarm should sound when oxygen runs out, N2O should shut off, and Failure and Oxygen Alarm LEDs should flash. Turn O2 back on, normal flow should resume and alarms should cease. Display Test
Check Before Each Use
Turn Digital Ultra on and press CANCEL/TEST button. All displays should light sequentially with an audio beep, including alarms. Cleaning
Perform After Each Use
Wipe with damp cloth. Do not allow liquids to touch rear auxiliary connections or enter case.
20
Disinfecting The following products are approved for disinfecting the front touch pad area. Do not allow spray or liquid to enter any connectors on back of unit. Lysol® Brand II I.C. Disinfectant Spray EcoTru® Spray ProSpray Surface Disinfectant COE Foam II CaviCide® Microstat2™ Clorox® “Anywhere Hard Surface.” Do not use Clorox® Disinfectant Spray. Oxygen Flush Valve Test Check Monthly • Turn Digital Ultra on at 5.0 LPM and leave nitrous oxide at 0%. • Disconnect the corrugated tube from the bag tee outspout. Reservoir bag should remain connected to the bag tee downspout. • Push the Flush button on Front Panel or Remote Control while blocking the flow from the outspout. Reservoir bag should fill within 5-10 seconds. Remove any blockage when test is complete. Outspout Check Valve Test Check Monthly • Digital Ultra should be off. • Reservoir bag should be connected to the bag tee downspout. • Mixed Gas tube should be connected to the outspout but not connected to the white patient delivery tubing. • Breathe into the open end of the corrugated tube. The reservoir bag should not fill. Override Air Valve Test Check Monthly • Digital Ultra should be off. • Reservoir bag should be connected to the bag tee downspout. • Mixed gas tube should be connected to the outspout but not connected to the white patient delivery tubing. Reservoir bag should be deflated. • Draw air through the open end of the corrugated tube. The Override Valve should open and allow air to enter the corrugated tube. Place your finger over the Override Valve and remove it to verify that air is entering the bag tee through the Override Valve. If the Override is not functioning, do not use Digital Ultra until it is repaired or replaced. Factory Check Recommended every 2 years Send equipment to authorized Service Center for operational check, battery replacement, and recalibration. Note: battery used for time and date info only, loss of battery does not affect safety or operation. Routine Maintenance There is no required routine maintenance. Unit should only be repaired by trained individuals with specialized equipment. Unauthorized opening of equipment will put individual at risk of electrical shock and will void Warranty.
21
VII. TROUBLESHOOTING GUIDE PROBLEM
POSSIBLE CAUSE
REMEDY
Display off
1. Power cord loose 2. No power to wall outlet 3. Fuse blown
1. Connect cord firmly 2. Check circuit breaker and/or call electrician 3. Replace fuse in holder under AC socket.
Oxygen Failure alarm
Low O2 pressure
1. Verify pressure in O2 cylinder 2. Verify valves are open
Nitrous Failure alarm
Low N2O pressure
1. Verify pressure in N2O cylinder 2. Verify valves are open
Nitrous & Oxygen Failure alarm
Obstructed flow to patient
Remove kinks or obstructions from mixed gas line to patient
Front panel buttons are not operating
1. Defective panel 2. Internal problem
Contact Accutron Customer Service
Remote Control is not operating
1. Loose connection to unit 2. Defective Remote 3. Internal problem
1. Check remote plug connection on back 2. If problem persists contact Accutron Customer Service
Displays don’t work
Broken display/circuit board
Contact Accutron Customer Service
Automatic Vacuum port (Accu-Vac) doesn’t work
1. Loose connection in back 2. Defective valve 3. Internal problem
1. Check plug connection 2. Verify output of vacuum outlet is 12 +/- 3 V DC 3. If not solved, contact Accutron Customer Service
Flush does not have enough oxygen flow
Flush solenoid damaged
Contact Accutron Customer Service
Flush does not work 1. Defective flush switch at all 2. Internal Problem
Contact Accutron Customer Service
Flow doesn’t appear to be accurate
1. Calibration error 2. Internal problem
Check output with Oxygen Analyzer if available Contact Accutron Customer Service
Unit freezes, doesn’t respond, gas won’t shut-off
1. Processor glitch 2. Power spike
Unplug power cord Plug back in (Reboot)
22
VIII. TECHNICAL SPECIFICATIONS Physical Flushmount Main Unit 8x4x7.5” (20,3x10,2x19 cm) Weight: 5.2 lbs (2,4 kg) Flushmount Controller 9x4x1.5” (22,9x10,2x3,8 cm) Weight: 1.0 lbs (0,8 kg) Flexmount 8x4x7.5” (20,3x10,2x19 cm) Weight: 6.2 lbs (2,8 kg) Digital Newport 19x32x22” (48x80x56 cm) Weight: 75 lbs (34 kg)
Electrical 100-240 V AC 50-60 Hz. 0.6 A Socket is IEC/EN 60320-1 C14 and accepts an IEC/EN 60320-1 C13 connector Power cords available for most countries
Fuses 240 V, .5 A slow-blow (quantity 2) Accutron part number 26456-FRU
Gas Supply Oxygen: 50-55 PSI at 100 LPM min. Nitrous Oxide: 50-55 PSI at 10 LPM min.
Gas Fittings Oxygen Inlet: Male DISS CGA 1240 Nitrous Oxide Inlet: Male DISS CGA 1040 Mixed Gas Outlet: Male DISS CGA 1160 Oxygen Resuscitator Connection: 1/4" I.D. Quick Disconnect Adapter hoses available for AGA, DIN, NIST, BOC, AFNOR, SIS, UNIFO
Gas Delivery Oxygen Flush: Minimum 20 LPM Oxygen Flow: 1.0 LPM-9.9 LPM (Accuracy +/- 0.5 LPM) Oxygen %: 30%-100% Oxygen Resuscitator Flow: Minimum 100 LPM, 100% O2 Nitrous Oxide Flow: 0-6.9 LPM (accuracy +/- 0.5 LPM) Nitrous Oxide %: 0-70% Mixed Gas Flow: 1.0-9.9 LPM
Environmental Transportation/Storage: Temperature: -40°C to +70°C (-40°F to 158°F) Humidity: 10-100% Operating Conditions:
Temperature: 10°C to 40°C (50°F to 104°F) Humidity: 30-75%
Accessories Printer Remote Control Remote Flow System (RFS) Accu-Vac
23