Aesculap
Aesculap Neurosurgery Systems
Reader Unit for Telemetrical Shunt Sensor Instructions for Use FV900X March 2011
Instructions for Use
61 Pages
Preview
Page 1
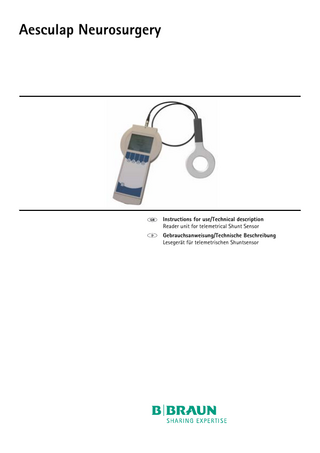
Aesculap Neurosurgery
Instructions for use/Technical description Reader unit for telemetrical Shunt Sensor Gebrauchsanweisung/Technische Beschreibung Lesegerät für telemetrischen Shuntsensor
2
3
4
1
5 6 7
9
8
10
Aesculap Neurosurgery
Reader unit for telemetrical Shunt Sensor
Legend
Symbol
ON/OFF switch 2 Display 3 Antenna socket 4 Antenna 5 SD card slot 6 Function keys 7 Connector socket for power supply 8 Connector (for reader unit) 9 Control lamp 10 Power supply
Explanation
1
Symbols on product and packages Symbol
Explanation Caution, general warning symbol Caution, see documentation supplied with the product Follow the instructions for use
Non-ionized radiation
Labeling of electric and electronic devices according to Directive 2002/96/EC (WEEE), see Chapter Disposal
ON/OFF switch
Function key The options on the display can be selected by using the 4 function keys IP44 IP44
Housing protection class to DIN EN 60529 Reader unit FV900X Power supply FV902X Protection class II (protective insulation) (Power supply FV902X only) Antenna symbol Socket for antenna SD card SD card slot
2
DCIN socket for power supply
Contents 1. Safe Handling ... 3 2. Product Description ... 3 2.1 Reader unit System Components... 3 2.2 Intended Use... 3 2.2.1 Indications... 4 2.2.2 Contraindications ... 4 2.3 Operating Principle ... 4 2.4 Symbols ... 4 2.4.1 Display Symbols ... 4 3. Using the reader unit ... 5 3.1 System Set-Up ... 5 3.2 Connecting the Power Supply ... 5 3.2.1 Connecting the Antenna ... 6 3.2.2 Inserting the SD Card... 6 3.3 Function Checks... 6 3.4 Operation ... 7 3.4.1 General Operating Instructions ... 7 3.4.2 Info Menu... 8 3.4.3 Taking Measurements ... 9 3.4.4 Managing Data/Displaying Measurements... 12 3.4.5 Settings ... 16 4. Validated Reprocessing Procedure ... 21 4.1 General Information ... 21 4.2 Preparations at the Place of Use... 21 4.3 Cleaning/Disinfection... 21 4.4 Manual Cleaning/Disinfection ... 22 4.4.1 Wipe Disinfection for Electrical Devices Without Sterilization ... 22 4.5 Inspection ... 22 4.6 Storage ... 22 5. Maintenance/Calibration ... 23 5.1 Calibration of BARD Sensor... 23 6. Troubleshooting ... 24 6.1 Malfunctions Displayed with an Error Message... 24 6.2 Other Malfunctions... 27 7. Technical Service ... 28 8. Technical Data... 28 8.1 Ambient Conditions ... 29 9. CE Marking... 29 10. Storage and Transport... 29 11. Disposal ... 29 12. Distributor in the US/Contact in Canada for product information and complaints... 29
1. Safe Handling
DANGER
WARNING
Risk of contamination if the reader unit or antenna is not used correctly in the surgical environment! ¾ Caution with sterile and non-sterile areas. Risk of injury due to incorrect operation of the product! ¾ Attend appropriate product training before using the product. ¾ For information regarding such training, please contact your national B. Braun/Aesculap agency.
¾ Clean the new product thoroughly after removing from the transport packaging, see Chapter Manual Cleaning/Disinfection. ¾ Ensure that the product is in perfect condition and fully functional prior to use, see Chapter Inspection. ¾ Observe the "Notes on Electromagnetic Compatibility (EMC)", see TA022130. ¾ To prevent damage as a result of incorrect installation or operation, and in order not to compromise warranty and manufacturer liability: – Use the product only as specified in these instructions for use. – Observe all safety information and maintenance instructions. – Use only Aesculap products in combination, see Chapter Reader unit System Components. ¾ Ensure that the product and its accessories are operated and used only by persons with the requisite training, knowledge, or experience. ¾ Keep the instructions for use accessible to the user.
2. Product Description
2.1 Reader unit System Components Description
Product no.
Reader unit shunt sensor
FV900X
Antenna reader unit shunt sensor
FV901X
Power supply reader unit shunt sensor
FV902X
2.2 Intended Use The reader unit is used together with the telemetric sensor in shunt function diagnostic tests and permits reliable and non-invasive detection and localization of occlusions in ventricular drainage systems (with no intervention or X-ray diagnostics) as well as identification of mechanical damage to shunt valves.
Fig. 1 The working distance for telemetric data transfer, i.e. the distance between antenna and shunt sensor, is 10-30 mm, see Fig. 1.
3
Aesculap Neurosurgery
Reader unit for telemetrical Shunt Sensor
2.2.1
Indications
• Functional diagnosis of implanted ventricular drainage systems (shunts) • Detection and localization of occlusions in ventricular drainage systems • Checking of shunt valve function 2.2.2 • • • •
Contraindications
Intracranial pressure measurement Intracranial pressure management based on measured values Intracranial pressure measurement without shunt Functional diagnosis of extracorporeal liquor drainage systems (traumatic brain injury)
2.3 Operating Principle The telemetric system is used to measure liquor pressure levels, the characteristics or relative time-dependent modification of which permit conclusions to be made regarding the function of an implanted ventricular drainage system. Diagnostic methods can be used to provoke and subsequently interpret a change in the level of pressure in the shunt. Using the reader unit, the data measured by the shunt sensor can be retrieved and displayed. The measured data are saved automatically on the SD card and can thus be analyzed at a later point. Based on the relative course of the liquor pressure in the shunt, conclusions can be drawn as to its function. As a result, it is possible to identify and localize any occlusion in the shunt as well as a loss of mechanical function in the shunt valves using noninvasive methods.
Starts measurement Stops the present measurement For deleting a saved measurement in the menu <Data management> For placing a marker during continuous measurement To call up the diagram processing menu To activate the zoom function To activate the cursor function For adjusting the presentation of the min. and max. values of the pressure axis For returning to the diagram processing menu For returning to the diagram processing menu Navigate forward Navigate backward On Off
2.4 Symbols Confirm 2.4.1
Display Symbols
Display symbols For displaying additional information or starting with the info menu For starting with the selection menu Fast measurement - Fast measurement can be quickly started without having to select further options Upward navigation of the cursor Downward navigation of the cursor For quitting the current menu Activates or confirms the selected function
4
For maximizing the display of a sequence in the menu <Data management> For minimizing the display of a sequence in the menu <Data management> For deactivating the acoustic signal
3. Using the reader unit
DANGER
WARNING
WARNING
WARNING
CAUTION
CAUTION
Risk of contamination if the reader unit or antenna is not used correctly in the surgical environment! ¾ Caution with sterile and non-sterile areas! Limited accuracy and no storage of measured data if operated without the SD card! ¾ Insert the SD card designated for use with the shunt sensor into the reader unit. ¾ The SD card designated for use with the implant (see patient pass) is recognizable by its identification number (ID). ¾ Measured data can be saved only on the designated SD card. Unexpected termination of measurement if the SD card is full! ¾ Check the available memory prior to starting measurement. ¾ Delete any data that are no longer needed. Danger from use of MRI! ¾ Only operate the reader unit outside of the MRI field of use! The reader unit cannot be operated if the battery status is low! ¾ Check the battery status. ¾ If the battery is low, connect to the power supply.
Note If the temperature of the telemetrical sensor is below 19°C, it is necessary to fall back on the "Measurement without SD Card". Operation will take place with less precision and it is not possible to save measurement data. The following error messages occur during measurement with the SD card: – During a long-term measurement: Pressure values invalid, measurement will continue – During an individual or collective measurement: Temperature values invalid, measurement will not continue For a more detailed description of errors, see Troubleshooting
3.1 System Set-Up The reader unit is equipped with a battery which, when fully charged, permits wireless operation for up to 5 hours. The battery must be charged when first installing the device. The power supply is used for charging the reader unit battery. It takes about 6 hours to fully charge the battery. The reader unit can also be operated while it is being charged (with connected power supply). Note Charging is not possible at an ambient temperature of >35 °C!
3.2 Connecting the Power Supply
DANGER
Damage to the reader unit from incorrect accessories and/or risk to the safety of user and patient! ¾ Use only the original power supply belonging to the reader unit shunt sensor (FV902X).
The mains voltage must be consistent with the voltage range stated on the label of the power supply for the reader unit shunt sensor.
Communication poor or non-existent! The telemetric link between the reader unit and implant may be disrupted by the operation of a further scanning device. ¾ Increase the distance between the scanning devices. ¾ The telemetric link between the antenna and implant may be disrupted by a further implant in the vicinity of the antenna. Increase the distance between the implants. ¾ The telemetric link between the antenna and implant may be disrupted by metal components in the vicinity of the implant. Increase the distance from metal components!
Fig. 1 5
Aesculap Neurosurgery
Reader unit for telemetrical Shunt Sensor
¾ Insert the power supply connector of the device into the connector socket of the reader unit, see Fig. 1. ¾ Connect power supply by inserting into a wall socket. 3.2.1
Connecting the Antenna
¾ Insert the SD card designated for use with the relevant shunt sensor (see patient pass) into the reader unit until it locks in firmly, see Fig. 3. Note Press the card lightly to remove.
3.3 Function Checks ¾ Check that the entire unit is in good condition and fully functional prior to each use. ¾ To check the battery status, check the function without using the power supply. ¾ Ensure that the device and antenna used for the function check are not visibly damaged. ¾ Check the function of the following components in the given order: – Activate the ON/OFF switch . – Automatic self-test after activation, including display and volume The following screen content is displayed in chronological order:
Fig. 2 ¾ Connect antenna to reader unit, see Fig. 2. 3.2.2
Inserting the SD Card Damage to SD card if not used correctly! ¾ Do not touch the contact strips of the SD card.
CAUTION
Fig. 3 6
Fig. 4 ¾ Check battery status, connect reader unit to mains power supply if necessary to charge the battery.
The following is displayed on the screen when operating the reader unit with mains supply:
Fig. 5 Legend A Display during power supply operation of reader unit Note The control lamp of the reader unit power supply must be illuminated! ¾ Check system time, correct if necessary, see Chapter Settings. ¾ Activate the ON/OFF switch .
3.4 Operation
Fig. 6 Legend A Date B Time C SD card D Memory map (on SD card) E Battery status F Info key G Fast measurement H Menu key ¾ Activate reader unit with ON/OFF switch . Start screen content is displayed, see Fig. 6. 3.4.1
General Operating Instructions
Menu-controlled operation of the device is facilitated by a total of 4 function keys . The context-related function of these soft keys is indicated by the symbols shown on the display for each of the keys. The exact meaning of the symbols is explained in the list "Display symbols". The pre-selected submenu is highlighted within a frame. For improved navigation, the position currently selected in the submenu is highlighted by a scroll bar in addition to the frame. The keys and are used for standard operation. Note When the reader unit is not in use it switches into standby-mode. Depending on the setting: 1-5 minutes.
7
Aesculap Neurosurgery
Reader unit for telemetrical Shunt Sensor
3.4.2
Info Menu
The following information can be retrieved from the info menu: • Hotline & Service • System specifications • Manufacturer specifications ¾ To reach the Info menu, press .
The following information is displayed on the screen, see Fig. 7.
Content of 3 submenus: hotline & service Hotline & Service Phone: +49 7461 95-1601 system details product name: Shunt Sensor reader unit article number: FV900X serial number: 00001 software version: 2.0 service date: 14.12.2011 manufacturer info manufacturer Aesculap AG Am Aesculap-Platz 78532 Tuttlingen Germany
Fig. 7 Legend A Pre-selected submenu B Scroll bar Using the keys and , the desired submenu can be pre-selected and confirmed by pressing . Return to the previous menu by pressing .
8
3.4.3
Taking Measurements
• Fast measurement Here, the sequence of unaveraged single measurements at the max. available measurement rate (approx. 40 measurements per second) is displayed in a time diagram and saved to the SD card.
Fig. 8 ¾ To reach the submenu, press . The following information is displayed on the screen:
Single measurement:
Fig. 9 ¾ To reach the measurement menu, press . The following information is displayed on the screen:
Fig. 11 ¾ Start a single measurement by pressing . ¾ Return to the Selection menu by pressing . During single measurement, the following information is displayed on the screen.
Fig. 10 There are three types of measurement: • Single measurement The mean of 8-10 measurements is displayed and saved to the SD card. • Continuous measurement Here, the sequence of single measurements at the selected measurement intervals is displayed in a time diagram and saved to the SD card.
¾ Use to select the single measurement menu. The following information is displayed on the screen:
Fig. 12
9
Aesculap Neurosurgery
Reader unit for telemetrical Shunt Sensor
Continuous measurement: ¾ Select the continuous measurement menu by pressing the keys and , and confirm by pressing . The following information is displayed on the screen:
Symbols for reception quality Symbol
Explanation Communication started
Distance antenna to measuring unit good
Distance antenna to measuring unit small - increase distance Distance antenna to measuring unit too far - reduce distance Fast measurement There are two ways to start fast measurement: ¾ Press the key on the start screen and then start measurement with the key. - or ¾ By pressing the key, the following submenu appears. Fig. 13 ¾ Start continuous measurement by pressing . ¾ Return to the selection menu by pressing . The following information is displayed on the screen:
Fig. 15 ¾ To reach the measurement menu, press . ¾ Select the fast Measurement menu by pressing the keys , and confirm by pressing .
Fig. 14 Legend A Symbol for reception quality ¾ A marker can be placed by pressing . ¾ Multiple markers can be placed during one measurement. ¾ Stop measurement by pressing . Note The markers permit circumstantial analysis of the measured data. 10
and
During fast measurement, the following information is displayed on the screen:
Fig. 16 ¾ The following information is displayed on the screen:
Fig. 18 Legend A Symbol for reception quality ¾ Stop measurement by pressing
.
Symbols for reception quality Symbol
Explanation Communication started
Distance antenna to measuring unit good
Fig. 17 ¾ Start fast measurement by pressing . ¾ Return to the selection menu by pressing
Distance antenna to measuring unit small - increase distance .
Distance antenna to measuring unit too far - reduce distance
11
Aesculap Neurosurgery
Reader unit for telemetrical Shunt Sensor
3.4.4
Managing Data/Displaying Measurements
¾ By pressing
on the start screen, the following submenu appears:
Fig. 19 ¾ Select the data management menu by pressing the keys , and confirm by pressing .
and
The data files are listed chronologically (time of starting measurement) and displayed as follows:
Fig. 21 ¾ Select the desired file by pressing the keys firm by pressing . The files are labeled as follows: Symbol
and
, and con-
Explanation Single measurement Continuous measurement Fast measurement
Note When loading a continuous or fast measurement, an hour glass appears and the loading time is displayed in seconds.
Fig. 20
12
Single measurement
Fig. 22 ¾ The data file can be deleted by pressing
Fig. 23 ¾ Deletion must be confirmed by pressing shown above by pressing . ¾ Return to the selection menu by pressing
Continuous measurement
Fig. 24 ¾ The measurement can be deleted by pressing . Deletion must be confirmed by pressing . Return to the screen shown above by pressing . ¾ Return to the selection menu by pressing . ¾ By pressing , the diagram processing menu appears. The following information is displayed on the screen
.
. Return to the screen . Fig. 25
13
Aesculap Neurosurgery
Reader unit for telemetrical Shunt Sensor
¾ By pressing
, the zoom menu appears.
Fig. 26 The and keys enable the display of a measurement sequence to be expanded or compressed (zoom). ¾ Return to the diagram processing menu by pressing . ¾ Return to the main display for continuous measurement by pressing . ¾ By pressing the key in the diagram processing menu, the following screen appears:
¾ By pressing the ing screen appears:
Fig. 28 Legend A Cursor ¾ Keys and can be used to adjust the max. and min. scale values at the cursor position. Using the key, the cursor can be switched between maximum, minimum and automatic. If the "automatic" function is selected ( ), the axes are scaled automatically in line with the measured data. If the "automatic" function is selected ( ), the max. and min. value setting becomes irrelevant. ¾ Return to the display of measured values by pressing . Fast measurement
Fig. 27 ¾ Return to the diagram processing menu by pressing . ¾ The or keys enable the time axis to be shifted to the left and right, respectively. ¾ Return to the main display for continuous measurement by pressing .
Fig. 29
14
key in the diagram processing menu, the follow-
¾ The measurement can be deleted by pressing . Deletion must be confirmed by pressing . Return to the screen shown above by pressing . ¾ Return to the selection menu by pressing . ¾ By pressing , the diagram processing menu appears. The following information is displayed on the screen:
Fig. 30 ¾ By pressing
, the zoom menu appears.
Fig. 31 ¾ The and keys enable the display of a measurement sequence to be expanded or compressed (zoom). ¾ Return to the diagram processing menu by pressing . ¾ Return to the main display for continuous measurement by pressing . Note Switching between displays can take a few seconds, depending on the file size.
¾ By pressing the ing screen appears:
key in the diagram processing menu, the follow-
Fig. 32 ¾ Return to the diagram processing menu by pressing . The or keys enable the time axis to be shifted to the left and right, respectively. ¾ Return to the main display for continuous measurement by pressing . ¾ By pressing the key in the diagram processing menu, the following screen appears:
Fig. 33 Legend A Cursor ¾ Keys and can be used to adjust the max. and min. scale values. Using the key, the cursor can be switched between maximum, minimum and automatic.
15
Aesculap Neurosurgery
Reader unit for telemetrical Shunt Sensor
¾ If the "automatic" function is selected ( ), the axes are scaled automatically in line with the measured data. If the "automatic" function is selected ( ), the max. and min. value setting becomes irrelevant. ¾ Return to the display of measured values by pressing . 3.4.5
The following information is displayed on the screen:
Settings
¾ By pressing
on the start screen, the following submenu appears:
Fig. 36 Date/time ¾ To display the date/time menu, press . The following information is displayed on the screen: Fig. 34 ¾ Select the settings menu by pressing the keys
Fig. 35 ¾ To display the settings menu, press
.
and
.
Fig. 37 Legend A Cursor ¾ The position of the cursor can be moved by pressing . ¾ Using the keys and , the values at the position of the cursor can be amended. ¾ Return to the display of measured values by pressing . Note Modified values are saved immediately.
16
Measurement interval
Units ¾ Select the units menu in the settings menu using the keys .
and
Fig. 38 ¾ To display the units menu, press . The following information is displayed on the screen:
Fig. 39 ¾ Select the desired unit using the keys pressing . ¾ Return to the settings menu by pressing
and .
These settings function only in the continuous measurement mode. ¾ Select the measurement interval menu in the settings menu using the keys and .
Fig. 40 ¾ To reach the measurement interval menu, press . The following information is displayed on the screen:
, and confirm by
Fig. 41 ¾ Select the desired measurement interval using the keys , and confirm by pressing . The available settings are 1-300. The available memory map on the SD card is also displayed. ¾ Return to the settings menu by pressing .
and
17
Aesculap Neurosurgery
Reader unit for telemetrical Shunt Sensor
Measurement display
Language
¾ Select the display data menu in the settings menu using the keys and .
¾ Select the language menu in the settings menu using the keys and .
Fig. 42 ¾ To reach the display data menu, press . The following information is displayed on the screen:
Fig. 44 ¾ To reach the language menu, press . The following information is displayed on the screen.
Fig. 43 ¾ The measurement display can be selected by pressing ¾ Return to the settings menu by pressing .
18
or
.
Fig. 45 ¾ Select the preferred language using the keys confirm by pressing . ¾ Return to the settings menu by pressing .
and
, and
Volume ¾ Select the volume menu in the settings menu using the keys .
Standby-mode and
¾ Select the standby-mode menu in the settings menu using the keys and .
Fig. 46 ¾ To reach the volume menu, press . The following information is displayed on the screen:
Fig. 48 ¾ To reach the standby-mode menu, press . The following information is displayed on the screen:
Fig. 47 ¾ Select the desired volume using the keys and , and confirm by pressing . The available settings are 1-5. An acoustic signal will be emitted as the volume is changed. ¾ Return to the settings menu by pressing .
Fig. 49 ¾ Select the preferred time at which the reader unit should switch into standby-mode using the keys and and confirm by pressing . The available settings are 1-5 minutes. ¾ Return to the settings menu by pressing .
Note The setting determines the volume of the warning signals. Warning signals are, as a rule, emitted at volume level 5.
19