User Manual
46 Pages
Preview
Page 1
Aurum bed – User Manual
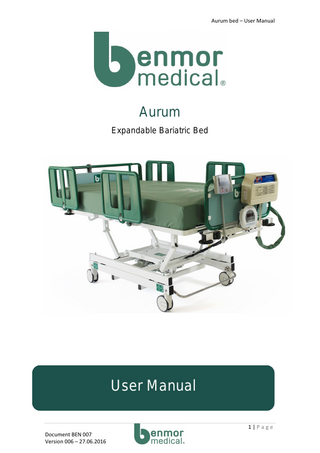
Aurum Expandable Bariatric Bed
User Manual 1|Page Document BEN 007 Version 006 – 27.06.2016
Aurum bed – User Manual
Benmor Medical has been supporting bariatric care since 1996 and was the first company in the UK specialising in bariatric patient handling equipment. As pioneers in the sales and rental market for bariatric equipment, Benmor Medical introduced total bariatric sales and rental solutions, allowing our customers to rent or purchase a bed, chair, hoist, commode and wheelchair as one package. We continually strive to drive innovation and quality within the bariatric market and have established a firm reputation for excellent customer support and class leading products. Benmor Medical supplies and rents a wide range of products which enable nurses and carers to provide the best quality care to patients.
Our extensive product portfolio includes: • • • • • • • • • •
Bariatric Beds Ultra Low Beds Community Beds Mattresses Hoists Riser Recliner Chairs Static Chairs Commodes Walking Aids Bariatric Wheelchairs
Our well established reputation in the UK bariatric sector has been achieved by providing excellent 24/7 customer service, supported by innovative products.
For further information, please visit our website: www.benmormedical.co.uk
2|Page Document BEN 007 Version 006 – 27.06.2016
Aurum bed – User Manual
Contents 1. 2. 3. 4. 5. 6. 7. 8. 9.
Introduction ... 4 Identification Labels ... 5 Symbols ... 6 Delivery ... 6 Safe Use Guidelines ... 7/8 Environmental Conditions ... 9 Technical Specification ... 10 Product Description ... 11 Installation and Setup ... 12 9.1 Power Supply and Electrical Connection ... 12 10. Bed Adjustment – Supervisor Control Panel ... 13 10.1 Knee-break Section Adjustment (3) ... 14 10.2 Backrest Section Adjustment (4) ... 14 10.3 Fowler Position (5) ... 14 10.4 CPR Position (6) ... 14 10.5 Trendelenburg and Reverse Trendelenburg (8) ... 14 10.6 Bed Height Adjustment (9) ... 14 10.7 Auto-contour Adjustment (10) ... 14 10.8 Trendelenburg Anti-shock Positioning (11) ... 15 10.9 Locking/Unlocking Bed Movements (1,2,7)... 15 11. Bed Adjustment – Patient Handset ... 16 11.1 Backrest Section Adjustment (1) ... 17 11.2 Knee Break (2) ... 17 11.3 Auto-contour (3) ... 17 11.4 Bed Height Adjustment (4) ... 17 11.5 Magnetic Lock Symbol (switching range) (5) ... 17 11.6 Functions - LED... 17 11.7 Functionality Keys ... 17 11.8 Power on LED ... 17 12. Central Castor Braking ... 18 13. Safety Rails ... 18 + 19 14. Width Adjustment ... 20 + 21 15. Bed Extension ... 22 16. Integrated Linen Shelf ... 22 17. Optional Weighing Scales User / Service Manual ... 23 to 38 18. Cleaning and Decontamination ... 39 + 40 19. Troubleshooting... 41 20. Storage and Transportation ... 42 21. Service and Maintenance ... 43 22. Recommended Accessories ... 44 23. Disposal ... 44 24. Warranty and Service ... 45 25. Contact Details ... 45 3|Page Document BEN 007 Version 006 – 27.06.2016
Aurum bed – User Manual
1. Introduction This user manual contains instructions for the installation, use and maintenance of the Benmor Medical Aurum bed. The Aurum bariatric bed is a hospital bed that has been designed specifically for size and strength. The width adjustment feature on this unique bariatric hospital bed means that it can be transported as a standard bed through the majority of hospital doors. It also means that it can accommodate wider patients by extending the mattress platform when in use. The platform is fully profiling and powered by strong electric actuators which allow the safe positioning the bariatric bed to cope with loads of up to 413kg / 65stone / 910lbs. The headboard of the Aurum bariatric bed can also be extended at a push of a button. This lessens the gap between the safety rails and the headboard to minimise the risk of entrapment. The integral weighing scales enable staff and carers to carry out accurate patient weighs up to 400kg / 63stone / 880lbs. The bed is constructed from high quality materials and is designed to function at an elevated level in a hospital environment. This product meets the requirements established under the directive 93/42/EEC concerning Medical Devices and the following harmonised standards where applicable: BS EN60601-1-2, BS EN 60601-2-52. The manufacturing process has been carried out in accordance with the Quality Management System under the standard ISO 13485:2012, ISO 9001:2008.
Benmor Medical shall not be liable for any damage or injury caused by failure to follow the proper instructions as described in this User Manual or by improper use of the bed. Before using the bed, all staff must familiarise themselves thoroughly with the various parts and controls as detailed in this User Manual
Note: All references to the position of parts are as viewed from a patient's perspective i.e. as the patient is laying on the bed. Note: Benmor Medical reserves the right to modify the information in this User Manual at any time. The information in this User Manual may vary slightly with respect to the basic design of the product.
4|Page Document BEN 007 Version 006 – 27.06.2016
Aurum bed – User Manual
2. Identification Labels When making contact with Benmor Medical the following information is required: ➢ The correct Name or Model number of your bed. ➢ The correct Serial Number of your bed.
Both can be found on the identification labels which are located on the lower base frame. Examples are shown below: -
Benmor Medical (UK) Ltd The Aurum Centre Ham Barn Business Park Farnham Road Liss Hampshire GU33 6LB UK T: +44 (0)333 800 9000 E: [email protected] www.benmormedical.co.uk
0086 2014 : 04
2014 : 04
BMPB065AS
BMPB065A
1146
1147
230V 50 - 60 Hz
230V 50 - 60 Hz
Full load current : 1.6 A
Full load current : 1.6 A
5|Page Document BEN 007 Version 006 – 27.06.2016
Aurum bed – User Manual
3. Symbols Icon
Description Attention, consult accompanying documents Consult Instructions For Use Type B Applied Part Type Number Serial Number Date of Manufacture Manufacturer General Precautions CE Mark relates to both Medical Device Directive 93/42/EC and RoHS Directive 2011/65/EC Primary Earth Connection Alternating Current Class II Equipment
4. Delivery The Aurum Bariatric bed is delivered fully assembled and demonstrated on delivery. Additional training can be arranged if required. If the bed appears to be damaged or any components are missing on delivery, please contact Benmor Medical immediately.
6|Page Document BEN 007 Version 006 – 27.06.2016
Aurum bed – User Manual
5. Safe Use Guidelines
WARNINGS AND PRECAUTIONS •
Before using the bed, it is recommended: ➢ All staff involved are familiar with the User Manual. ➢ All functions are tested. ➢ The bed is decontaminated and cleaned thoroughly before every use.
•
The bed must be operated by personnel who have been properly trained or have suitable experience with equipment of this nature.
•
The bed must only be used on clean, hard and flat horizontal surfaces.
•
Never exceed the maximum load capacity of the bed, even for brief periods.
•
The braking system must be locked whilst a patient is on the bed (except for patient manoeuvring).
•
Check there is no risk for the patient, carer other people or accessories to become trapped when adjusting any sections activating, raising or lowering of the bed.
•
If an emergency situation requires the weight capacity of the bed to be exceeded, adjust all sections of the bed to their lowest positions. This should only be done if absolutely necessary.
•
To avoid exceeding the weight capacity of the bed, no person should sit on the bed, next to the patient.
•
For side ingress / egress, position the patient in the middle of the bed.
•
DO NOT ingress / egress the bed at the head or foot end.
•
The power cable for the bed must be unplugged before moving, cleaning or maintenance activities.
•
Do not position the bed so that it is difficult to disconnect the mains plug.
•
There is a possibility of injury to the patient or user if: ➢ The bed is used on an inappropriate floor surface. ➢ The power cable is damaged or pulled out of the power socket. ➢ Two or more electric functions are operated at the same time. ➢ Any maintenance or repair work is not carried out according to the manufacturer’s instructions.
7|Page Document BEN 007 Version 006 – 27.06.2016
Aurum bed – User Manual
WARNINGS AND PRECAUTIONS •
Benmor Medical shall not be liable for any damage or injury caused by the use of accessories provided by other companies.
•
In the event of any defect which may jeopardise the patient or user safety, or which may damage the bed or building contents, remove the bed and do not use it until the defect is corrected.
•
Any repair work must be carried out by qualified staff.
•
When making repairs, only original materials and components should be used. Use only the cleaning and disinfectant agents recommended in this User Manual.
•
The bed should be left in its lowest position when unattended to reduce risk of patient falls with the safety rails in the upright position.
•
When routing cables from other equipment on the bed, precautions shall be taken to avoid squeezing those cables between parts of the bed.
•
Avoid hazards caused by inappropriate handling of the power supply cord e.g. by kinking, shearing or other mechanical damages.
•
During transportation, transportation bolts will be tightened on to the load cells and when the bed is in use, the transportation bolts need to be loosened.
•
Use recommended accessories only
When choosing bed and mattress combinations, it is important to assess the use of Safety Rails based on the clinical assessment of each individual patient and in line with local policy. Safety Rails must only be used with a mattress of the correct size and which is approved for use with the bed. The maximum recommended mattress thickness for use with Safety Rails is 220mm. When assessing the suitability of a mattress for use with Safety Rails, please consider that specialist powered air / foam replacement mattresses will typically envelop the patient when loaded and can generally be deeper than a foam mattress without compromising safety. All Benmor Medical mattress replacements will maintain sufficient clearance between patients and Safety Rails to preserve the function of the Safety Rail. Other makes of specialist mattress replacement must be assessed individually prior to use to verify sufficient clearance is maintained. Incompatible mattresses can create entrapment hazards. Read instructions for use. Using non-approved mattress may compromise the Safety Rails and increase the chance of entrapment. Do not modify this equipment without the authorisation from Benmor Medical. Contraindications The Aurum bed is not to be used as a transport bed. Never exceed the maximum load capacity of the Aurum bed, even for brief periods. 8|Page Document BEN 007 Version 006 – 27.06.2016
Aurum bed – User Manual
6. Environmental Conditions
Operating It is recommended that the bed is installed in a dry, indoor environment. The temperature and humidity ranges for optimum performance of the bed are: Temperature (°C) Relative Humidity (%) Altitude (metres)
Min 10 30
Max 40 75 < 2000
The Aurum bed is designed for medical purposes only. Electrical installations must comply with your local electrical installation requirements. It is recommended that the bed is disconnected from the electrical mains supply during exceptional cases i.e. lightning storms etc.
Transport / Storage Temperature (°C) Relative Humidity (%) Air Pressure (hPa)
Min -20 30 800
Max +50 75 1060
9|Page Document BEN 007 Version 006 – 27.06.2016
Aurum bed – User Manual
7. Technical Specification Bed Data Overall Length without scales Extended Overall Length with scales
2270mm 2355mm 2425mm
Extended Overall Width
2510mm 1105mm
Extended Mattress Platform Length
1405mm 2015mm
Extended Mattress Platform Width
2225mm 915mm
Extended
1220mm
Mattress Platform Height Without scales With scales
Min 415mm - Max 835mm Min 415mm - Max 835mm
Backrest – Max tilt angle
55°
Upper Leg Section – Max tilt angle
25°
Lower Leg Section – Max tilt angle
18°
Trendelenburg
21°
Reverse Trendelenburg
21°
Safety Rail Height Above Mattress Platform
460mm
Product weight without scales (approx)
190kg
Product weight with scales (approx)
215kg
Maximum Safe Working Load (SWL)
413kg / 65 stone / 910lbs
Medical Device Classification – Without Scales
Class 1
Medical Device Classification – With Scales
Class 1 Measuring
Electrical Data Power Supply Power Consumption Duty Rating Equipment Classification Liquid Ingress Protection
230V ̴ 50-60Hz Max. 1.6A AC Intermittent 10% (2min / 18min) Class II Type B Applied Part IPX6
10 | P a g e Document BEN 007 Version 006 – 27.06.2016
Aurum bed – User Manual
8. Product Description 5 6 1 7
2
8
3
9 4
10
11 12
Note: The above illustration is for reference purposes only. The specification of your actual Aurum bed may vary to the above illustration. 1. Removable Expandable Head Board 2. Removable and Adjustable Safety Rails 3. Individual Width Adjustable Mattress Sections 4. Integral bed extension 5. 4 Section Profiling Platform 6. Supervisors Control Panel 7. Removable Foot Board 8. Weighing Scales (optional) 9. Protective Bumper Wheels 10. Integral Linen Shelf 11. Central Braking Lever 12. Central Locking 150mm Castors
11 | P a g e Document BEN 007 Version 006 – 27.06.2016
Aurum bed – User Manual
9. Installation and Setup
1. 2. 3. 4. 5.
Remove any packaging completely. Carefully check the bed for damage and any missing components. All staff should carefully read the User Manual. Plug the power cable into an electric socket. Test all functions including: ➢ Braking System ➢ Fowler’s position (adjustment of back and leg section). ➢ Height adjustment of the mattress platform. ➢ Trendelenburg and Reverse Trendelenburg. ➢ Lock-out functions ➢ Weighing Scales (if fitted). 6. Safely dispose of any packaging 7. Keep the User Manual in a safe accessible place.
9.1 Power Supply and Electrical Connection The bed is delivered fully assembled and is ready to be connected to the power supply. The battery back-up safety feature allows the bed to be functional for a short time without mains power in emergency circumstances. The battery will automatically charge when the bed is connected to the power supply. The bed should be placed as close as possible to the power supply and any excess cable safety positioned to avoid accidents.
To avoid the risk of electric shock, this equipment must only be connected to a mains supply with protective earth.
The replacement of power supply cords, fuses and other parts must be performed by a trained Benmor Medical technician.
The bed must only be used on clean, hard and flat horizontal surfaces.
Use recommended accessories only.
The Aurum bed is not to be used as a transport bed but can be used for positioning.
12 | P a g e Document BEN 007 Version 006 – 27.06.2016
Aurum bed – User Manual
10. Bed Adjustment – Supervisor Control Panel The Supervisors Control Panel is located at the foot end of the bed, connected by a flexible cable and can be conveniently stored / located on the foot board using the clip on the rear of the panel. The Supervisor Control Panel operates all bed functions as shown below. To activate the controls on the Supervisor Control Panel you will need to simultaneously press and hold an Activation Button and a Positioning Button as required. This dual action operation enhances patient safety by preventing unintentional bed positioning.
1
2
7
3
8 9
4
10
5
11
6
1. Knee-break Lockout Switch 2. Backrest Lockout Switch 3. Knee-break Positioning Buttons 4. Backrest Positioning Buttons 5. Fowler Positioning Button 6. Cardio Pulmonary Resuscitation (CPR) Button 7. Height and Tilt Lockout Switch 8. Mattress Platform Tilt Buttons 9. Bed Height Adjustment Buttons 10. Auto-contour Adjustment Buttons 11. Trendelenburg Anti-Shock Positioning Button
13 | P a g e Document BEN 007 Version 006 – 27.06.2016
Aurum bed – User Manual Supervisor Control Panel Symbols Before carrying out these operations, check there are no objects on or under the lower frame which could interfere with the bed movement. This function can be locked out by means of the Supervisor Control Panel. 10.1
Knee-break Section Adjustment (3)
To raise or lower the knee-break section of the bed press and hold the desired directional knee-break adjustment button. Movement will continue until the button is released or the limit of travel is reached.
10.2
Backrest Section Adjustment (4)
To raise or lower the backrest section of the bed press and hold the desired directional knee break adjustment button. Movement will continue until the button is released or the limit of travel is reached.
10.3
Fowler Positioning (5)
To activate Fowler positioning press and hold the Fowler positioning button. All parts of the bed will simultaneously move and continue until the button is released or the limit of travel is reached.
10.4
CPR Position (6)
The CPR position is designed for resuscitation purposes only and before using this function, ensure all three bed movements are unlocked – see 10.9 below. To activate CPR press and hold the red ‘N’ Button. All parts of the bed will simultaneously move to their lowest positions and the mattress platform will move to the horizontal position. The red N Button must be held until all bed movements have stopped.
10.5
Trendelenburg and Reverse Trendelenburg (8)
Head down tilt (Trendelenburg) and foot down tilt (reverse Trendelenburg) can be applied using the Supervisors Control Panel. To tilt the mattress platform press and hold desired tilt direction button until the desired tilt angle has been reached.
10.6
Bed Height Adjustment (9)
To raise or lower the mattress platform press and hold the desired directional height adjustment button. Movement will continue until the buttons are released or the limit of travel is reached.
10.7
Auto-contour Adjustment (10)
To activate the Auto-contour adjustment of the bed, press and hold the desired directional Auto-contour adjustment button. Movement will continue until the buttons are released or the limit of travel is reached. 14 | P a g e Document BEN 007 Version 006 – 27.06.2016
Aurum bed – User Manual
10.8
Trendelenburg Anti-shock Positioning (11)
To activate Trendelenburg Anti-Shock Positioning press and hold the Trendelenburg AntiShock Positioning Button. All parts of the bed will simultaneously move to their lowest positions and the mattress platform will tilt to a maximum angle of 21°. This function cannot be locked.
10.9
Locking/Unlocking Bed Movements (1,2,7)
The Aurum bed is equipped with a safety function that disables specific individual sections by the use of Lockout Switches located on the Supervisor Control Panel. To lock/unlock specific functions: Locking Procedure 1. Turn Lockout Switch clockwise (to horizontal) to lock required function (Lockout Switches 1, 2, or 7). 2. When switch is in horizontal position bed function(s) will be locked from use. Unlocking Procedure 1. Turn Lockout Switch anti-clockwise (to vertical) to unlock required function (Lockout Switches 1, 2, or 7). 2. When switch is in vertical position bed function(s) will be unlocked.
Note: When selecting individual Lockout Switches, the Supervisor Control Panel and Patient Handset will be locked out.
15 | P a g e Document BEN 007 Version 006 – 27.06.2016
Aurum bed – User Manual
11. Bed Adjustment – Patient Handset
Before carrying out these operations check there are no objects on or under the lower frame which could interfere with the bed movement. This function can be locked out by means of the Supervisor Control Panel. The Patient Handset is connected by a flexible cable and can be positioned either side of the bed. It adjusts individual parts of the bed mattress platform and has limited functions opposed to the Supervisor Control Panel.
1
2
3
4
5
1. 2. 3. 4. 5.
Backrest Positioning Buttons Knee-break Positioning Buttons Auto-contour Adjustment Buttons Height Adjustment Buttons Handset Lockout Indicator
Note: To prevent the Patient Handset from being damaged it should always be stored, using the provided hook, on your bed Safety Rail.
16 | P a g e Document BEN 007 Version 006 – 27.06.2016
Aurum bed – User Manual 11.1
Backrest Section Adjustment (1)
To raise or lower the backrest section of the bed press and hold the desired directional knee break adjustment button. Movement will continue until the button is released or the limit of travel is reached.
11.2
Knee-break Section Adjustment (2)
To raise or lower the knee-break section of the bed press and hold the desired directional knee-break adjustment button. Movement will continue until the button is released or the limit of travel is reached.
11.3
Auto-contour Adjustment (3)
To activate the Auto-contour adjustment of the bed, press and hold the desired directional Auto-contour adjustment button. Movement will continue until the buttons are released or the limit of travel is reached.
11.4
Bed Height Adjustment (4)
To raise or lower the mattress platform press and hold the desired directional height adjustment button. Movement will continue until the buttons are released or the limit of travel is reached.
11.5
Magnetic lock symbol (switching range) (5)
11.6
Functions - LED
11.7
11.8
Functionality keys
Power on LED
17 | P a g e Document BEN 007 Version 006 – 27.06.2016
Aurum bed – User Manual
12. Central Castor Braking The Aurum bed is equipped with a Central Braking System. A bar located on the bed Undercarriage at the head end and foot end operates all four castors (central braking): Up – Steering mechanism – when the brake lever is pushed up to its highest position the steering feature is activated. Centre – Neutral Position – when the brake lever is in the central position the castors move freely in all directions Down – Brake Position – when the brake lever is pushed down in the lowest position, all four castors are fixed.
Ensure the bed is set to the ‘Brake’ position before placing a patient onto your bed.
13. Safety Rails The Aurum bed is fitted with four plastic Safety Rails that can be individually removed from the bed. Each Safety Rail is mounted into a fixed socket that is labelled with a position number, (1) or (2), this corresponds with the numbered label on the Safety Rail and ensures that each Safety Rail is correctly positioned. Removing Safety Rail
1. To remove the Safety Rail, ensure it is in the ‘up’ position. 2. Depress the button as indicted. 3. Remove the Safety Rail.
Replacing the Safety Rail
1. To replace the Safety Rail, align the stem to the socket and let the Safety Rail drop into position. 2. The Safety Rail will automatically lock in position when replaced.
18 | P a g e Document BEN 007 Version 006 – 27.06.2016
Aurum bed – User Manual
Before removing the Safety Rails, carefully check there are no objects which may interfere with their function. Take care not to get hands or fingers caught when adjusting or removing the Safety Rails. The intended use of the Safety Rails is to prevent the user from falling out of bed. They are not intended to act as a form of restraint or limit the freedom of people by preventing them from intentionally leaving their beds; nor are they intended to restrain people whose condition disposes them too erratic, repetitive or violent movement. Incompatible Safety Rails can create entrapment hazards.
The safety rails shall not be used as support or leverage for the patient, when leaving or repositioning on the bed.
19 | P a g e Document BEN 007 Version 006 – 27.06.2016
Aurum bed – User Manual
14. Width Adjustment The Aurum bed has a width adjustment feature which allows it to be used alongside standard beds during everyday use but can be expanded quickly and simply to accommodate a larger patient. When moving the bed, all extensions including the headboard MUST be retracted to enable the bed to fit through a standard wide door. Before adjusting the mattress platform, carefully check there are no objects which may interfere with the function. Take care not to get hands or fingers caught when adjusting the mattress platform. Always remember to check the locking pins are in place after the extendable sides have been adjusted. Before adjusting the headboard frame, carefully check there are no objects which may interfere with the function. Take care not to get hands or fingers caught when adjusting the headboard frame. Always remember to check the locking pins are in place after the extendable sides have been adjusted. Always retract the headboard when manoeuvring the bed.
➢ 36” / 915mm width – standard hospital bed size The bed is delivered at this size and will need to be adjusted to suit the patient before use. If there are space restriction when transporting the bed, it can be reduced back to this size to aid with getting through doors or corridors.
➢ 42” / 1066mm width – intermediate size This setting gives the patient an extra 3” of space on both sides. The mattress in use on the bed will need to be adjustment to fill the space.
➢ 48” / 1220mm width – largest size This setting gives the patient the most space on the bed. There may be difficulties when transporting the bed through doorways and corridors at this setting. If this is the case, reduce the size of the bed to smaller width.
20 | P a g e Document BEN 007 Version 006 – 27.06.2016