Quick Installation Guide
4 Pages
Preview
Page 1
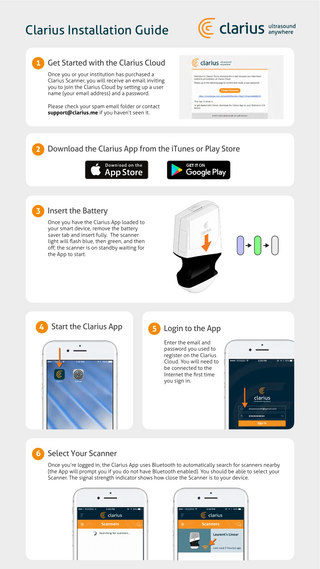
Clarius Installation Guide 1 Get Started with the Clarius Cloud Once you or your institution has purchased a Clarius Scanner, you will receive an email inviting you to join the Clarius Cloud by setting up a user name (your email address) and a password. Please check your spam email folder or contact [email protected] if you haven’t seen it.
2 Download the Clarius App from the iTunes or Play Store
3 Insert the Battery Once you have the Clarius App loaded to your smart device, remove the battery saver tab and insert fully. The scanner light will flash blue, then green, and then off; the scanner is on standby waiting for the App to start.
4 Start the Clarius App
Clarius
Se�ngs
5 Login to the App Enter the email and password you used to register on the Clarius Cloud. You will need to be connected to the Internet the first time you sign in.
6 Select Your Scanner Once you’re logged in, the Clarius App uses Bluetooth to automatically search for scanners nearby (the App will prompt you if you do not have Bluetooth enabled). You should be able to select your Scanner. The signal strength indicator shows how close the Scanner is to your device.
Clarius Installation Guide 7 Now Look at Your Scanner
8 Check Connection Status Screen
The indicator light on your scanner will flash blue and then become solid blue within 10 seconds.
The wheel at the top-right of the screen shows the connection status. Press it for more information about connection status.
10s
9 Connect to the WiFi Direct Network Once the initial connection is established, connect your device to the scanner’s WiFi Direct network. The system prompts you to connect to a specific network.
First, press the Home button, then open the Settings, then choose Wi-Fi.
Clarius
Se�ngs
Select the scanner's DIRECT WiFi name. The first time you connect, you will need the scanner’s WIFI password, which is stored on the clipboard. Simply press copy and then paste to enter it. Then press “Join”.
10 Return to the Clarius App Press “Home”, then the “Clarius” App.
Clarius
Se�ngs
Clarius Installation Guide 11 Select Examination Type Select the type of examination you want to perform from the Workflows list.
12 Patient Demographics Enter patient demographics and indication, or simply press the arrow on the bottom right of the screen to go to the next step.
13 Ready to Scan You are now in the live imaging screen. View the tutorial video at www.clarius.me/tutorials to learn basic imaging functions
Visit www.clarius.me/support if you need help with set up.
Read the Clarius Ultrasound System User Manual for full instructions and safety information: www.clarius.me/manuals.
Clarius Installation Guide IMPORTANT TIP FOR FUTURE CONNECTIONS: Your password will be saved for future use but you may still need to switch from the default WiFi network that your device uses for other functions, to the Clarius Scanner’s WiFi DIRECT network. Here are a few connection options: are not on any WiFi network in the location where you scan, then the connection to a Iftheyou scanner’s WiFi will happen automatically.
b
If you need to switch WiFi networks, the fastest way is to double-click on the Home button to switch between your device settings and the Clarius App.
c
A third option is to press the settings icon in the scanner selection page and let the scanner connect to your network. Image performance will vary depending on your router configuration.
2x
APP UPDATES In some instances, the system will prompt you to update your Scanner software. Simply press update to proceed.
During an update The Scanner’s light first starts blinking blue, then flashes purple while its software is updating. Please do not unplug the battery during that time. A purple indicator also shows on the top-right of the screen. Once the update is complete, the scanner light will turn blue and the connection will be reestablished automatically.
After the update You may need to reconnect to the scanner WiFi DIRECT network, as per step #9. This time, you will not have to enter the WiFi DIRECT password.