Instructions
24 Pages
Preview
Page 1
English
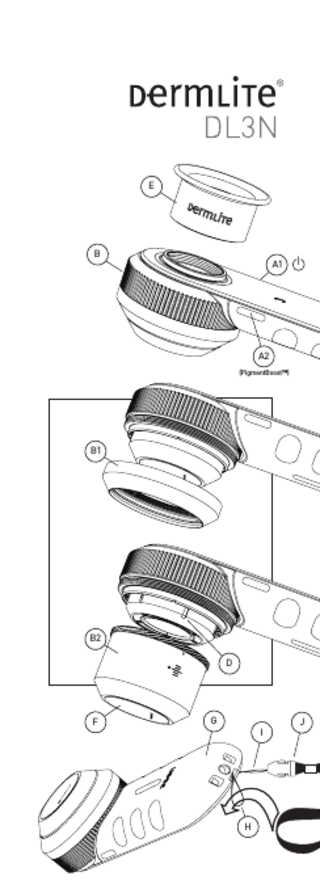
Instructions CAUTION: Prior to using the DermLite DL3N, read these instructions and keep them in a safe place for future reference. CAUTION: United States Federal Law restricts this device to sale by or on the order of a physician. CAUTION: The DermLite DL3N is designed for external examination only. DermLite DL3N is a camera-compatible pocket dermatoscope designed to view skin lesions with high magnification and clarity. Two sets of white LEDs (light emitting diodes) can be activated independently; one set of LEDs provides cross-polarized light (by canceling the reflected light from the skin), whereas the other set of LEDs provides non-polarized light for traditional immersion fluid dermoscopy. A special PigmentBoost™ button activates a third set of LEDs. A high quality, four-element, 25 mm, 10x lens with superb color correction and reduced image distortion produces an image rich in surface detail. To facilitate the use of immersion fluids, and allow for fixed digital imaging, the unit is equipped with a retractable faceplate spacer. Directions for Use CAUTION: Do not look directly into the bright LED light. Patients must close their eyes during facial examinations. IMPORTANT: Before initial use, please charge the internal lithium ion battery for a minimum of 4 hours using the charging base provided. See “Charging” for details. Hold your DermLite DL3N so that the LEDs are aimed in the direction of the lesion to be examined. Place the device approximately 1” (~25mm) from the skin. Push and hold the power button (A1) at the right side of the unit for approximately 1 second to turn on the cross-polarized mode. A quick tap of the button enables the non-polarized mode for immersion fluid dermoscopy, another tap toggles back to the cross-polarized illumination. In either mode, the additional PigmentBoost™ illumination may be activated via the left button (A2). Look through the lens with your eye placed about 1 to 4” (25-100 mm) above your DermLite. Move the device closer or further away from the skin to obtain the desired image focus. For dermoscopy with skin contact, or for camera use, rotate the Focus Dial (B) to the left or right. The position “0” indicates the ideal distance for photography. To turn off your DermLite DL3N, push & hold the power button for approx. 1 sec. CAUTION: If your DermLite is used for oil immersion imaging, place the oil only on the skin and then place the extended faceplate spacer on top of the oil. Do not allow oil to contact the charging contacts or battery compartment. Removing the Spacer Unscrew the Retaining Ring (B1) and rotate the Focus Dial (B) until the Spacer (B2) drops. To re-attach the Spacer, slip its three pins through the three notches (D) and gently rotate the Focus Dial until the Spacer is being pulled back in. Reattach the Retaining Ring. Eyepiece To reduce internal reflections and improve the contrast of the image, attach the optional eyepiece onto the 28mm thread (E). Camera Use To enable you to attach your DermLite DL3N to a camera, the device is equipped with a 28 mm thread (E). A simple ring adapter (such as a 28-37 mm stepping ring) may be all that is required to adapt the device to your camera of choice, although many cameras require a special adapter made by the camera manufacturer or a photography supply company. Prior to taking images, wipe the Faceplate (F) clean and extend the Spacer to the “0” position. Generally, good images may be obtained by setting your camera to automatic or “P” mode, activating the “macro” function, and deactivating the flash. Please contact 3Gen or your camera dealer for more information. Charging Prior to using the DermLite, insert the 110V-220V power plug into an electrical outlet and the other end into the back of the charging base.
Set the base on a level surface. Place the DermLite onto the base, and the “3” will illuminate red to indicate that the DermLite DL3N is being charged. When the lithium battery is fully charged and either in its base or outside its base and powered on, the “3” is green and the device will allow up to 2 hours of continuous operation, or enough power for imaging approximately 600 lesions at 30 seconds per examination. If less than 25% battery life remains, the “3” will turn orange. After approximately 1,000 charges, the battery’s capacity will diminish and the battery may need to be replaced. To remove the battery, slide the rubber handle (G) back and completely off the device. Disconnect the small white battery plug and remove the battery. Insert a new battery and reconnect the battery plug. Slide the rubber handle securely onto the device. CAUTION: Your DermLite DL3N uses a special lithium battery, which can only be purchased from 3Gen or from an authorized 3Gen dealer. Do not under any circumstances use another battery other than the one designed for this unit. Doing so could result in damage to the unit. Also, do not under any circumstances use another charger other than the one supplied with the unit. Using the Lanyard CAUTION: Lanyards pose a strangulation risk. Use with caution. Run the short, thin portion string through the eyelet (H) located at the end of the device. Feed the other end of the lanyard through the loop made by the thin string (I). Separate the DermLite from the lanyard by squeezing the snap connector (J). Troubleshooting Please check our website (www.dermlite.com) for the most current troubleshooting information. If your DermLite requires servicing, please go to the “Service & Support” pages at www.dermlite.com, where you can complete a “Repair Request” form. Or, contact your local 3Gen dealer. No Light Fully recharge the battery and check again. If the condition persists, your DermLite may require servicing. LED Fails The LEDs used in your DermLite are designed to last over 100,000 hours. If any one of the LEDs fails, your DermLite requires servicing. Mechanical Malfunction Please contact 3Gen to arrange for service. Care and Maintenance Your DermLite DL3N is designed for trouble-free operation. There are no adjustments to be made nor is any special servicing required. Never attempt to open the device for any reason. Cleaning and Sterilization The exterior of your DermLite may be cleaned or disinfected by wiping it with Isopropyl alcohol (70% vol.). Do not use alcohol or disinfectants in the optical areas of the unit. Do not use abrasive material on any part of the equipment or immerse the device in liquid. Do not autoclave. Cleaning the Lens and the Polarizers The lens and the polarizing filters should be treated as high quality photographic equipment and should be cleaned with standard lens cleaning equipment and protected from harmful chemicals. DermLite DL3N components include: Twenty-eight 3mm LEDs, four-element 25mm lens with 10x magnification, cross-polarized and non-polarized illumination, PigmentBoost™, retractable faceplate spacer with 10mm scale, 28 mm eyepiece, lanyard Warranty 5 years for parts and labor. Serial number and company information are located inside the battery compartment.