Quick Reference Guide
42 Pages
Preview
Page 1
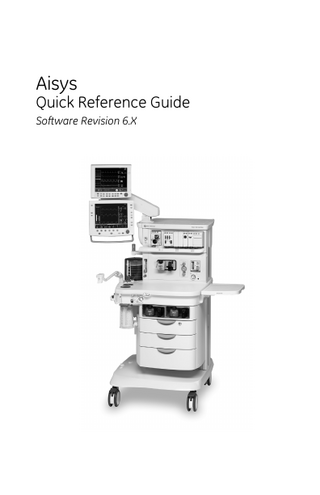
Aisys
Quick Reference Guide Software Revision 6.X
Refer to the User’s Reference manual for step-by-step instructions. Read each component’s User’s Reference manual before using this system.
WARNING Before using the system: •
Complete all of the preoperative tests.
•
Test all other system components.
System Controls and Menus WARNING Do not use antistatic or electrically-conductive breathing tubes or masks. They can cause burns if used near high-frequency surgical equipment.
w Explosion Hazard. Do not use this system with flammable anesthetic agents.
M1156680
1
System overview 14
13
12
11 1 2 3 4 5
10
6 7
15
8
1. 2. 3. 4. 5. 6. 7. 8.
Light switch Dovetail Aladin cassette and active bay Alternate O2 control System switch Mains indicator Integrated suction (optional) Brake
AB.75.097
9
9. O2 flush button 10. Advanced breathing system 11. Auxiliary O2 flow control (optional) 12. Anesthesia display 13. Patient monitoring modules (optional) 14. Patient monitoring display (optional) 15. Aladin cassette storage bay
Figure 1 • Front view 2
M1156680
1
2 3 4 5
AB.75.046
6
11 10
1. 2. 3. 4. 5. 6.
9
Serial port Collection bottle connection Cylinder wrench (key) storage Cylinder yoke AGSS (Anesthesia Gas Scavenging System) Pipeline connections
7 8
7. Mains inlet 8. System circuit breaker 9. Equipotential stud 10. Outlet circuit breaker 11. Isolated electrical outlet
Figure 2 • Rear view M1156680
3
Advanced breathing system (ABS) components
13
12 11 10
1 2
9 8 7
3 4
6
AB.75.098
5
1. 2. 3. 4. 5. 6. 7.
Expiratory check valve Inspiratory check valve Inspiratory flow sensor Expiratory flow sensor Absorber canister Absorber canister release Leak test plug
8. Breathing system release 9. Manual bag port 10. Adjustable pressure-limiting (APL) valve 11. Bag/Vent switch 12. Bellows assembly 13. Airway module (optional)
Figure 3 • Advanced breathing system
4
M1156680
Optional ABS components
1
4 7
32 1. 2. 3. 4. 5. 6. 7.
6
AB.75.049 AB.82.043
5
Bag support arm Auxiliary Common Gas Outlet (ACGO) switch ACGO port EZchange canister module (CO2 bypass) EZchange canister release Condenser drain button Condenser
Figure 4 • Breathing system options
M1156680
5
Aladin cassette controls The electronically controlled vaporizer consists of the internal electronic control unit and the Aladin agent cassette. See the “Vaporizer” section in the User’s Reference manual for more information.
1
4 1. 2. 3. 4.
3
AB.60.038
2
Handle with release trigger Lock Liquid level indicator Agent filling port
Figure 5 • Aladin2 cassette
6
M1156680
Display controls 8
7
1
6 2
5
2
4
AB.75.099
3
1. Silence Alarms key Push to silence any active, silenceable high and medium priority alarms or to suspend/acknowledge any nonactive medium or high priority alarms. Alarm is silenced for 120 seconds or alarm is suspended for 90 seconds. 2. Menu keys Push to show corresponding menu. 3. ComWheel Push to select a menu item or confirm a setting. Turn clockwise or counterclockwise to scroll menu items or change settings. 4. Normal Screen key Push to remove all menus from the screen. 5. Quick keys Push to change corresponding gas setting or ventilator setting. Turn the ComWheel to make a change. Push the ComWheel to activate the change. 6. Timer keys Push to start or stop the timer. Push to reset the timer back to zero. 7. MV/TV Alarms key Push to turn off the MV and TV alarms. Push again to turn the MV and TV alarms on. 8. Alarm LEDs Turn on solid or flash to indicate alarm priority.
Figure 6 • Display controls M1156680
7
Using menus Push a menu key to display the corresponding menu. Use the ComWheel to navigate the menu. 1
2
Main Menu 3
Trends On
System Status Cardiac Bypass
6
On
Off
Fresh Gas Usage
4
Screen Setup Parameters Setup Calibration Normal Screen
5 AB.91.126
On suspends the volume, apnea, low agent, and low CO2 alarms.
1. 2. 3. 4. 5. 6.
Menu title Current selection Adjustment window Submenu Instructions or help information Menu items
Figure 7 • Menu example 1. Push the menu key to display the corresponding menu. 2. Turn the ComWheel counterclockwise to highlight the next menu item. Turn the ComWheel clockwise to highlight the previous menu item. 3. Push the ComWheel to enter the adjustment window or a submenu. 4. Turn the ComWheel clockwise or counterclockwise to highlight the desired selection. 5. Push the ComWheel to confirm the selection. 6. Select Normal Screen or push the Normal Screen key to exit the menu and return to the normal monitoring display. (Select Previous Menu to return to the last displayed menu, if available.) 8
M1156680
Operation WARNING Ventilator alarms indicate potential hazard conditions. All alarms that occur should be investigated to help ensure adequate patient safety.
w Maintain sufficient fresh gas flow when using sevoflurane.
w Desiccated (dehydrated) absorbent material may produce dangerous chemical reactions when exposed to inhalation anesthetics. Adequate precautions should be taken to ensure that absorbent does not dry out. Turn off all gases when finished using the system.
M1156680
9
Turning on the system 1. Plug the power cord into an electrical outlet. Make sure the system circuit breaker is on. • The mains indicator is lit when AC power is connected. • Battery is charging if it is not already fully charged. 2. Check that the breathing system is properly connected.
CAUTION Do not turn on the system with the right-hand (inspiratory) port plugged. 3. Turn the System switch to On. • The display shows the power-up screen. • The system does a series of automated self tests. 4. Perform a Machine Check before the first case of the day. 5. Perform a preoperative checkout before each case. See the “” section. Note The system must perform a power-up self test after 12 hours of remaining on. If the system has been on longer than 12 hours without a power-up self test, the ‘Turn power Off and On for self tests’ alarm occurs. Turn the power off and then back on between cases to resolve the alarm.
10
M1156680
Start case (start gas flow)
Start Case Default Settings Patient Weight Set Vent By Weight Patient Age Other Gas CO2 Alarms Volume Apnea Start Case Now
Using default settings 1. Set the Bag/Vent switch to Bag. 2. Push the Start/End Case key. • The case defaults are shown on the menu. • The Default Settings selection shows the preset case type. 3. Verify or change the settings on the Start Case menu. 4. Select Start Case Now. Gas flow starts.
Using customized settings The case type, ventilator settings, ventilation mode, alarm settings, and gas settings can be changed before starting a case. Use the Vent Setup menu, Alarm Setup menu, or Gas Setup menu to change settings not shown on the Start Case menu before starting a case. Return to the Start Case menu from these menus to make additional adjustments or to start a case. 1. Set the Bag/Vent switch to Bag. 2. Push the Start/End Case key. 3. Verify or change the settings on the Start Case menu. • Select a case type or Last Case from the Default Settings. • Make adjustments to the other settings as appropriate for the case. • The Default Settings selection changes to show ‘Preset’ if any changes to the settings are made. M1156680
11
4. To change the alarm settings: • Push the Alarm Setup key. • Select Adjust Settings. • Change the settings. • Select Back. • Make any other changes to the alarm setup. • Select Previous Menu to return to the Start Case menu to make additional adjustments. 5. To change ventilator settings: • Push the Vent Setup key. • Select Adjust Settings. • Change the settings. • Select Exit to return to the Start Case menu. 6. To change the ventilation mode: • Push the Vent Setup key. • Select the desired mode. • Select Confirm or adjust the settings and select Confirm to return to the Start Case menu. 7. To change the gas settings: • Push the Gas Setup key. • Select Adjust Settings. • Change the settings. • Select Exit to return to the Start Case menu. 8. To change the balance gas: • Push the Gas Setup key. • Select the balance gas to use with O2. • Select Exit or adjust the settings and select Exit to return to the Start Case menu. 9. To change the circuit type: • Push the Gas Setup key. • Select the circuit type. • Select Confirm or adjust the settings and select Confirm to return to the Start Case menu. 10. From the Start Case menu, select Start Case Now. Gas flow starts.
12
M1156680
End case End Case End Case Now Normal Screen
1. Set the Bag/Vent switch to Bag. 2. Push the Start/End Case key. 3. Select End Case Now to put the system in standby (stops gas flow and patient alarms).
M1156680
13
Ventilator setup Vent Setup Adjust Settings Mode: VCV PCV SIMV/PSV PSVPro SIMV-PC PCV-VG Spirometry Normal Screen
WARNING Most anesthetic agents will cause patients to have reduced ventilatory responses to carbon dioxide and to hypoxemia. Therefore, triggered modes of ventilation may not produce adequate ventilation.
w The use of neuromuscular blocking agents will reduce the patient’s breathing response, which will interfere with triggering.
Using quick keys The four main ventilator settings for each mode can easily be changed using the ventilator quick keys. 1. Push a ventilator quick key to select the corresponding ventilator setting. 2. Turn the ComWheel to make a change. 3. Push the ComWheel to activate (confirm) the change.
14
M1156680
Using Vent Setup menu 1. Push the Vent Setup key. • Adjust Settings is selected by default. • An arrow to the right of the mode indicates the current mode. 2. Push the ComWheel to enter the adjustment window for the selected mode. 3. Use the ComWheel to navigate the adjustment window and to change a value. 4. Push the ComWheel to activate the change. 5. Push the Normal Screen key or select Exit.
Changing ventilator modes and settings 1. Push the Vent Setup key. 2. Select the mode and push the ComWheel to enter the adjustment window. 3. Use the ComWheel to navigate the adjustment window and to change a value. 4. Select Confirm to activate the mode.
M1156680
15
Gas setup
Gas Setup Adjust Settings Gas: N2O Air Circuit: Circle Non-Circle Normal Screen
Using quick keys The O2% and total flow can easily be changed using the gas quick keys. 1. Push a gas quick key to select the corresponding gas setting. 2. Turn the ComWheel to make a change. 3. Push the ComWheel to activate (confirm) the change.
Using Gas Setup menu 1. Push the Gas Setup key. • An arrow to the right of the balance gas indicates the gas currently being used with O2. • Adjust Settings is selected by default. 2. Push the ComWheel to enter the adjustment window. 3. Use the ComWheel to navigate the adjustment window and change a value. 4. Push the ComWheel to activate the change. 5. Push the Normal Screen key or select Exit.
16
M1156680
Changing gas and settings 1. Push the Gas Setup key. 2. Select the balance gas to use with O2 and push the ComWheel to enter the adjustment window. 3. Use the ComWheel to navigate the adjustment window and change a value. 4. Push the ComWheel to activate the change. 5. Push the Normal Screen key or select Exit.
Changing circuit type 1. Push the Gas Setup key. • Adjust Settings is selected by default. • An arrow to the right of the circuit type indicates the circuit currently in use. 2. Use the ComWheel to select Circle or Non-Circle and enter the adjustment window. 3. Confirm or change and confirm the settings. 4. Push the Normal Screen key or select Exit.
M1156680
17
Spirometry There are three types of spirometry loops: Pressure-Volume (P-V), Flow-Volume (F-V) and Pressure-Flow (P-F). View, save, and erase spirometry loops and set the loop scaling in the Spirometry menu. Access the Spirometry menu by pushing the Spirometry key. Use the Spirometry menu to: • View a specific loop type; select Loop Type and set the loop type. •
Adjust the loop scaling; select Scaling and set the scale type.
•
Access the Spirometry Setup menu; select Spiro Setup.
•
Store a loop to memory; select Save Loop. Up to six loops can be saved.
•
View a saved loop; select Reference Loop and the time at which the loop was saved.
•
Erase a saved loop; select Erase Loop and the time at which the loop was saved.
Spirometry Loop Type Scaling Spiro Setup Save Loop Reference Loop Erase Loop Previous Menu
18
P-V
None None
M1156680