Integra LifeSciences Corporation
Head Support Systems
Integra BUDDE Halo Brain Retractors Set-Up Guide Oct 2010
Set-Up Guide
1 Page
Preview
Page 1
Integra
™
Budde® Halo Brain Retractors Limit uncertainty with functional flexibility combined with controlled retraction.
Radiolucent / Stainless Steel Set-Up Affix the Skull Clamp to the patient so that application of the Budde® Halo can be accommodated. Position and drape the patient in the usual manner. From this point, the sterile field is created and the entire assembly should be completed while maintaining sterile technique.
Integra Budde Halo Radiolucent Retractor System A1096
Note: Photos are shown for display purposes, without a sterile drape. Refer to Instruction Manual for complete instructions. Final set-up is dependent upon surgeon preference. A1096
A1040
A1096
Designed to significantly reduce artifact during intracranial procedures in which retraction of delicate brain tissue is required.
A1040
Integra Budde Halo Retractor System A1040
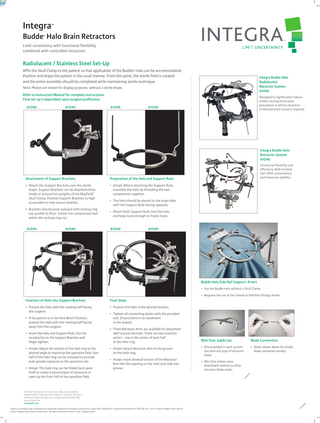
Attachment of Support Brackets
Preparation of the Halo and Support Rods
• Attach the Support Brackets over the sterile drape. Support Brackets can be attached either inside or around the uprights of the Mayfield® Skull Clamp. Position Support Brackets as high as possible to help ensure stability.
• A1096: Before attaching the Support Rods, assemble the Halo by threading the two components together. • The Halo should be placed on the prep table with the Support Rods facing upwards.
• Brackets should point outward with locking ring nut parallel to floor. Center the compression ball within the locking ring nut.
• Attach both Support Rods into the Halo and keep loose enough to freely move.
A1096
A1096
A1040
Functional flexibility and efficiency. Built-in hand rest offers convenience and maximum stability.
A1040
Budde Halo Side Rail Support: A1067 • Use the Budde Halo without a Skull Clamp. • Requires the use of the Universal Side Rail Fittings A1060
Insertion of Halo into Support Brackets
Final Steps
• Present the Halo with the rotating half facing the surgeon.
• Position the Halo in the desired location.
• If the patient is in the Park Bench Position, present the Halo with the rotating half facing away from the surgeon. • Insert the Halo and Support Rods into the receptacles on the Support Brackets and finger tighten. • A1096: Adjust the section of the Halo ring to the desired angle to maximize the operative field. One half of the Halo ring can be removed to provide even greater exposure to the operative site. • A1040: The Halo ring can be folded back upon itself to create a second layer of retraction or open up the front half of the operative field.
• Tighten all connecting points with the provided tool. Ensure there is no movement in the system. • Three Retractor Arms are available for placement 360º around the Halo. There are two insertion points – one in the center of each half of the Halo ring. • A1096: Attach Retractor Arm to the groove on the Halo ring. • A1040: Insert dovetail section of the Retractor Arm into the opening on the Halo and slide into groove.
For more information or to place an order, please contact: Integra 4900 Charlemar Drive, Bldg. A, Cincinnati, OH 45227 USA and Canada: 877.444.1114 513.533.7979 (Outside USA) 513.271.1915 (Fax) integralife.com n
n
Integra, the Integra logo and Budde are registered trademarks of Integra LifeSciences Corporation. Mayfield is a registered trademark of SM USA, Inc. and is used by Integra under license. ©2010 Integra LifeSciences Corporation. All rights reserved. Printed in USA. NS4324-10/10
Mini Vise: 438A1140
Blade Connection
• One provided in each system. Use with any type of retractor blade.
• Quick release allows for simple blade connection activity.
• Mini Vise utilizes same attachment method as other retractor blade styles.