Quick Guide
1 Page
Preview
Page 1
Entering Patient Information with the MediCap™ USB200 or USB170 By using an optional keyboard connected to the MediCap USB200 or USB1701, you can enter Patient Information at the start of each imaging session. The information can be included in the file names of still images and video clips, and can be “stamped” on still images. The information is also stored in a text file in the same folder as the images and videos. In addition, if you are capturing images in the DICOM format, the information is added to the DICOM header.
Keyboard Required for the Patient Information Feature To use this feature, plug a USB keyboard (available as an option) into one of the USB connectors on the back of your MediCap. The unit is compatible with USB keyboards from most major manufacturers. You can also purchase a keyboard at www.medicapture.com. Note: If the Patient Information option is not in the Setup Menu, your unit needs a firmware upgrade. Please contact your MediCapture representative.
Setting Up the Patient Information Feature To turn on this feature, press the Menu button on the front panel to display the Main Menu. Select “Setup,” then “Patient Information.” Set “Collect Patient Information” to “Yes.” Then set the following: • Add Info to File Names? - Allows you to specify what patient information, will be automatically included in folder and file names. You can select: o None - No patient information will be included in folder and file names o Name - The patient’s name will be included o ID - The patient’s ID will be included o Name+ID - The patient’s name and ID will be included • Add Info Stamp to Images? - Imprints patient information on each still image (information is not stamped on video clips). You can select None (no stamping), or Upper Left, Upper Right, Lower Left, or Lower Right (stamps the patient information in the selected area). The following is stamped on the image: Patient First and Last Name, Sex, and ID. You may also consider using the Time Stamp options (go to Main Menu > Setup Menu > Date / Time).
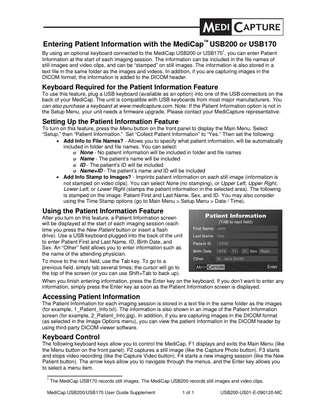
Using the Patient Information Feature After you turn on this feature, a Patient Information screen will be displayed at the start of each imaging session (each time you press the New Patient button or insert a flash drive). Use a USB keyboard plugged into the back of the unit to enter Patient First and Last Name, ID, Birth Date, and Sex. An “Other” field allows you to enter information such as the name of the attending physician. To move to the next field, use the Tab key. To go to a previous field, simply tab several times; the cursor will go to the top of the screen (or you can use Shift+Tab to back up). When you finish entering information, press the Enter key on the keyboard. If you don’t want to enter any information, simply press the Enter key as soon as the Patient Information screen is displayed.
Accessing Patient Information The Patient Information for each imaging session is stored in a text file in the same folder as the images (for example, 1_Patient_Info.txt). The information is also shown in an image of the Patient Information screen (for example, 2_Patient_Info.jpg). In addition, if you are capturing images in the DICOM format (as selected in the Image Options menu), you can view the patient information in the DICOM header by using third-party DICOM viewer software.
Keyboard Control The following keyboard keys allow you to control the MediCap. F1 displays and exits the Main Menu (like the Menu button on the front panel). F2 captures a still image (like the Capture Photo button). F3 starts and stops video recording (like the Capture Video button). F4 starts a new imaging session (like the New Patient button). The arrow keys allow you to navigate through the menus, and the Enter key allows you to select a menu item. 1
The MediCap USB170 records still images. The MediCap USB200 records still images and video clips.
MediCap USB200/USB170 User Guide Supplement
1 of 1
USB200-US01-E-090120-MC