Set-Up Guide
1 Page
Preview
Page 1
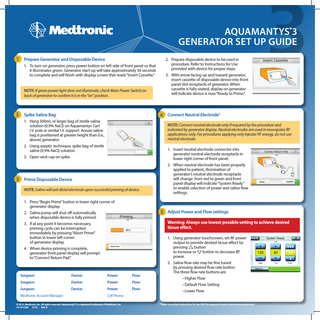
Aquamantys®3 GENERATOR Set Up GuidE 1 Prepare Generator and Disposable Device 1. To turn on generator, press power button on left side of front panel so that it illuminates green. Generator start-up will take approximately 30 seconds to complete and will finish with display screen that reads “Insert Cassette.” NOTE: If green power light does not illuminate, check Main Power Switch on back of generator to confirm it is in the “on” position.
2 Spike Saline Bag
4 Connect Neutral Electrode*
1. Hang 500mL or larger bag of sterile saline solution (0.9% NaCl) on Aquamantys Cart I.V. pole or similar I.V. support. Assure saline bag is positioned at greater height than (i.e., above) generator. 2. Using aseptic technique, spike bag of sterile saline (0.9% NaCl) solution. 3. Open vent cap on spike.
NOTE: Connect neutral electrode only if required by the procedure and indicated by generator display. Neutral electrodes are used in monopolar RF applications only. For procedures applying only bipolar RF energy, do not use neutral electrode.
3 Prime Disposable Device NOTE: Saline will exit distal electrode upon successful priming of device. 1. Press “Begin Prime” button in lower right corner of generator display. 2. Saline pump will shut off automatically when disposable device is fully primed. 3. If at any point it becomes necessary, priming cycle can be interrupted immediately by pressing “Abort Prime” button in lower left corner of generator display. 4. When device priming is complete, generator front panel display will prompt to “Connect Return Pad.”
1. Insert neutral electrode connector into generator neutral electrode receptacle in lower right corner of front panel. 2. When neutral electrode has been properly applied to patient, illumination of generator’s neutral electrode receptacle will change from red to green and front panel display will indicate “System Ready” to enable selection of power and saline flow settings.
5 Adjust Power and Flow settings Warning: Always use lowest possible setting to achieve desired tissue effect.
Surgeon: Device: Power:
Flow:
Surgeon: Device: Power:
Flow:
Surgeon: Device: Power:
Flow:
Medtronic Account Manager:
2. Prepare disposable device to be used in procedure. Refer to Instructions for Use provided with device for proper steps. 3. With arrow facing up and toward generator, insert cassette of disposable device into front panel slot receptacle of generator. When cassette is fully seated, display on generator will indicate device is now “Ready to Prime.”
1. Using generator touchscreen, set RF power output to provide desired tissue effect by pressing button to increase or button to decrease RF power. 2. Saline flow rate may be fine tuned by pressing desired flow rate button. The three flow rate buttons are: • Higher Flow • Default Flow Setting • Lower Flow
Cell Phone:
© 2012, Medtronic, Inc. All rights reserved. Aquamantys® is a registered trademark of Medtronic, Inc. 70-10-1228 10.12 Rev A
* Refer to product Instructions for Use (IFU) for approved neutral electrode manufacturers.