medtronic
Medtronic Integrated Power Control (IPC) Systems
STRAIGHTSHOT M5, M4 Magnum II & III Quick Guide and Processing Instructions
Quick Guide and Processing Instructions
6 Pages
Preview
Page 1
STRAIGHTSHOT M5, STRAIGHTSHOT M4, STRAIGHTSHOT MAGNUM II, and STRAIGHTSHOT III
STRAIGHTSHOT M5, STRAIGHTSHOT M4, STRAIGHTSHOT MAGNUM II, AND STRAIGHTSHOT III DEVICE DESCRIPTION
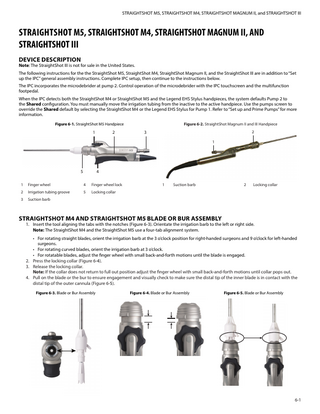
Note: The StraightShot III is not for sale in the United States. The following instructions for the the StraightShot M5, StraightShot M4, StraightShot Magnum II, and the StraightShot III are in addition to “Set up the IPC” general assembly instructions. Complete IPC setup, then continue to the instructions below. The IPC incorporates the microdebrider at pump 2. Control operation of the microdebrider with the IPC touchscreen and the multifunction footpedal. When the IPC detects both the StraightShot M4 or StraightShot M5 and the Legend EHS Stylus handpieces, the system defaults Pump 2 to the Shared configuration. You must manually move the irrigation tubing from the inactive to the active handpiece. Use the pumps screen to override the Shared default by selecting the StraightShot M4 or the Legend EHS Stylus for Pump 1. Refer to “Set up and Prime Pumps” for more information. Figure 6-1. StraightShot M5 Handpiece
1
2
Figure 6-2. StraightShot Magnum II and III Handpiece
3
2 1
5
4
1
Finger wheel
4
Finger wheel lock
2
Irrigation tubing groove
5
Locking collar
3
Suction barb
1
Suction barb
2
Locking collar
STRAIGHTSHOT M4 AND STRAIGHTSHOT M5 BLADE OR BUR ASSEMBLY
1. Insert the tool aligning the tabs with the notches (Figure 6-3). Orientate the irrigation barb to the left or right side. Note: The StraightShot M4 and the StraightShot M5 use a four-tab alignment system. • For rotating straight blades, orient the irrigation barb at the 3 o’clock position for right-handed surgeons and 9 o’clock for left-handed surgeons. • For rotating curved blades, orient the irrigation barb at 3 o’clock. • For rotatable blades, adjust the finger wheel with small back-and-forth motions until the blade is engaged. 2. Press the locking collar (Figure 6-4). 3. Release the locking collar. Note: If the collar does not return to full out position adjust the finger wheel with small back-and-forth motions until collar pops out. 4. Pull on the blade or the bur to ensure engagement and visually check to make sure the distal tip of the inner blade is in contact with the distal tip of the outer cannula (Figure 6-5). Figure 6-3. Blade or Bur Assembly
Figure 6-4. Blade or Bur Assembly
Figure 6-5. Blade or Bur Assembly
6-1
STRAIGHTSHOT M5, STRAIGHTSHOT M4, STRAIGHTSHOT MAGNUM II, and STRAIGHTSHOT III
CONNECT STRAIGHTSHOT TO IPC CONSOLE
Locate the StraightShot connection port on the connector panel (Figure 6-10) and insert the connector. Note: To insert multi-pin connectors (indicated by a silver or red mark on the connector), align the mark on the connector to the mark on the console, then insert the connector. Figure 6-10. IPC Connection Ports
1 1
Handpiece connection port
2
Multifunction footpedal connection port
STRAIGHTSHOT M4, STRAIGHTSHOT MAGNUM II AND STRAIGHTSHOT III TOUCHSCREEN CONTROLS
2
Figure 6-11. StraightShot M4 Touchscreen
Note: The StraightShot M4, StraightShot Magnum II and StraightShot III handpiece screens feature the same controls as those shown on the StraightShot M4 Control Box. Note: When you stop the blade, one of the following occurs: • If the IPC button is visible on the touchscreen, the inner blade returns to the same position it began. • If the XPS button is visible on the touchscreen, the inner blade stops the current position. To set or adjust StraightShot controls, on the IPC touchscreen, in the StraightShot Handpiece control box (Figure 6-11), do the following: • To change rotation mode, select OSC (oscillating) or FWD (forward). Note: The system displays the default oscillating or forward mode speed. • To adjust speed, in the Speed control box, press the plus to increase speed or the minus button to decrease speed. Forward Mode: Default, 12000 rpm; variable adjustment from 50 to 12000 rpm. Oscillate Mode: Default, 5000 rpm; variable adjustment from 50 to 5000 rpm. • To adjust the irrigation flow rate, in the Pump control box, press the plus button to increase flow rate or the minus button to decrease flow rate. If intermittent flow is available, pressing the plus or minus button progresses the system through intermittent and continuous flow. The system displays Intermittent when in intermittent flow mode. Forward Mode: Default, 30cc per minute. Oscillate Mode: Default, 5cc per minute. Note: To adjust flow rate, you can use the touchscreen or the IntelliFlow Irrigation remote control. • To rotate outer blade, use the finger wheel (Figure 6-1). • In oscillating mode only, you can use the Blade Position control box to do any of the following: Note: The motion indicator indicates rotation direction of the blade. To enable the multifunction footpedal to change rotation displacement, press the delta button.
60º
180º
To rotate inner blade in small increments, press the counter-clockwise buttons.
6-3
STRAIGHTSHOT M5, STRAIGHTSHOT M4, STRAIGHTSHOT MAGNUM II, and STRAIGHTSHOT III
STRAIGHTSHOT M5 TOUCHSCREEN CONTROLS
Figure 6-12. StraightShot M5 Touchscreen
Note: When you stop the blade, one of the following occurs:
• If the IPC button is visible on the touchscreen, the inner blade returns to the same position it began. • If the XPS button is visible on the touchscreen, the inner blade stops the current position. To set or adjust StraightShot controls, on the IPC touchscreen, in the StraightShot Handpiece control box (Figure 6-11), do the following: • To change rotation mode, select OSC (oscillating) or FWD (forward). Note: The system displays the default oscillating or forward mode speed. • To adjust speed, in the Speed control box, press the plus to increase speed or the minus button to decrease speed. Forward Mode: Default, 12000 rpm; variable adjustment from 50 to 30000 rpm. Oscillate Mode: Default, 5000 rpm; variable adjustment from 50 to 7500 rpm. • To adjust the irrigation flow rate, in the Pump control box, press the plus button to increase flow rate or the minus button to decrease flow rate. If intermittent flow is available, pressing the plus or minus button progresses the system through intermittent and continuous flow. The system displays Intermittent when in intermittent flow mode. Forward Mode: Default, 30cc per minute. Oscillate Mode: Default, 5cc per minute. Note: To adjust flow rate, you can use the touchscreen or the IntelliFlow Irrigation remote control. • To rotate outer blade, use the finger wheel (Figure 6-1). In oscillating mode only, you can use the Blade Position control box to do any of the following: Note: The motion indicator indicates rotation direction of the blade. To enable the multifunction footpedal to change rotation displacement, press the delta button.
60º
180º
To rotate inner blade in small increments, press the counter-clockwise buttons.
MICRODEBRIDER BLADE CONTROL
Figure 6-13. Blade Dissection
Important: If airway blade becomes clogged during use, 1-5cc of irrigant could be aspirated by the patient before you detect the clog.
1
Note: Periodically submerse blade tip in sterile water, with suction on, to keep blades clear during the procedure. • To rotate the outer blade (Figure 5-8), use the finger wheel (Figure 6-13). • To rotate the inner blade, use the Blade Position control box on the IPC touchscreen. Refer to the related accessory Controls topic for further information.
6-4
2
3
4
1
Suction flow in through inner blade irrigation flow between inner and outer blades
2
Outer blade
3
Inner blade
4
Outer sleeve
STRAIGHTSHOT M5, STRAIGHTSHOT M4, STRAIGHTSHOT MAGNUM II, and STRAIGHTSHOT III
MULTIFUNCTION FOOTPEDAL CONTROLS
Important: By default, press each button on the footpedal for at least 100 mS for the selection to become active. Use the IPC touch screen Settings screen to change the default value. To use the multifunction footpedal (Figure 6-14) to control the handpiece do the following: • To select forward or oscillate mode, press the mode button. • To start or adjust the speed of a handpiece in variable mode, press the foot pedal. • To rotate the inner blade (600 or 1800), press the control button.
Figure 6-14. Multifunction Footpedal & Y-Splitter
2
6
1
3
7
5
• To change the handpiece, press the handpiece button.
4
8
2
1 3 5 4
1
Mode button
5
Foot pedal
2
Handpiece button
6
Y-Splitter
3
Control button
7
Port 1
4
Slip-resistant food pad
8
Port 2
CLEANING AND STERILIZATION INSTRUCTIONS
Refer to document 68E3282 in the Cleaning and Sterilization section.
STRAIGHTSHOT M4 TECHNICAL SPECIFICATIONS
StraightShot M4 1898200T
Size 14.3 cm length x 1.8 cm width (1898200T) Weight 228g 1898200T Speed 50-5000 rpm oscillate 50-12000 rpm forward Duty Cycle for Applied Part The StraightShot M4 handpiece under full load is rated for intermittent operation per the following: Maximum On Time: 60 seconds Minimum Off Time: 30 seconds
STRAIGHTSHOT M5 TECHNICAL SPECIFICATIONS
StraightShot M5 1899200
Size 12.5cm length x 2.0 cm width Weight 203g 1899200 Speed 50-7500 rpm oscillate 50-30000 rpm forward Duty Cycle for Applied Part The StraightShot M5 handpiece under full load is rated for intermittent operation per the following: Maximum On Time: 60 seconds Minimum Off Time: 30 seconds
6-5
Reprocessing Instructions Microdebriders
Spine Shaver, StraightShot M5, StraightShot M4, StraightShot Magnum II or StraightShot III Warnings and Precautions
• • • • • •
Reprocessing Instructions (Per ISO17664) Cleaning and Sterilization instructions are subject to change without notice. Up to date instructions are available online at manuals.medtronic.com. 68E3282 D
Disconnect the power before cleaning. Do not fully immerse, or ultrasonically clean, this instrument. Do not cold soak sterilize this instrument in glutaraldehyde. This will void the warranty. Do not use organic solvents to clean the bur chuck. For drill handpiece cleaning, cover handpiece cable connector end with Handpiece Cable Cap, Small, catalog no. 3318510 or Handpiece Cleaning Cap, Universal, catalog no. 3318520. (Note: Use 3318520 for Straightshot M4, Visao, and Xcalibur Hi-Speed with angled cable. Use 3318510 for other handpieces.) After completion of the cleaning steps, remove Handpiece Cable Cap or other protective components installed prior to cleaning.
Limitations
After cleaning and sterilization, verify functionality prior to re-use.
Point of Use
• •
Containment and Transportation
It is recommended that instruments are reprocessed as soon as is practical following use.
Preparation for Decontaimination
Remove the bur from the handpiece, otherwise disassembly is not required.
Cleaning: Automated (Do NOT use ultrasonic washer)
• Remove instruments and equipment from any instrument trays. • Use alkaline (pH ≤10.5) or neutral pH detergent. • Do not immerse the handpiece. Auto Wash Pre-Cleaning Instructions - Neutral Detergent • Manually rinse the handpiece, cable, and tubing management clips with running tap water to remove all visible soil from the device. Using a soft bristled brush and a neutral detergent solution, gently and thoroughly clean the entire open lumen of the device. Actuate the collet while rinsing and turn the thumbwheel. Hold the handpiece with collet end down when rinsing and run stream of water through the suction port. • Place devices in the washer with the collet facing downward to facilitate drainage.
This product is provided non-sterile and must be cleaned and sterilized before the first use and any reuse. To remove occasional residual buildup on handpiece cable connector, use a soft brush and isopropyl alcohol.
Auto wash Cycle - Neutral Enzymatic Detergent Phase
Minimum Time
Temperature
Detergent
Pre-wash 1
02:00
cold tap water
N/A
Enzyme wash
05:00
< 50°C
neutral pH enzymatic detergent, manufacturer’s recommended concentration
Rinse 1
01:00
hot tap water
N/A
Thermal rinse
01:00
82°C minimum
N/A
Dry the devices with a clean soft cloth. Visually exame for cleanliness. Auto Wash Pre-Cleaning Instructions - Alkaline Detergent • Manually rinse the handpiece, cable, and tubing management clips with running tap water to remove all visible soil from the device. Using a soft bristled brush and a neutral detergent solution, gently and thoroughly brush the entire open lumen of the device. Actuate the collet while rinsing and turn the thumbwheel. Hold the handpiece with collet end down when rinsing and run stream of water through the suction port. • Place devices in the washer with the collet facing downward to facilitate drainage. Auto wash Cycle - Alkaline Detergent Phase
Minimum Time
Temperature
Detergent
Pre-wash 1
02:00
cold tap water
N/A
Wash 1
05:00
66°C (set point)
alkaline detergent pH ≤ 10.5
Rinse 1
01:00
hot tap water
N/A
Thermal rinse
01:00
82°C minimum
N/A
Dry the devices with a clean soft cloth. Visually exame for cleanliness. Cleaning: Manual
• • • • • • • •
• • •
Remove instruments and equipment from instrument tray. Do not immerse the handpiece. Wipe the handpiece and cable with neutral detergent applied to a clean, non-abrasive cloth. Manually rinse the handpiece, cable, and tubing management clips with running tap water to remove all visible soil from the device. Hold the handpiece with collet end down when rinsing and run stream of water through the suction port. Use an enzymatic detergent solution to loosen and remove collected tissues from the unit. Using an enzymatic detergent solution and a soft cloth dampened with the detergent, wipe the motor and cable. Gently clean the handpiece, cable, and tubing management clips with a soft bristle brush wetted with the enzymatic detergent. Using a soft bristled brush, gently and thoroughly clean the entire open lumen of the device. Actuate the collet while cleaning and turn the thumbwheel. Use the brush to thoroughly clean the tubing management clips. Manually rinse the handpiece, cable, and tubing management clips with running tap water to remove all visible soil from the device. Hold the handpiece with collet end down when rinsing the lumen thoroughly.* * Additional Cleaning Instructions for XPS Straightshot M5/M4/Spine Shaver Microdebrider: • During the normal cleaning cycle, run a gentle stream of warm water into the collet (front end), and into the lock lever of the Straightshot M4/Spine Shaver handpiece. • While warm water is running into the collet, rotate the mechanism for several revolutions (rotate the wheel); and while water is running into the lock lever, actuate the lock lever several times (locking and unlocking). • Shake excess water from the handpiece. • PRECAUTION: Ensure the use of a very gentle stream of warm clean water during this additional cleaning step. Dry the handpiece and cable with a lint-free towel. Make sure to dry off the electrical connection on the cable ends. Apply a small amount of silicone spray into the front-end collet and outside of the handpiece. Sterilize the handpiece immediately after cleaning.
Disinfection
Do not cold soak in gluteraldehyde.
Packaging
• •
A standard, sterilization wrap may be used. In the US, an FDA approved surgical wrap must be used. Ensure that the pack is large enough to contain the instrument without stressing the seals. In sets: Instruments may be loaded into dedicated instrument trays. Wrap trays using appropriate method.
Reprocessing Instructions Microdebriders
Spine Shaver, StraightShot M5, StraightShot M4, StraightShot Magnum II or StraightShot III Sterilization (Temperatures are minimum required, times are minimum required)
Reprocessing Instructions (Per ISO17664) Cleaning and Sterilization instructions are subject to change without notice. Up to date instructions are available online at manuals.medtronic.com. 68E3282 D
The sterilization parameters given below should be used for devices that are fully disassembled when disassembly is possible. Use basic aseptic technique during post-sterilization assembly to maintain the sterility of the instrument(s). All steam sterilization cycles have been validated in the wrapped configuration and instruments can be sterilized wrapped or unwrapped. Steam Sterilization Cycle
Gravity
Pre-Vac
Pre-Vac (FR/WHO)
Pre-vac (UK)
Temperature
1210C
1320C
1340C
1340C
Time
40 minutes
4 minutes
18 minutes
3 minutes
Drying
25 minutes, or until visibly dry
100% EtO Sterilization Parameters (set points) Preconditioning
54°C, 60% relative humidity, 60 minutes
Sterilization
Temperature
540C
Relative Humidity
60%
Ethylene oxide concentration
725 mg/L
Gas exposure time (full-cycle)
120 minutes
Aeration
540C, 8 hours
Maintenance, Inspection and Testing
• •
Storage
It is extremely important that the handpiece be rapidly and completely vacuum dried before storage to prevent corrosion and residue deposits in the bearing and motor.
Additional Information
Increase temperatures higher than those stated when necessary to satisfy governmental or health care facility requirements so long as the temperature does not exceed 149° C. Heating above 149° C may damage the handpiece and will void the warranty.
Inspect components for any damage before and after each use. If damage is observed do not use the instrument until it is repaired. After cleaning and sterilization, verify functionality prior to re-use.
Note: The instructions provided above have been validated by the manufacturer as being CAPABLE of preparing the product for re-use. It remains the responsibility of the processor to ensure that the reprocessing is actually performed using equipment, materials and personnel in the reprocessing facility to achieve the desired result. This normally requires validation and routine monitoring of the process. Note: All validations performed per current AAMI TIR12, Designing, testing, and labeling reusable medical devices for reprocessing in health care facilities: A guide for medical device manufacturers. Medtronic recommends incineration of devices that have directly contacted patients suspected or confirmed with Transmissible Spongiform Encephalopathy (TSE)/ CJD diagnosis. NHS Estates HTM 2010 Parts 4 & 6: Appendix 2, Items contaminated with TSE Agents and WHO Infection Control Guidelines for Transmissible Spongiform Encephalopathies refers to a TSE decontamination cycle using a steam autoclave at a temperature of 134-137°C for a single cycle of 18 minutes or repeated for a total of six 3-minute cycles.