Patient Guide
2 Pages
Preview
Page 1
Natus NeuroWorks
™
Patient Guide
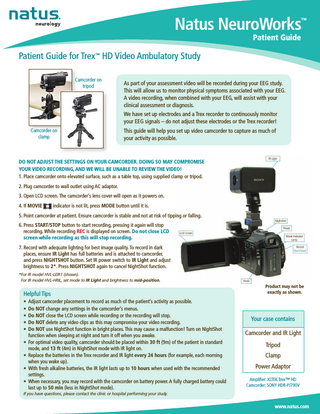
Patient Guide for Trex™ HD Video Ambulatory Study Camcorder on tripod
As part of your assessment video will be recorded during your EEG study. This will allow us to monitor physical symptoms associated with your EEG. A video recording, when combined with your EEG, will assist with your clinical assessment or diagnosis. We have set up electrodes and a Trex recorder to continuously monitor your EEG signals – do not adjust these electrodes or the Trex recorder!
Camcorder on clamp
This guide will help you set up video camcorder to capture as much of your activity as possible.
DO NOT ADJUST THE SETTINGS ON YOUR CAMCORDER. DOING SO MAY COMPROMISE YOUR VIDEO RECORDING, AND WE WILL BE UNABLE TO REVIEW THE VIDEO! 1. Place camcorder onto elevated surface, such as a table top, using supplied clamp or tripod. 2. Plug camcorder to wall outlet using AC adaptor. 3. Open LCD screen. The camcorder’s lens cover will open as it powers on. 4. If MOVIE
indicator is not lit, press MODE button until it is.
5. Point camcorder at patient. Ensure camcorder is stable and not at risk of tipping or falling. 6. Press START/STOP button to start recording, pressing it again will stop recording. While recording REC is displayed on screen. Do not close LCD screen while recording as this will stop recording. 7. Record with adequate lighting for best image quality. To record in dark places, ensure IR Light has full batteries and is attached to camcorder, and press NIGHTSHOT button. Set IR power switch to IR Light and adjust brightness to 2*. Press NIGHTSHOT again to cancel NightShot function. *For IR model HVL-LEIR1 (shown). For IR model HVL-HRIL, set mode to IR Light and brightness to mid-position.
Helpful Tips • Adjust camcorder placement to record as much of the patient’s activity as possible. • Do NOT change any settings in the camcorder’s menus. • Do NOT close the LCD screen while recording or the recording will stop. • Do NOT delete any video clips as this may compromise your video recording. • Do NOT use NightShot function in bright places. This may cause a malfunction! Turn on NightShot function when sleeping at night and turn it off when you awake. • For optimal video quality, camcorder should be placed within 30 ft (9m) of the patient in standard mode, and 13 ft (4m) in NightShot mode with IR light on. • Replace the batteries in the Trex recorder and IR light every 24 hours (for example, each morning when you wake up). • With fresh alkaline batteries, the IR light lasts up to 10 hours when used with the recommended settings. • When necessary, you may record with the camcorder on battery power. A fully charged battery could last up to 50 min (less in NightShot mode).
Product may not be exactly as shown.
Your case contains Camcorder and IR Light Tripod Clamp Power Adaptor Amplifier: XLTEK Trex™ HD Camcorder: SONY HDR-PJ790V
If you have questions, please contact the clinic or hospital performing your study.
www.natus.com
NeuroWorks Patient Guide
Storing Trex HD Video Equipment in Case
Camcorder attached to clamp
Camcorder attached to tripod
If you have any questions or concerns, please contact:
Natus Medical Incorporated Excel-Tech Ltd. (XLTEK) 2568 Bristol Circle, Oakville ON L6H 5S1 CANADA
www.natus.com
P/N 009320D