Quick Setup Guide
2 Pages
Preview
Page 1
PiCCO2 Quick Setup Guide ®
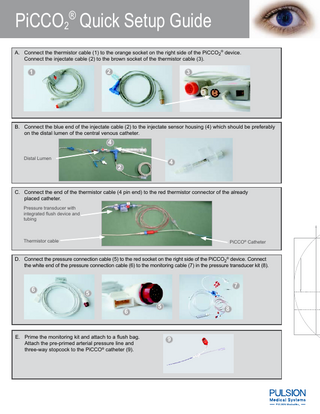
A. Connect the thermistor cable (1) to the orange socket on the right side of the PiCCO2® device. Connect the injectate cable (2) to the brown socket of the thermistor cable (3).
2
1
3
B. Connect the blue end of the injectate cable (2) to the injectate sensor housing (4) which should be preferably on the distal lumen of the central venous catheter.
4 Distal Lumen
4
2
C. Connect the end of the thermistor cable (4 pin end) to the red thermistor connector of the already placed catheter. Pressure transducer with integrated flush device and tubing
Thermistor cable
PiCCO® Catheter
D. Connect the pressure connection cable (5) to the red socket on the right side of the PiCCO2® device. Connect the white end of the pressure connection cable (6) to the monitoring cable (7) in the pressure transducer kit (8).
6
7
5 6
E. Prime the monitoring kit and attach to a flush bag. Attach the pre-primed arterial pressure line and three-way stopcock to the PiCCO® catheter (9).
5
8
9
PiCCO2 Quick Setup Guide ®
F. Switch on the device. The device will ask whether it is a new patient or not. Select ‘YES’ accordingly, confirm, then enter patient specific data, including height, weight, category (adult/ped), gender by touching the screen over the area you want to change. Press ‘EXIT’ (10) to move to the Zero Adjustment Screen.
10
G. Perform Zero Adjustment on the PiCCO2® first (after opening transducer to the atmosphere) and then the bedside monitor. Enter the patient CVP here (11). Press ‘EXIT’ to go to the thermodilution screen.
11
H. Perform 3 initial thermodilution measurements to calibrate the device and obtain the static parameters. Press exit once finished to go to the main monitoring screen. Press ‘START‘ when you and the machine are ready to inject Wait for ‘READY‘ to appear before pressing start
ELWI < 10
ELWI > 10
kg BW
iced
iced
<3
2 ml
2 ml
< 10
2 ml
3 ml
< 25
3 ml
5 ml
< 50
5 ml
10 ml
< 100
10 ml
15 ml
≥ 100
15 ml
20 ml
I.
To navigate around the screen either touch the area you wish to change or use the navigation dial.
See instructions for use and package insert for full prescribing information. Technical specifications are subject to change without further notice. © 2009 PULSION Medical Systems all rights reserved. PULSION Medical Inc. • 2445 Gateway Drive • Suite 110 • TX 75063 Irving, USA Tel. +1 (214) 446 8500 • Fax +1 (214) 446 6702 • Toll free +1 877 655 8844 [email protected] • www.PULSION.com
PiCCO2_Quick-SetupGudie_US R00 © PULSION 02/2009
Amount to be injected