Setup Guide
2 Pages

Preview
Page 1
PiCCO2® Setup Guide Tips & Tricks •
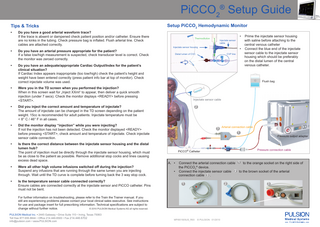
Do you have a good arterial waveform trace? If the trace is absent or dampened check patient position and/or catheter. Ensure there are no kinks in the tubing. Check pressure bag is inflated. Flush arterial line. Check cables are attached correctly.
•
Do you have an arterial pressure appropriate for the patient? If a false low/high measurement is suspected, check transducer level is correct. Check the monitor was zeroed correctly.
•
Do you have an adequate/appropriate Cardiac Output/Index for the patient’s clinical situation? If Cardiac Index appears inappropriate (too low/high) check the patient’s height and weight have been entered correctly (press patient info bar at top of monitor). Check correct injectate volume was used.
•
Did you inject the correct amount and temperature of injectate? The amount of injectate can be changed in the TD screen depending on the patient weight. 15cc is recommended for adult patients. Injectate temperature must be < 8° C / 46° F in all cases.
•
Did the monitor display “injection” while you were injecting? If not the injection has not been detected. Check the monitor displayed <READY> before pressing <START>, check amount and temperature of injectate. Check injectate sensor cable connection. Is there the correct distance between the injectate sensor housing and the distal lumen hub? The point of injection must be directly through the injectate sensor housing, which must be as close to the patient as possible. Remove additional stop cocks and lines causing excess dead space.
•
Were all other high volume infusions switched off during the injection? Suspend any infusions that are running through the same lumen you are injecting through. Wait until the TD curve is complete before turning back the 3 way stop cock.
•
Is the temperature sensor cable connected correctly? Ensure cables are connected correctly at the injectate sensor and PiCCO catheter. Pins must not be bent.
•
Thermodilution
Injectate sensor cable
Injectate sensor housing
• CVP line
Distal lumen of CVC
Injectate sensor cable
2
3
Arterial connection cable
1
A. • •
Pressure output adapter
Pressure connection cable
PiCCO® Catheter
Connect the arterial connection cable 1 to the orange socket on the right side of the PiCCO2® device. Connect the injectate sensor cable 2 to the brown socket of the arterial connection cable 3 . 2
1
For further information on troubleshooting, please refer to the Train the Trainer manual. If you still are experiencing problems please contact your local clinical sales executive. See instructions for use and package insert for full prescribing information. Technical specifications are subject to © 2010 PULSION Medical Systems AG all rights reserved. change without further notice. PULSION Medical Inc. • 2445 Gateway • Drive Suite 110 • Irving, Texas 75063 Toll free 877.655.8844 • Office 214.446.8500 • Fax 214.446.6702 [email protected] • www.PULSION.com
Prime the injectate sensor housing with saline before attaching to the central venous catheter Connect the blue end of the injectate sensor cable to the injectate sensor housing which should be preferably on the distal lumen of the central venous catheter.
Flush bag
Were you in the TD screen when you performed the injection? When in this screen wait for „Inject XXml“ to appear, then deliver a quick smooth injection (under 7 secs). Check the monitor displays <READY> before pressing <START>.
•
•
Setup PiCCO2 Hemodynamic Monitor
MPI851505US_R00
© PULSION 01/2010
3
PiCCO2® Setup Guide B. •
Carefully connect the arterial connection cable 1 to the red plug of the already placed PiCCO catheter. Do not use excessive force.
F. •
• •
1
Perform Zero Adjustment on the PiCCO2® first (after opening transducer to the atmosphere) and then on the bedside monitor. Enter the patient CVP here 11 . Press ‘EXIT’ to go to the thermodilution screen.
11
C. •
Connect the pressure connection cable 5 to the red socket on the right side of the PiCCO2® device. • Connect the white end of the pressure connection cable 6 to the monitoring cable 7 on the pressure transducer kit 8 . 6
7
5
• 6
D. • •
G. •
5
Attach the monitoring kit to a flush bag and prime. Then connect the other end of the arterial pressure line to the PiCCO catheter 9 .
8
Perform 3 initial thermodilution measurements to calibrate the device and obtain the parameters. Press ‘EXIT’ once finished to go to the main monitoring screen.
B
•
•
Switch on the device. The device will ask whether it is a new patient or not. Select ‘YES’ accordingly, confirm, then enter patient specific data, including height, weight, category (adult/ped), gender by touching the screen over the area you want to change. Press ‘NEXT’ or ‘EXIT’ 10 to continue to the Zero Adjustment Screen.
A C
1.
Draw up syringes and prepare to perform 3 injections of required volume of cold saline.
2.
Select the correct injectate volume A .
Volume
10
PULSION Medical Inc. • 2445 Gateway • Drive Suite 110 • Irving, Texas 75063 Toll free 877.655.8844 • Office 214.446.8500 • Fax 214.446.6702 [email protected] • www.PULSION.com
Inject 15ml
Performing the Thermodilution
9
Weight
E. • •
D
KG
5
<10
<25
<50
<100
>100
LBS
11
cold saline
2ml
<22
<55
<110
<220
>220
3ml
5 ml
10ml
15ml
20ml
3.
Attach a syringe to the injectate sensor housing. Open the stop-cock between injectate temperature housing and CVC, turning off to the CVP.
4.
Press the `START` key B .
5.
When `INJECT XXml` C appears, inject the displayed volume of saline quickly and smoothly (under 7 secs). TD curve together with measurement results will be displayed.
6.
Repeat steps 3 to 5 for the remaining injections.
7.
To delete unwanted values: Press column once to highlight values in green. Press again to delete (unwanted values now appear crossed out) D .