User Instructions
34 Pages
Preview
Page 1
User Instructions SISS BABYCONTROL
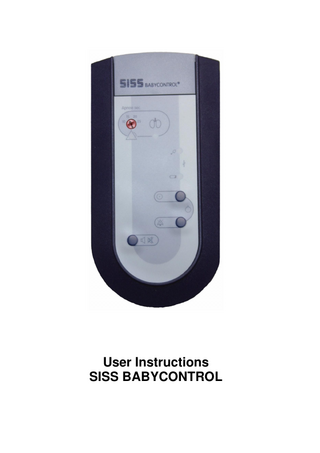
Control elements
1
Switch f or respirat ion alarm delay
2
Alarm signal: respir ation
3
Funct ion signal: respiration (green)
4
Respirat ion senso r f ault ( yellow)
5
Alarm signal: batter y discharged
6
ON button / to switch on BABYCONTRO L
7
Reset button f or Alar m
8
Button f or respirat ion monitor ing tone: On/Off
9
Batter y compartment (back of monitor)
3
Key to Symbols
Key to Symbols Respiration monit oring Respiration monitoring tone ON / OFF Body sensor Malfunction ON button Switches off the instrument (press buttons 6 and 7 simultaneously - this serves as child protection) Reset alarm button
Monitor Connections
Fig. 2: Monitor connections 10
Alarm output
11
Socket for body sensor
4
Contents
Contents Control elements ... 2 Key to Symbols ... 4 Monitor Connections ... 4 Contents ... 5 Purpose and Function ... 6 Notes Concerning these Instructions ... 7 Important Notes... 8 Safety Notes ... 9 Brief Instructions: First Use ... 10 Applying the respiration sensor ... 10 Overview of Alarm and Fault Indications ... 11 Installing and switching on the monitor ... 13 Respiration monitoring ... 14 Memory Function ... 16 Action in the event of an alarm ... 17 Monitor behavior during alarm ... 18 Care and maintenance of the monitor ... 19 Messages, faults and troubleshooting ... 21 Reading out the data with a PC ... 23 Technical Data ... 25 Maintenance and calibration ... 27 Technical description ... 28 Warranty ... 33 Liability ... 34
5
Purpose and Function
Purpose and Function
Dear Customer, With SISS BABYCONTROL, you have purchased an easy-to-use device for monitoring the respiration in babies and infants.
SISS BABYCONTROL issues an Alarm as soon as a dangerously long interruption to respiration occurs.
SISS BABYCONTROL saves all processes automatically with an accuracy of seconds. Specific operating procedures for this purpose are not necessary. The processes saved include:
on and off switching of the instrument, resetting of the alarms, all types of alarms, respiration rate by alarm
The optionally available USB adapter with software allows the events recorded to be displayed and evaluated on a commercially available PC.
The SISS BABYCONTROL is suitable for monitoring the respiration of babies and infants in a mobile and dom estic environment, as well as in hospitals and similar establishments.
6
Notes Concerning these Instructions
Notes Concerning these Instructions
Warning, noncompliance with which can endanger the child.
Special notes, tips
GROSS
Courier
Fett
=>
Indicates a button on the instrument
Indicates a software menu item Particular highlighting in the text
Refer to…
7
Important Notes
Important Notes Warning: Noncompliance with the User Instructions can result in malfunctions or less effective monitoring, and this in turn can result in injury or death of the child. Warning: The SISS BABYCONTROL monitor can be of assistance only if the person caring for the child i s always within the audible range of any possible alarm. Only by this means can vital assistance be given in the event of en emergency. Also the supervisory person must convince the undisturbed operation of the monitor. Thus the proper functions of the b uzzer (alarm tone / soft clicking tone) and the announcement elements (puls-LED's) are to be controlled with every turning on and in the running operation regularly.
Before putting your SISS BABYCONTROL monitor into operation, please comply with t he following instructions: These User Instructions must be carefully studied by all persons looking after your child. This will avoid errors in operation and misunderstandings. These User Instructions form part of the SISS BABYCONTROL monitor and must alwa ys be kept in its vicinity.
8
Safety Notes
Safety Notes 1. The monitor is not defibrillation -proof. Disconnect the monitor from the patient before using a defibrillator. 2. The monitor is not designated for explosionendangered areas. 3. Mobile communication devices (e.g. radio telephones, radio equipment) must not be used within a 1 m distance of the monitor (look at the technical description at page 28). These devices can disrupt or render impossible the safe functioning of the SISS BABYCON TROL monitor. 4. Do not leave small parts (packaging materials etc.) in your child's bed. He/she could swallow them. 5. For safe operation of the monitors, please use only the batteries/rechargeable batteries recommended and the recommended charging method. =>Battery and rechargeable battery supply / Battery changing /Battery alarm Page 19
9
Brief Instructions: First Use
Brief Instructions: First Use The following notes on first use will help you to quickly get used to operating the monitor.
1. Apply the blue respiration sensor as in Fig. 3. Secure the respiration sensor to the child’s body with the Leukosilk or Leukopor sticking plaster supplied. One horizontal strip across the sensor will suffice. The respiration sensor must not be kinked. 2. Connect the respiration sensor to the 3 -pole socket of the monitor. 3. Check the alarm limit set on the monitor. 4. Switch on the monitor by pressing the button it pressed for about 1 second.
( 6 ) and keeping
5. The monitor then carries out a self -test and, after emittin g an acknowledge tone, starts reliable monitoring.
Applying the respiration sensor
Fig. 3: Recommended location of the respiration sensor
10
Overview of Alarm and Fault Indications
Overview of Alarm and Fault Indications Significance of the LED colors Green:
Activity display of the respiration function
Red:
Patient alarm: the permitted pause in respiration has been exceeded
Yellow:
-
Technical alarm: sensor error Battery alarm
Patient alarms are high -priority alarms. They indicate a situation requiring immediate attention to your child. This includes the respiration alarm. It indicates that the permitted pause in respiration has been exceeded. The alarm is indicated by the red LED (2). In addition, the sequence of tones for the patient alarm is emitted repeatedly: ‘ Beep - Beep - Beep- short interval - Beep - Beep – long interval ‘ =>Monitor behavior during patient alarm Page 17
Technical alarms are medium -priority alarms These indicate a longer lasting fault or malfunction of the monitoring channel, e.g. a defective or disconnected respiration sensor. Correct monitoring cannot be continued. The alarm is indicated by the yellow LED (4). In addition, the sequence of tones for the medium priority technical alarm is emitted repea tedly: ‘ Beep – Beep – Beep – long interval – Beep – Beep –Beep – long interval ‘ =>Monitor behavior during medium -priority technical alarms Page 18
11
Overview of Alarm and Fault Indications
Battery warning The yellow LED ( 5 ) lights up every 10 sec. Monitoring will continue but the ba ttery / rechargeable battery should be exchanged as soon as possible.
=> Battery and rechargeable battery disposal / battery changing / battery alarm Page 19
Battery alarm Indicated by the lighting of the yellow L ED ( 5 ) with the sequence of tones for the medium -priority technical alarm emitted. Monitoring is no longer carried out. Exchange the battery / rechargeable battery immediately to continue monitoring.
=> Battery and rechargeable battery disposal / battery changing / battery alarm Page 19
12
Installing and switching on the monitor
Installing and switching on the monitor Place the monitor in a position where the displays are easily visible on entering the room. W ith the optionally available multifunction case the SISS BABYCONTROL is optimally protected.
Warning: Do not place the SISS BABYCONTROL directly over the bed. Otherwise the monitor could fall into the bed and injure your child if the cable is pulled. Before switching on the SISS BABYCONTROL, first apply the respiration sensor to your child. => Brief Instructions: First Use Page 10 It is best to lead out the sensor cable at the foot end of the bed, so that your child will not use it as a toy. Switch on the monitor with the ON button (6).
Warning: Before switching on, check that the rotary switch is set correctly for the alarm value to be monitored . As soon as it is switched on, the monitor carries out a self -test: all monitoring LED’s light up in turn. A shor t signal tone also sounds at the beginning and end of the test. This allows you to check the LED’s and the audible signal generator for correct function each time you switch on the monitor.
The flashing green monitoring LED (3) together with a soft clicking tone on the SISS BABYCONTROL indicate regular respiration. You can enable/disable the monitoring tone by pressing the “Respiration monitoring tone” button (8) .
13
Respiration monitoring
Respiration monitoring Respiration sensing Respiration movements (diaphragm mov ements) are transformed into electrical signals by the piezo -element in the respiration sensor via compression / bending moments. The sensor sensitivity is largely determined by its location (next to the navel) and the strength of the diaphragm movement pr evailing in that position. In special cases of shallow breathing, the respiration sensing on the monitor can be switched to a more sensitive setting:
Fig.4: Sensitivity switch of the respiration channe l in the battery compartment. Position N: Normal Position E: Sensitive => Messages, Faults and Troubleshooting Page 21 Alarm delay Babies occasionally experience interruptions in respiration of more than 10 seconds. This is not unusual. These irregularities in the respiratory rhythm decline with increasing age and, in most cases, they have disappeared by three years of age. If, however, the respiratory arrest exceeds the above -specified period and/or occurs more frequently, then your baby may be at risk. To compensate for individual fluctuat ions, the delay time after which the alarm is given can be adjusted . Setting the respiration alarm time Attention: Alter the limit values only when the monitor is switched off. Changes to the limit values become effective only when the monitor is switched on again (child safeguard).
14
Respiration monitoring
Adjustments are made with the rotary switch (1). Set the limit value as directed by your doctor. A time of 20 seconds (for babies) or 15 seconds (from about the second month of life onwards) is often used. If alarms often occur without there being an actual danger situation, the alarm time can be increased after consultation with the attending pediatrician (20 or 25 seconds). Respiration alarm The alarm is triggered as soon as no pulse from the respiration sensor has been detected over the duration of the set respiration alarm time. The red LED (2) lights and the sequence of tones is emitted for the patient alarm.
No respiration, emergency situation! See the details on Page 17 “Action in the event of an alarm”.
Central and obstructive apneas SISS BABYCONTROL can wrongly interpret vibration-induced movements as respiration, e.g. during transport by ambulance, car or perambulator. The same applies when t he child is held in your arms. Central apneas (no respiration or activity of the respiratory muscles) can therefore be detected only under the proviso that the child is sleeping, lying quietly, not moving or being moved. Obstructive apneas, i.e. apneas c aused by occlusion or blockage of the respiratory passages are not detected by the SISS BABYCONTROL.
15
Memory Function
Memory Function The memory function is always enabled. No special operating procedures are required for this function . The memory is a ‘non-volatile ring memory’, i.e. the stored data are not lost if the batter y is removed. When the memory capacity is exceeded, the oldest data are overwritten. However, the batter y should remain in the monitor, otherwise the date and time information in the software will not be correctly indicated. The internal clock is buffered for short time removal (approx. 1-2 days) or battery changing.
16
Action in the event of an alarm
Action in the event of an alarm What to do in the event of a patient alarm The following information represents only a very short summary of the measures which must be taken in the event of an emergency:
1. Switch off the alarm by pressing the RESET button
.
2. Check for breathing: Notice if the baby’s colour is paler than normal or blue. Place your cheek next to the baby’s face to see whether you can feel or hear any breathing. Look down for movement of the baby’s chest and tummy. Stimulate the baby by talking, tickling the soles of the feet or picking the baby up. 3. If the baby is not breathing carry out the resuscitation techniques that you have learned and immediately seek medical assistance
Warning: Specifically, the actions taken in Point 2 can be taught only by a trained person. Also knowledge of resuscitation measures for ad ults is not sufficient, since with children there are a number of specific differences involved.
17
Monitor behavior during alarm
Monitor behavior during alarm
Monitor behavior during patient alarm Alarm indication: => Overview of alarm and fault indications Page 11 Reset the patient alarm by pressing the button
:
The alarm tone stops and the alarm LED (2) goes out. No further respiration alarm will be given for the next 30 secs. (alarm suppressed). The green respiration indication LED (3) remains a ctivated. If, after the alarm suppression time, the alarm condition persists, an alarm is triggered again. Monitor behavior during medium-priority technical alarms Alarm indication: => Overview of alarm and fault indications Page 11 Reset a medium-priority technical alarm by switching off the monitor (press buttons
18
and
).
Care and maintenance of the monitor
Care and maintenance of the monitor Monitor test Switch on the monitor once a week with the respiration sensor plugged in but without a pplying the sensor to your child. Ensure that the sensor lies completely undisturbed. 1. After the set time, the respiration alarm must occur (red LED (2)) followed by the high -priority alarm tone. 2. Remove the respiration sensor. The fault display should now light up (yellow LED (4)). The tone will change to the medium-priority alarm tone. => Overview of alarm and fault indications Page 11
Cleaning Instructions for the device and Reusable Sensor.
Warning:
Do not autoclave or immerse the device or sensor in liquid.
Device: Clean the surface of the device with a soft cloth moistened with water or a mild soap solution. If disinfecting is necessary, wipe the surfaces of the device with iso propyl alcohol (eg. Clinell solution/wipes) Then wipe over with a soft water -moistened cloth. Do not allow any liquid to enter any of the devices openings. Sensor: Disinfecting the resuable sensor – wipe/spray the sensor with isopropyl alcohol following the disinfectant manufacturers guidleines for relevant disinfection timescales. Then, wipe over with a soft water-moistened cloth prior to use.
19
Care and maintenance of the monitor
Battery and rechargeable battery disposal / battery changing / battery alarm With average use, the life of a battery will be approximately 6 to 8 weeks. Before the actual battery alarm, the monitor will give a battery warning: the yellow LED will flash every 10 seconds during operation. The battery should then be changed within the next 1 -2 days. A rechargeable battery should be changed immediately. You can suppress the flashing for a short time with the button
.
When the battery voltage drops further during operation, the actual battery alarm occurs. A medium -priority tone sounds and the yellow display “Battery alarm” (5) lights up. To change the battery, open the battery compartment and insert the new battery in accordance with the label in the battery compartment. Note: Discharged batteries which are not r emoved from the monitor can damage the monitor by leaking acid. When discharged, take the batteries to the correct special waste disposal or your dealer's collection point. Do not throw them in your domestic waste!
The following batteries / rechargeabl e batteries are urgently recommended to ensure safe operation of monitors: Batteries:
9 V block battery, alkaline type, e.g. Duracell Plus
Rechargeable batteries
9 V block rechargeable battery, 200 mAh NiMH e.g. ANSMANN 9V Block PP3 6F22
Using rechargeable batteries: Avoid unnecessary battery alarms by changing rechargeable batteries regularly and promptly. Always keep a charged -up rechargeable battery ready. Batteries/rechargeable batteries differing from the types listed above can lead to operating faults in the event of a weak charge.
20
Messages, faults and troubleshooting
Messages, faults and troubleshooting Note: The following tables assist in the rapid understanding of messages and for the detection and remedy of possible faults and problems. Please also refer to the information i n the previous sections on the relevant subjects. In case of doubt, contact your dealer or the manufacturer.
Technical faults Fault / Indication Yellow battery LED (5) lights up, tone sequence emitted for medium-priority tech. alarm (Beep – Beep –Beep –Pause ...)
Yellow battery LED (5) flashes
Cause / Remedy Battery alarm. Insert a new battery / rechargeable batter y immediately.
Battery warning. Batter y / rechargeable batter y still have a residual charge: monitoring is still possible for a short time ( 1 – 2 days) depending on battery / rechargeable battery type You can reset the warning LED by pressing the button . You will avoid an unnecessary battery alarm by immediately inserting new battery / rechargeable battery.
Fault / Indication
Cause / Remedy
Medium-priority technical alarm. Yellow LED (4) lights up in addition with tone sequence emitted for medium-priority tech. alarm
Check the connection of the respiration sensor or exchan ge it.
( Beep – Beep - Beep – Pause...)
21