Service Manual
26 Pages
Preview
Page 1
*smith&nephew RENASYS™ TOUCH Negative Pressure Wound Therapy
Service Manual REF 66801280
EN
*smith&nephew RENASYS™ TOUCH
Service Manual (REF 66801280)
Negative Pressure Wound Therapy
Table of Contents Purpose
4
Annual service and maintenance
10
Scope
4
• Replacement Components
10
Responsibilities
4
• Device vacuum checks
11
Training
4
• Maintenance mode
11
Equipment and materials required
4
Storage and battery maintenance
11
RENASYS TOUCH features
5
Device failure
12
Repair and returning device
12
Device disposal
12 13
Service and maintenance performed after each patient use
6
• Device cleaning
6
• Device physical appearance check
7
RENASYS TOUCH service and maintenance sample checklist
• Functionality and alarm checks
8
LIMITED WARRANTY
16
. Functionality check
8
Electromagnetic compatibility
17
. Clinician mode
8
. Operation check
9
Specifications
19
. Operation on Battery check
9
Replacement parts and accessories
21
. Blockage alarm check
10
Caution statements
22
. Restore presets
10
Essential Performance
22
Icon and symbol glossary
23
Global Customer Assistance
295
Purpose
Equipment and materials required
This Service Manual provides guidance on regular service and maintenance checks to be conducted by trained personnel on the RENASYS™ TOUCH device (REF 66801280).
The following equipment is recommended to support service and maintenance of RENASYS TOUCH devices. Availability and usage is at discretion of each facility. Note: All measurement/test equipment must be calibrated and be in acceptable condition prior to use.
Note: The service and maintenance checks intended at a facility level do not require opening the device. Opening or attempting to open case will void all warranties and render the user responsible for all subsequent liabilities associated with device. Contact your local Smith & Nephew customer care representative or sales representative to resolve device problems.
• RENASYS TOUCH canister (REF 66801273, 66801274, 66801275) • Quick click adapter (REF 66801259, included with drain kits: REF 66801251,66801252, 66801253, 66801254, 66801255, 66801256, 66801257, 66801258) • RENASYS Y-connector (REF 66800971, 66800504)
Scope
• RENASYS TOUCH Odor filter (REF 66801284)
This service manual is only applicable to the RENASYS TOUCH device manufactured by Smith & Nephew (REF 66801280)
• RENASYS TOUCH O-ring (REF 66801283) • Vacuum measurement gauge with minimum range of up to 250mmHg vacuum (e.g., Extech® HD750, 406800 or 407910, Digitron® 2000P series, Dwyer® Series 475 or equivalent)
Responsibilities It is the responsibility of the facility that owns or operates the device to perform regular service and maintenance checks of medical equipment to verify basic device safety and function. The checks specified in this manual are to be performed on a device at a minimum once a year. However, these checks must also be performed prior to any reuse or after prolonged storage of more than 6 months. The retention of any device service and maintenance records are the responsibility of the party performing the procedure. A sample checklist is included with this manual to provide guidance on documenting the recommended service and maintenance checks; however, the service and maintenance documentation should be managed at the discretion of each facility.
• Optional electronic data acquisition and printer for checklist • Minimum of protective gloves and eye protection consult cleaning agent MSDS • Vented hood, or local SOP guidelines for handling bio hazardous materials • Plastic O-ring removal tool (http://www.prepol.com/ product-range/product-subpages/o-ring-removaltool or http://www.golemgear.com/p-302-o-ringpick-plastic.aspx) • #1 Pozidriv® screwdriver • Stopwatch • Cotton swabs (e.g., Q-tips®)
Training
• Disposable paper towels or cloth
It is recommended that individuals performing service and maintenance on the RENASYS TOUCH device be technicians familiar with regular service and maintenance of medical equipment and with the use of test equipment required.
• Cleaning materials validated for use with RENASYS TOUCH are: · Neutral (pH 7) based detergent · Diluted 10% (chlorine) bleach in water solution · Germicidal/antibacterial treated disposable wipes moistened with 70% Isopropyl Alcohol (70% IPA) · Intermediate disinfectant agents (such as Sporicidin® Disinfectant) that are safe for use on plastic may be used. Follow manufacturer’s instruction carefully.
4
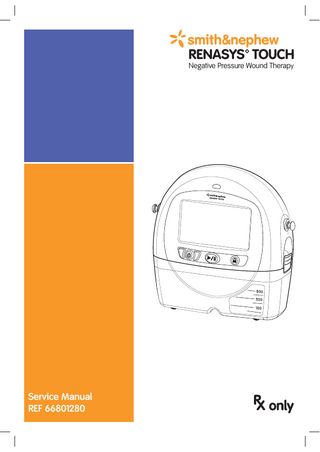
RENASYS™ TOUCH features Front view of device
Left view of device and power Power cord inlet
Touchscreen
Status indicator
AC cord External power indicator Power jack
Power supply DC cord
Power
Lock/Unlock
Start/Pause Therapy
300ml Canister (available in 800ml)
Home screen Date and Time indicators
Therapy set point
Underside of device Inlet port
Battery indicator Alarm volume indicator
Settings Log
Therapy indicator
Decrease value
Increase value
Help Therapy mode toggle
O-ring
Y-Connect toggle
Rear view of device
Barcode label
IV pole/bed clamp Attachment knob
Speaker
Knob
Lead screw Label Pad Bumper Air exhaust outlet
Odor filter and USB access door
Identification label
Attachment recesses
5
Clamp clips
6. Check that inlet port and air exhaust outlet are free of obstructions, dust or foreign materials.
Service and maintenance performed after each patient use
7. Apply germicidal/antibacterial product to a cotton swab and clean both inlet port and air exhaust outlet.
Device cleaning Recommended personnel: Device cleaning should be performed by a trained technician. Equipment and materials required: Gloves, eye protection, neutral (pH7) based detergent, 10% chlorine bleach solution, germicidal/antibacterial treated disposable wipes, cotton swab and dry disposable cloth. Precautions: • Use of gloves and eye protection or other personal and environmental protections is recommended. The party conducting any cleaning should consult the cleaning agent MSDS and their facility or local operating procedures for specific requirements for handling biohazards. • Device should not be connected to AC mains power while being cleaned. • Follow manufacturer’s guidelines for safe use and disposal of cleaning materials.
8. Visually inspect device surface for debris or soils that have not been removed and repeat cleaning steps if necessary.
• Do not spray cleaning agent, immerse any part of device in fluid or use an excessively wet cloth.
9. If RENASYS™ TOUCH IV pole/bed clamp (66801278) is present
Cleaning instructions
• Wipe down clamp surface with a dampened cloth or disposable wipe.
1. Place device and all associated accessories under a vented hood. This includes all items that may be associated with use of the device: power supply, power cord, IV pole/bed clamp, etc.
• Turn clamp knob to fully extend clamp. • Open clamp clips. • Carefully clean all external surfaces with one of the recommended cleaning materials.
2. Remove device from plastic bag, if used, and discard bag.
• Clean under clamp clips and between lead screw threads.
3. If canister is present, remove it from device and place in a plastic bag for disposal in accordance with facility protocols and/or local ordinances for disposal of potentially infected or bio-hazardous materials.
• When dry, turn knob to fully close clamp. 10. Wipe down power supply and power cord surfaces with a dampened cloth or disposable wipe. Carefully clean all external surfaces with one of the recommended cleaning materials.
4. Place other single patient accessories, such as the carry bag or carry strap, in a plastic bag and dispose in accordance with facility protocols or local ordinances.
11. If damp, dry all surfaces with a disposable towel or cloth. 12. Dispose of cleaning materials as instructed by the manufacturer.
5. Wipe down device surface with a dampened cloth or disposable wipe. Carefully clean all external surfaces of device with one of the recommended cleaning materials
6
Device physical appearance check Recommended personnel: Device physical appearance check should be performed by a trained technician.
12. Confirm inlet port is not damaged and device O-ring is present. 13. Confirm bar code label is present and legible on bottom of device.
Equipment and materials required: None. Note: Prior to proceeding with device inspection, verify device has been cleaned and disinfected appropriately. 1. Place device on a flat surface and ensure device is not connected to AC mains power. 2. Visually inspect device for damage, cracks or missing pieces. 3. Confirm device plastic housing is not cracked, shattered or in deformed condition. 4. Rotate device 360° in vertical and horizontal planes. Confirm device does not have loose components.
14. Confirm power supply has no fraying or missing insulation and plug is not bent, loose or missing.
5. Confirm device touchscreen is not cracked, shattered or in dismounted condition.
15. Confirm power supply front and rear labels are clearly visible and legible.
6. Confirm device push buttons (Power, Start/Pause Therapy, and Lock/Unlock) are intact, physically undamaged and symbols are legible. 7. Confirm device attachment knobs are intact.
Smith & Nephew Medical Limited 101 Hessle Rd, Hull HU3 2BN England Made in China D
8. Confirm device status indicator is not cracked, shattered or in dismounted condition. 9. Confirm device external power indicator is not cracked, shattered or in dismounted condition. 10. Confirm device power jack is not damaged.
16. Confirm power cord has no fraying, missing insulation, or any bent, loose or missing plug blades. 17. If RENASYS™ TOUCH IV pole/bed clamp (66801278) is present: • Visually inspect clamp for damage, cracks or missing pieces. • Confirm clamp label is present. The REF and LOT numbers should be clearly visible and legible. • Confirm the clamp clips open and close.
11. Confirm device identification label is present. The REF and SN numbers should be clearly visible.
• Confirm clamp knob fully opens and closes the arm. • If any of the above checks for clamp fails, dispose of clamp and acquire a new clamp from Smith & Nephew as needed.
7
Functionality and alarm checks
Note: The touchscreen should only be actuated by finger. Using pens or other pointed objects may damage the screen. Tap touchscreen to make a selection. Slide finger to scroll.
Recommended personnel: Functionality and alarm checks should be performed by a trained technician. Equipment and materials required: RENASYS™ TOUCH canister, RENASYS TOUCH power supply, RENASYS power cord, RENASYS quick click adapter and stopwatch.
7. Select device information and locate software versions. 8. Record Serial Number, Operating System, Main Application Version, Motor Controller Version, Bootloader Version, RENASYS TOUCH System Version, Battery Remaining and Device Lifetime Therapy displayed on device information screen.
Functionality check 1. Connect power supply to device power jack. Connect power cord to power supply and to AC mains power.
9. Press Back
2. Confirm external power indicator illuminates green.
icon to return to the Settings menu.
10. Device language may be changed as described below:
3. Turn on device by pressing and holding Power button for 2 seconds. Confirm:
• In the Settings menu, scroll to Language.
• status indicator illuminates while the power button is pressed
• Press Language to select. • Scroll and select preferred language from available list.
• Smith & Nephew start up screen displays • status indicator flashes yellow then green
• Press Back
• device issues an audible tone, then
icon to return to Settings menu.
Clinician mode
• Welcome screen displays
To perform operation checks, device must be in Clinician mode.
The Home screen will display upon completion of startup sequence.
• In the Settings menu, scroll to Change Mode. • Press to select Change Mode. • If Patient mode is highlighted, press Clinician mode and enter password (3141) to change to Clinician mode.
*smith&nephew
• If Clinician mode is highlighted, no change is necessary.
4. Confirm device powers on and is ready to accept user inputs. 5. Confirm battery status indicator on touchscreen has a lightning bolt (either flashing or steady) to indicate the battery is charging. 6. Press Settings
and scroll to Device Information.
8
• Press Back
icon to return to Settings menu.
• Press Home
icon to return to Home screen.
Operation check
7. Press and hold Lock/Unlock
button for 2 seconds.
1. Connect RENASYS™ TOUCH canister to device by gently pushing canister over device inlet port and engaging both canister clips. 2. Connect canister tubing quick click connector to quick click adapter included with drain kits and engage tethered cap into open connector of quick click adapter. Engaged tethered cap
8. Confirm user interface is locked by pressing Start/ Pause Therapy button and confirming device does not stop operating.
3. Press Therapy Mode toggle icon on the homescreen to select Continuous therapy. 4. Adjust therapy set point to 80mmHg by pressing Increase or Decrease icons. 5. Press Start/Pause Therapy
9. Press and hold Lock/Unlock 2 seconds.
button.
button for
6. Confirm device begins operating: status indicator illuminates green, therapy Indicator at the top of touchscreen rotates orange and touchscreen displays – “Leak Check”, “Seal Achieved” and “Delivering Therapy”.
10. Stop device operation by pressing Start/Pause Therapy button. The status indicator turns off, therapy indicator turns gray and device returns to Home screen. Operation on Battery check 1. Confirm that the therapy set point is at 80mmHg and disconnect power supply from device. 2. Press Start/Pause Therapy
button.
3. Confirm device starts operating: status indicator illuminates green and after leak check is complete the “Delivering Therapy” screen displays. 4. Press Start/Pause Therapy button and confirm device stops operating: status indicator turns off, therapy indicator turns gray and device returns to Home screen.
9
Blockage alarm check
• Intermittent therapy on Home screen set to 80mmHg for 5 minutes and 0mmHg for 2 minutes.
Note: Alarm can be tested on either battery or AC mains power. If testing on battery power, ensure battery charge is sufficient: battery indicator is green.
• Total Patient Therapy in Log is set to zero. Note: Press the Therapy Mode toggle icon to switch between Continuous and Intermittent Therapy
1. Disconnect quick click adaptor from canister tubing and cap off canister tubing quick click connector. 2. Reset stopwatch to zero.
Annual service and maintenance
3. Increase therapy set point to 100mmHg by pressing Increase icon. 4. Press Start/Pause Therapy stopwatch.
Replacement Components Recommended personnel: Component replacement should be performed by a trained technician.
button. Start
Equipment and materials required: Gloves, eye protection, germicidal/antibacterial product, cotton swab, RENASYS TOUCH O-ring, RENASYS TOUCH odor filter, #1 Pozidriv® screwdriver, plastic o-ring removal tool.
5. Confirm that within approximately 3 minutes touchscreen displays “WARNING BLOCKAGE”, status indicator illuminates yellow and audible alarm sounds.
Precautions: • Use of gloves and eye protection or other personal and environmental protections is recommended. • Device should not be connected to AC mains power while being cleaned. 6. Press Start/Pause Therapy button to stop device operation. Stop stopwatch.
• Follow manufacturer’s guidelines for safe use and disposal of cleaning materials.
7. If device fails test on first execution, check for any damage to the canister and o-ring, ensure there are no kinks in canister tubing and ensure canister tubing quick click connector is capped. Re-test. If device fails second time, replace o-ring and re-test. If device fails again, remove from service and return for repair.
• Do not spray cleaning agent, immerse any part of device in fluid, or use an excessively wet cloth. 1. Remove existing o-ring using a plastic removal tool, and dispose. Ensure inlet port is not damaged. 2. Ensure device is turned off and face down on a soft surface to avoid damage to touchscreen. Loosen screw in rear access door. Remove and dispose of existing odor filter.
Note: If device pump runs continuously at any time during test (as determined by a quiet “putt-putt” sound), then seal of test equipment is inadequate and test will provide an inaccurate result, i.e., selected vacuum levels not achieved within specified tolerances.
3. Check that inlet port and air exhaust outlet are free of obstructions, dust or foreign materials. 4. Apply germicidal/antibacterial product to a cotton swab and clean both inlet port and air exhaust outlet.
Restore presets RENASYS™ TOUCH device settings must be restored to factory presets between each patient use.
5. Dispose of cleaning materials in accordance with facility protocol.
1. Press Setting , scroll down and select Restore Presets from Setting menu. 2. Press Accept presets.
6. Once inlet port is clean, carefully place new o-ring onto inlet port. Ensure o-ring is properly seated in the groove.
icon to restore device factory
3. Confirm:
7. Once air exhaust outlet is clean, carefully place new odor filter behind access door.
• Alarm volume in Settings menu is set to HIGH.
8. Close access door. Tighten screw until door is flush with case.
• Compression rate in Settings menu is set to HIGH. • Continuous therapy on Home screen is set to 80mmHg.
Caution: Do not over-tighten 10
10. Increase therapy set point to 200mmHg by pressing icon. the Increase
Device vacuum checks Recommended personnel: Device vacuum checks should be performed by a trained technician or biomedical engineer.
11. Press Start/Pause Therapy button to start device operation. Allow vacuum level to stabilize (this may take up to 60 seconds).
Equipment required: RENASYS™ TOUCH power supply, RENASYS power cord, RENASYS quick click adapter, RENASYS Y-connector, calibrated pressure gauge.
12. Confirm pressure measured on calibrated pressure gauge controls to 200mmHg ± 5mmHg. 13. Press Start/Pause Therapy device operation.
1. Connect power supply to device and to power cord. 2. Connect RENASYS TOUCH canister to device by gently pushing canister over device inlet port and engaging both canister clips.
button to stop
Note: The device pump may run continuously during this test (as determined by a quiet "putt-putt sound).
3. Connect canister tubing quick click connector to Y-connector.
Maintenance mode To reset annual maintenance timer, device must be in Maintenance mode. • In the Settings menu, scroll to Change Mode. • Press to select Change Mode. • Press Maintenance mode and enter password (1414).
4. Connect one of the Y-connector quick click connectors to the quick click adaptor included with drain kits, or RENASYS Service Pack (REF 66021812) Engage tethered cap of quick click adaptor into open connector. • The Press the accept button
to reset timer.
• The device will return to the Home screen.
Storage and battery maintenance 1. Prior to storage, confirm battery is approximately 40 – 60% charged since some battery discharge may occur while in storage. To view the percentage of battery remaining, select Settings and scroll to Device Information. Select Device Information and locate Battery Remaining.
5. Connect second quick click connector to a calibrated pressure gauge.
2. Device should be stored between 5 to 40°C (41 to 104°F) for optimal battery performance but can be stored between -25 to 70°C (-13 to 158°F) for short periods of time. 6. Decrease therapy set point to 25mmHg by pressing the Decrease icon on the touch screen.
3. Battery should be fully charged before storing device longer than 6 months.
button to start 7. Press Start/Pause Therapy device operation. Allow vacuum level to stabilize (this may take up to 60 seconds).
4. If device battery is still charging after more than 8 hours of continuous charge, contact your Smith & Nephew distributor or authorized provider.
8. Confirm pressure measured on calibrated pressure gauge controls to 25mmHg ± 5mmHg. 9. Press Start/Pause Therapy device operation.
button to stop
11
Device failure
Device disposal
In the event device fails any test, has sustained obvious damage, has a missing or illegible device label, or gives any indication product may not be fit for its purpose, the following actions must be taken.
WEEE Directive [2002/96/EC] on Waste Electrical and Electronic Equipment. This statement only applies to European countries with regard to Waste Electrical and Electric Equipment (WEEE) European Directive.
1. Device must be clearly labeled to explain it does not meet testing acceptance criteria.
The WEEE symbol on the product or its packaging indicates this product must not be disposed of with other waste. Instead, it is your responsibility to dispose of your waste equipment by sending it to a designated collection point for recycling of Waste Electrical and Electronic Equipment. The separate collection and recycling of your waste equipment at the time of disposal will help conserve natural resources and ensure it is recycled in a manner that protects human health and the environment. For more information about where you can drop off your medical equipment at the end of its useful life for recycling, please contact a Smith & Nephew representative.
2. A Smith & Nephew Service and Repair Representative must be notified of device failure. The disposition will be determined based on nature of failure (such as complaint, return/repair, etc.) (refer to Global customer assistance for contact information). 3. Instructions for return and disposition of unit will be provided by Smith & Nephew Service and Repair Center.
Repair and returning device There are non user serviceable components inside the RENASYS™ TOUCH NPWT device. Repairs and adjustments are to be performed only by Smith & Nephew authorized service centers. To arrange repair, please contact the Smith & Nephew Customer Care Center or your Smith & Nephew Sales Representative. WARNING: The device should not be opened by anyone other than a Smith & Nephew authorized service center. Opening or attempting to open the case will void all warranties and render the user responsible for all subsequent liabilities associated with the device. Prior to returning the device to your Smith & Nephew Service and Repair Center, the device must be cleaned according to the steps outlined under the cleaning section of this manual. The device and power supply should be returned within the original packaging.
12
RENASYS™ TOUCH service and maintenance sample checklist Note: In the event that a device fails any test, has sustained obvious damage, has a missing or illegible label, or has any indication it may not be fit for intended use, please return the unit to Smith & Nephew Service and Repair Center.
Service and maintenance sample check list UNIT SERIAL # Steps
Yes No
Device cleaning 1
All external surfaces of device, clamp, power cord and power supply cleaned.
Device physical appearance check 2
No evidence of device damage, cracks or missing pieces.
3
No evidence of loose parts inside the device.
4
Device touchscreen is not cracked, shattered or in dismounted condition.
5
Device push buttons (Power, Start/Pause Therapy and Lock/Unlock) are intact, physically undamaged and symbols legible.
6
Device attachment knobs are intact.
7
Status indicator is not cracked, shattered, or in dismounted condition.
8
External power indicator is not cracked shattered or in dismounted condition.
9
Device power jack is physically undamaged.
10
Device identification label is present, REF and SN numbers clearly visible.
11
No evidence of inlet port damage. O-ring is present.
12
Barcode label is intact and legible.
13
Power supply DC cord is not fraying, missing insulation, and has no bent, loose or missing plug blades or earth/ground blade.
14
Front and rear labels of power supply are legible.
15
Power cord is not fraying, missing insulation, and has no bent, loose or missing plug blades.
16
No evidence of clamp damage, cracks or missing pieces.
17
Clamp label is intact and legible.
18
Clamp clips open and close.
19
Clamp knob fully opens and closes arm.
13
Comments
Steps
Yes
No
Comments
Functionality check 20
External power indicator illuminates green after power is connected.
21
The status indicator illuminates green when Power button is pressed, Smith & Nephew startup screen displays, status indicator flashes yellow then green, the device issues an audible tone and the welcome screen displays.
22
Touchscreen is ready to accept user inputs.
23
Lightning bolt present in battery indicator to indicate charging.
24
Record Serial Number, Operating System, Main Application Version, Motor Controller Version, Bootloader Version, RENASYS™ TOUCH System Version, Battery Remaining, Device Lifetime Therapy and Maintenance Due.
25
Device is set to Clinician mode.
Operation check 26
Status indicator illuminates green, therapy indicator rotates orange, device performs leak check and Delivering Therapy screen displays.
27
User interface locked.
28
User interface unlocked.
Operation on Battery check 29
Device operates on battery power.
Blockage alarm checks 30
Touchscreen displayed “WARNING BLOCKAGE”, status indicator illuminated yellow and audible alarm sounded within approximately 3 minutes.
14
Serial Number Operating System Main Application Motor Controller Bootloader System Version RENASYS TOUCH System Version Battery Remaining Device Lifetime Therapy Maintenance Due
Steps
Yes
No
Comments
Restore presets 31
Alarm volume: Compression rate: Continuous therapy: Intermittent therapy:
High High 80mmHg 80mmHg for 5 min 0mmHg for 2 min Total Patient Therapy: 0
Annual service and maintenance 32
O-ring replaced with new o-ring.
33
Odor filter replaced with new odor filter.
34
The vacuum measured by the pressure gauge is 25 ± 5mmHg when device set @ 25mmHg.
35
The vacuum measured by the pressure gauge is 200 ± 5mmHg when device set @ 200mmHg.
36
Entered maintenance mode and reset annual timer
New expiration date
Storage and battery maintenance 37
Battery charge level is between 40%–60%. Battery fully charged, if being stored for longer than 6 months.
Cleaning and Packing 38
Device and power supply cleaned and packaged with all necessary items for customer use or return.
Performed by: Print Name:
Date:
Signature:
Day
Location (Address):
15
Month
Year
CUSTOMER’S SOLE REMEDY, AND SMITH & NEPHEW’S SOLE LIABILITY, FOR ANY CLAIM WILL BE THE REPAIR OR REPLACEMENT BY SMITH & NEPHEW AS PROVIDED FOR IN THIS WARRANTY. EXCEPT FOR THIS LIMITED LIABILITY OF SMITH & NEPHEW, SMITH & NEPHEW UNDER NO CIRCUMSTANCES WILL BE LIABLE FOR ANY (A) CLAIM, FOR DAMAGES OR OTHERWISE, WHETHER ARISING FROM BREACH OF CONTRACT, TORT (INCLUDING NEGLIGENCE) OR OTHERWISE, AND WHETHER OR NOT BASED ON OR FLOWING DIRECTLY, INDIRECTLY OR AS A CONSEQUENCE OF A WARRANTY CLAIM, BREACH OF CONTRACT, A TORT, BREACH OF LAW, OR ANY OTHER CAUSE OR LEGAL THEORY, OR (B) DIRECT, INCIDENTAL, CONSEQUENTIAL OR SPECIAL DAMAGES, LOSSES OR EXPENSES ARISING FROM THIS AGREEMENT OR ITS PERFORMANCE OR LACK THEREOF, OR IN CONNECTION WITH THE SALE OR USE OF, OR INABILITY TO USE, THE DEVICE, INCLUDING BUT NOT LIMITED TO, LOSS OF PROFIT OR ANTICIPATED SAVINGS, LOSS OF ANTICIPATED PROFIT, COST OF COVER FOR REPLACEMENT OR ALTERNATIVE PRODUCT, ECONOMIC LOSS, LOSS OF DATA, WASTED EXPENDITURE OR LOSS OF REPUTATION OR GOODWILL.
LIMITED WARRANTY LIMITATION OF REMEDIES/LIABILITY: The Smith & Nephew negative pressure wound care electro-mechanical device (“Device”) is warranted against defects in workmanship and materials for the warranty period specified below (“Warranty Period”). Smith & Nephew reserves the right to discontinue any Device or change any Device’s specifications or designs from time to time. For any Device that fails to meet the foregoing warranty, this warranty provides and is restricted to replacement or repair (on site service not included) as elected by Smith & Nephew in its sole discretion. If Smith & Nephew replaces a Device under this warranty and requests Customer to return the Device that was replaced, Customer will be invoiced, at Smith & Nephew’s then current list price, for the replacement Device if Customer does not return the replaced Device within thirty (30) days after Smith & Nephew’s shipment of the replacement Device. This warranty does not cover and is voided by any of the following: (i) a warranty claim not made within the first to occur of expiration of the Warranty Period or thirty (30) days following the failure of the Device to perform as warranted; (ii) a Device packaged or labeled by someone other than Smith & Nephew or its authorized agents; (iii) a Device not used in compliance with the specifications, instructions or claims for use of the Device; (iv) a Device used in conjunction with disposables, accessories or any other products not specified for use with the Device; (v) a Device used in conjunction with expired or reprocessed disposables, accessories or other products specified for use with the Device; (vi) modification of the Device; (vii) damage due to misuse, reprocessing, alteration, unauthorized repair or negligent handling or damage due to lack of care by the owner, user, or handler of the Device including but not limited to storage, handling or cleaning; and (viii) any other damage inflicted to a Device by the owner, user or handler. This warranty applies only to the original buyer from Smith & Nephew or its authorized distributor and is not transferable. THIS WARRANTY IS THE SOLE WARRANTY OF SMITH & NEPHEW. ALL OTHER WARRANTIES OF ANY KIND OR DESCRIPTION WHATSOEVER, INCLUDING WARRANTIES OF MERCHANTABILITY, SATISFACTORY QUALITY AND FITNESS FOR A PARTICULAR PURPOSE, EXPRESSED OR IMPLIED, ARE EXCLUDED TO THE FULLEST EXTENT PERMITTED BY LAW. Device
Warranty Period
RENASYS™ NPWT electromechanical devices (inclusive of the power cord and power supply)
Two (2) years from date of delivery to original buyer
16
Electromagnetic compatibility RENASYS™ TOUCH (REF 66801280) This equipment has been tested and found to comply with the limits for medical devices to IEC 60601-1-2-2007. These limits and test levels are intended to provide reasonable safety with regard to electromagnetic disturbances when the device is used in a typical medical installation. This equipment generates, uses and can radiate radio frequency energy and, if not installed and used in accordance with the instructions, may cause harmful interference to other devices in the vicinity. However, there is no guarantee that interference will not occur in a particular installation. Guidance and manufacturer’s declaration - electromagnetic immunity The device is intended for use in the electromagnetic environment specified below. The customer or the user of the device should assure that it is used in such an environment. Immunity test IEC 60601 test level
Compliance level
Electromagnetic environment – guidelines
Electrostatic ±6 kV contact discharge (ESD) ±8 kV air IEC 61000-4-2
±6 kV contact ±15 kV air
Floors should be wood, concrete or ceramic tile. If floors are covered with synthetic material, the relative humidity should be at least 30%
±2 kV for power supply lines Electrical fast transient/burst IEC 61000-4-4
±2 kV for power supply lines Mains power quality should be that of a typical commercial or hospital environment
Surge IEC 61000-4-5
±1 kV differential mode ±2 kV common mode
±1 kV line to line ±2 kV line to earth
Mains power quality should be that of a typical commercial or hospital environment
Voltage dips, short interruptions and voltage variations on power supply input lines IEC 61000-4-11
<5% UT (>95% dip in UT) for 0.5 cycles 40% UT (60% dip in UT) for 5 cycles 70% UT (30% dip in UT) for 25 cycles <5% UT (>95% dip in UT) for 5 sec
same same same same
Mains power quality should be that of a typical commercial or hospital environment. If the user of the device requires continued operation during power mains interruptions, it is recommended that the device be powered from an uninterruptable power supply or battery
NOTE UT is the a.c. mains voltage prior to application of the test level
Power frequency 3 A/m (50/60Hz) magnetic field IEC 61000-4-8
Conducted RF IEC 61000-4-6
30 A/m
3 Vrms 150 kHz to 80 MHz
10 Vrms
Radiated RF IEC 3 V/m 80 MHz to 2.5 GHz 61000-4-3
20 V/m
Power frequency magnetic fields should be at levels characteristic of a typical location in a typical commercial or hospital environment Portable and mobile communications equipment should be separated from the device by no less than distances calculated/listed below: Recommended separation distance: d = 1.2 P d = 1.2 P (80 MHz to 800 MHz) d = 2.3 P (800 MHz to 2.5 GHz)
NOTE 1: At 80 MHz, the higher frequency range applies. NOTE 2: These guidelines may not apply in all situations. Electromagnetic propagation is affected by absorption and reflection from structures, objects and people. a. Field strengths from fixed transmitters, such as base stations for radio (cellular/cordless) telephones and land mobile radios, amateur radio, AM and FM radio broadcast and TV broadcast cannot be predicted theoretically with accuracy. To assess the electromagnetic environment due to fixed RF transmitters, an electromagnetic site survey should be considered. If the measured field strength in the location in which the device is used exceeds 3V/m, the device should be observed to verify normal operation. If abnormal performance is observed, additional measures may be necessary, such as reorienting or relocating the device. b. Over the frequency range 150 kHz to 80 MHz, field strengths should be less than 3 V/m.
17
where P is the maximum output power rating of the transmitter in watts (W) according to the transmitter manufacturer and d is the recommended separation distance in meters (m). Field strengths from fixed RF transmitters, as determined by an electromagnetic site surveya, should be less than the compliance level in each frequency rangeb. Interference may occur in the vicinity of equipment marked with the following symbol:
Guidance and manufacturer’s declaration – electromagnetic emissions RENASYS™ TOUCH (REF 66801280) The device is intended for use in the electromagnetic environment specified below. The customer or user of device should assure that it is used in such an environment. Emissions test
Compliance
Electromagnetic environment – guidelines
RF emissions CISPR 11
Group 1
The device uses RF energy only for its internal function. Therefore, its RF emissions are very low and are not likely to cause interference in nearby electronic equipment.
RF emissions CISPR 11
Class B
Harmonic emissions IEC 61000-3-2
Class A
Voltage fluctuations/flicker emissions IEC 61000-3-2
Comply
The device is suitable for use in all establishments including domestic and those directly connected to the public lowvoltage power supply network that supplies buildings used for domestic purposes.
WARNING: The device should not be used adjacent to or stacked with other equipment and that if adjacent or stacked use is necessary, the device should be observed to verify normal operation in the configuration in which it will be used. Recommended separation distances between portable and mobile RF communications equipment and the device The device is intended for use in an electromagnetic environment in which radiated RF disturbances are controlled. The customer or user of device can help prevent electromagnetic interference by maintaining a minimum distance between portable and mobile RF communications equipment (transmitters) and the device as recommended below, according to the maximum output power of the communications equipment. Rated maximum output power of transmitter (W)
Separation distance according to frequency of transmitter (m): 150 kHz to 80 MHz d = 1.2P
80 MHz to 800 MHz d = 1.2P
800 MHz to 2.5 GHz d = 2.3P
0.01
0.02
0.02
0.03
0.1
0.06
0.06
0.11
1.0
0.18
0.18
0.35
10
0.57
0.57
1.1
100
1.8
1.8
3.5
For transmitters rated at a maximum output power not listed above, the recommended separation distance d in meters (m) can be estimated using the equation applicable to the frequency of the transmitter, where P is the maximum power rating of the transmitter in watts (W) according to the transmitter manufacturer. NOTE 1: At 80 MHz and 800 MHz, the separation distance for the higher frequency range applies. NOTE 2: These guidelines may not apply in all situations. Electromagnetic propagation is affected by absorption and reflection from structures, objects and people.
18
Specifications Vacuum Continuous Therapy Levels
25, 40, 50, 60, 70, 80, 90, 100, 120, 140, 160, 180, 200mmHg
Intermittent Therapy Levels
High: 25, 40, 50, 60, 70, 80, 90, 100, 120, 140, 160, 180, 200mmHg Low: 0, 25, 40, 50, 60, 70, 80, 90, 100, 120, 140, 160, 180mmHg
Intermittent Therapy Cycle Times
High: 3, 5, 8, 10 minutes Low: 2, 3, 5, 8, 10 minutes
Alarms General (all alarms) Priority
Low
Auditory Sound Level
Low: 60 dB, Medium: 68 dB, High: 74 dB (1 meter from device)
Indicator Color
Yellow
Overall alarm delays Over vacuum
less than 5 seconds
High vacuum Continuous Mode Intermittent Mode
180 seconds 60 seconds
Low vacuum
60 seconds
Leak
45 seconds (not time based)
Blockage
120 seconds +/- 5 seconds
Canister full
45 seconds +/- 5 seconds
Low battery
immediate
Critical battery
immediate
Battery failed
30 seconds
Inactive
15 minutes
Annual maintenance
Immediately following startup sequence
Device failed
30 seconds
Power Requirements Device input voltage
19.5 VDC
Device input power
50 W
Mains Adapter
Smith & Nephew REF 66801286 Input: 100-240VAC, 50/60HZ, 10-35VA Output: 19.5VDC, 2.6A, 50W Fuses: Internal electronic fuse, not user changeable
Physical Dimensions
180 x 190 x 76 mm (7" W x 7.5" H x 3" D) with 300ml canister
Weight
1.1 kg (2.4 lbs) with 300ml canister 19
Sound Level Normal Operations
no alarms: <43.7dB
Battery Operating Time
~ 10-16 hours (therapy) when operating from 25mmHg to 120 mmHg; ~ 8 hours (therapy) at 200mmHg
Type
Lithium ion
Compliance
UL 2054 / IEC 62133
Safety Protection Protection Against Electric Shock
Device internally powered; external power supply. Class II.
Patient Protection
Type BF
Ingress Protection
IP22
Environmental Short term storage and transport temperature
-25 to 70°C (-13 to 158°F)
Long term storage temperature
5 to 40°C (41 to 104°F)
Operational temperature
5 to 40°C (41 to 104°F)
Relative Humidity
15% to 93% RH
Atmospheric Pressure
700 mbar to 1,060 mbar
Compliance UL 60601-1 IEC 60601-1 IEC 60601-1-2 IEC 60601-1-6 IEC 60601-1-8 IEC 60601-1-11 CAN/CSA C22.2 RTCA/DO-160G
20
Replacement parts and accessories The following products are available from Smith & Nephew. Contact Smith & Nephew Customer Assistance for availability and ordering information Part description
REF (product catalog number)
RENASYS™ TOUCH O-ring
66801283
RENASYS TOUCH Odor Filter
66801284
RENASYS TOUCH Class 2 Power Supply
66801286
RENASYS Power Cords: Australia and New Zealand Power Cord
66801560
China Power Cord
66801561
Japan Power Cord
66801562
Brazil Power Cord
66801563
North America and Philippines Power Cord
66801564
United Kingdom Power Cord
66801565
Continental Europe Power Cord
66801566
South Africa and India Power Cord
66801567
RENASYS TOUCH IV pole/bed clamp (66801278)
66801278
RENASYS TOUCH Carry Bag
66801277
RENASYS TOUCH Carry Strap
66801276
RENASYS TOUCH Transit Case
66801279
RENASYS TOUCH Clinician User Manual
66801287
RENASYS TOUCH Home Healthcare User Manual
66801288
RENASYS TOUCH Service Manual
66801289
RENASYS TOUCH 300ml Canister with solidifier
66801273
RENASYS TOUCH 800ml Canister with solidifier
66801274
RENASYS TOUCH 300ml Canister without solidifier
66801275
21