Quick Setup Guide
2 Pages
Preview
Page 1
SONOPET
®
Ultrasonic Aspirator
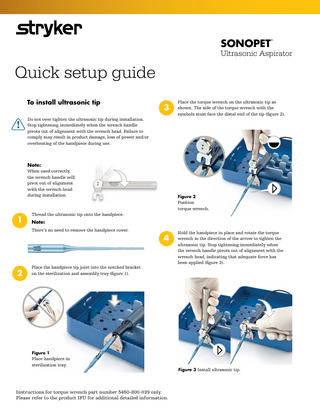
Quick setup guide To install ultrasonic tip
3
Do not over tighten the ultrasonic tip during installation. Stop tightening immediately when the wrench handle pivots out of alignment with the wrench head. Failure to comply may result in product damage, loss of power and/or overheating of the handpiece during use.
Place the torque wrench on the ultrasonic tip as shown. The side of the torque wrench with the symbols must face the distal end of the tip (figure 2).
Note: When used correctly, the wrench handle will pivot out of alignment with the wrench head during installation.
Figure 2
Position torque wrench.
1
Thread the ultrasonic tip onto the handpiece.
Note: There’s no need to remove the handpiece cover.
2
4
Place the handpiece tip joint into the notched bracket on the sterilization and assembly tray (figure 1).
Hold the handpiece in place and rotate the torque wrench in the direction of the arrow to tighten the ultrasonic tip. Stop tightening immediately when the wrench handle pivots out of alignment with the wrench head, indicating that adequate force has been applied (figure 3).
Figure 1
Place handpiece in sterilization tray.
Instructions for torque wrench part number 5450-800-039 only. Please refer to the product IFU for additional detailed information.
Figure 3 Install ultrasonic tip.
SONOPET
To remove ultrasonic tip
Ultrasonic Aspirator
Caution: When removing the ultrasonic tip, DO NOT remove the tip joint.
Note: There is no need to remove the handpiece cover. Removing the tip cover alone will expose the tip joint.
1
Place the handpiece tip joint into the notched bracket on the sterilization and assembly tray (figure 4).
2
Place the torque wrench on the ultrasonic tip as shown. The side of the torque wrench with the symbols must face the distal end of the tip (figure 5).
3
Figure 4
Place handpiece in sterilization tray.
If necessary, reset the head of the torque wrench to its proper position by rotating the handle in the opposite direction of the arrow until it clicks into alignment with the head (figure 6).
4
Hold the handpiece in place and rotate the torque wrench in the opposite direction of the arrow to loosen and remove the ultrasonic tip (figure 6).
5
Discard the ultrasonic tip. See the Disposal/Recycle section in Instructions for Use.
Figure 5
Position torque wrench.
Figure 6 Remove ultrasonic tip.
Instructions for torque wrench part number 5450-800-039 only. Please refer to the product IFU for additional detailed information.
Neuro Spine ENT This document is intended solely for the use of healthcare professionals. A surgeon must always rely on his or her own professional clinical judgment when deciding whether to use a particular product when treating a particular patient. Stryker does not dispense medical advice and recommends that surgeons be trained in the use of any particular product before using it in surgery. The information presented is intended to demonstrate a Stryker product. A surgeon must always refer to the package insert, product label and/or instructions for use, including the instructions for cleaning and sterilization (if applicable), before using any Stryker product. Products may not be available in all markets because product availability is subject to the regulatory and/or medical practices in individual markets. Please contact your Stryker representative if you have questions about the availability of Stryker products in your area. Stryker Corporation or its affiliates own, use, or have applied for the following trademarks or service marks: SONOPET, Stryker. All other trademarks are trademarks of their respective owners or holders. Literature Number: 9100-004-059 Rev. None Copyright © 2016 Stryker
Manufactured by: Stryker Neuro Spine ENT 4100 East Milham Avenue Kalamazoo, MI 49001 USA Tel: 269 323 7700 Fax: 269 353 3026 Toll free: 800 253 3210 stryker.com/nse