Alaris
Alaris Lockbox Accessory Removal of failed Lockset in the Lockbox Issue 1 April 2016
Service Bulletin
4 Pages
Preview
Page 1
Switzerland t CareFusion 317 Sàrl
A-One Business Centre Z.A. Vers-La-Pièce n°10 1180 Rolle / Switzerland +41 21 556 30 00 tel +41 21 556 30 99 fax carefusion.com
Information Notice: IN0214 Issue:
1
Date Issued:
April 2016
Status:
Information Only
Change Order:
15214
Subject:
Alaris™ Syringe Pump Lockbox Accessory
Models:
1000SP01884 and 1000SP01885
Software Version
N/A
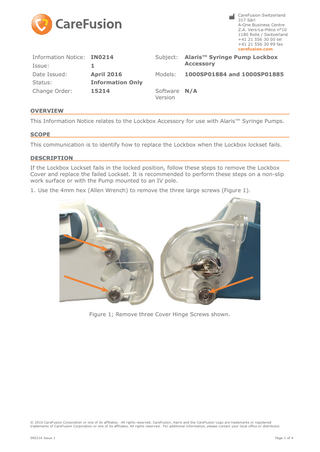
OVERVIEW This Information Notice relates to the Lockbox Accessory for use with Alaris™ Syringe Pumps. SCOPE This communication is to identify how to replace the Lockbox when the Lockbox lockset fails. DESCRIPTION If the Lockbox Lockset fails in the locked position, follow these steps to remove the Lockbox Cover and replace the failed Lockset. It is recommended to perform these steps on a non-slip work surface or with the Pump mounted to an IV pole. 1. Use the 4mm hex (Allen Wrench) to remove the three large screws (Figure 1).
Figure 1; Remove three Cover Hinge Screws shown.
© 2016 CareFusion Corporation or one of its affiliates. All rights reserved. CareFusion, Alaris and the CareFusion Logo are trademarks or registered trademarks of CareFusion Corporation or one of its affiliates. All rights reserved. For additional information, please contact your local office or distributor. IN0214 Issue 1
Page 1 of 4
Switzerland t CareFusion 317 Sàrl
A-One Business Centre Z.A. Vers-La-Pièce n°10 1180 Rolle / Switzerland +41 21 556 30 00 tel +41 21 556 30 99 fax carefusion.com
2. Lift the side of the cover opposite the lock (Figure 2) to gain access to the lock mechanism; use a long flat blade screwdriver or suitable tool to depress the black plastic pawl of the lock to release the Cover.
Figure 2. Lift Cover to gain access and depress lock pawl to release Cover. 3. As the cover is being removed from the pump, note the location of the Cover compression spring (Figure 3); set it aside for reassembly.
Figure 3. Note Location of Cover Compressions Spring.
© 2016 CareFusion Corporation or one of its affiliates. All rights reserved. CareFusion, Alaris and the CareFusion Logo are trademarks or registered trademarks of CareFusion Corporation or one of its affiliates. All rights reserved. For additional information, please contact your local office or distributor. IN0214 Issue 1
Page 2 of 4
Switzerland t CareFusion 317 Sàrl
A-One Business Centre Z.A. Vers-La-Pièce n°10 1180 Rolle / Switzerland +41 21 556 30 00 tel +41 21 556 30 99 fax carefusion.com
4. With the Lockbox Cover removed, fit a deep 7/8” socket over the securing nut of the lockset that is on the inside of the Cover; turn the nut counterclockwise to remove the nut and lock washer. Depress the lock pawl as needed to fit the socket onto the securing nut (Figure 4).
Figure 4. Position the 7/8” Deep socket over the Lock securing nut. 5. Push the lock assembly toward the outside of the Cover to separate it from the Cover. This can be a tight fit, so use a suitable tool to push the lock out if needed (Figure 5). Depress the black lock pawl as needed to remove it from the Cover. Black plastic pawl faces outward
Figure 5. Correct orientation of the Lock (black plastic pawl facing as shown). 6. The Lock can be orientated two ways in the Lockbox Cover; note the correct orientation of the Lock (Figure 5). Install the new Lock onto the Lockbox Cover from the outside of the Cover, orientated as shown; pressing into position. The fit can be tight, so use a suitable tool as needed to fully seat the Lock into the Lockbox Cover. © 2016 CareFusion Corporation or one of its affiliates. All rights reserved. CareFusion, Alaris and the CareFusion Logo are trademarks or registered trademarks of CareFusion Corporation or one of its affiliates. All rights reserved. For additional information, please contact your local office or distributor. IN0214 Issue 1
Page 3 of 4
Switzerland t CareFusion 317 Sàrl
A-One Business Centre Z.A. Vers-La-Pièce n°10 1180 Rolle / Switzerland +41 21 556 30 00 tel +41 21 556 30 99 fax carefusion.com
7. Install first the lock washer, then the nut (Figure 5). Use the 7/8” deep socket wrench (Figure 4) to tighten the nut fully; recommended tightening torque is 4.0 Nm. 8. Position the spring in the spring housing of the Lockbox Baseplate (Figure 6).
Cylindrical Spring Housing on Baseplate
Figure 6. Positioning the Door compression spring before installing Cover Assembly. 9. Replace the Cover Assembly as before, by engaging the springe housing of the Cover with the mating housing on the Baseplate (Figure 6). Replace the three large screws removed in step 1; use the long shoulder screw on the right side of the Lockbox Cover, and the shorter shoulder screw on the left side. Tighten all three screws using the 4mm hex Allen wrench fully without over-tightening, recommended torque is 2.5 Nm. 10. Open and close the lockbox Cover to make sure it operates smoothly and as intended.
REFERENCES Alaris Syringe Pump MK4 Technical Service Manual
1000SM00024
Alaris Syringe Pump MK3 Technical Service Manual
1000SM00001
© 2016 CareFusion Corporation or one of its affiliates. All rights reserved. CareFusion, Alaris and the CareFusion Logo are trademarks or registered trademarks of CareFusion Corporation or one of its affiliates. All rights reserved. For additional information, please contact your local office or distributor. IN0214 Issue 1
Page 4 of 4