Guide
2 Pages
Preview
Page 1
Preparation Technique – Arthrex Angel™ System
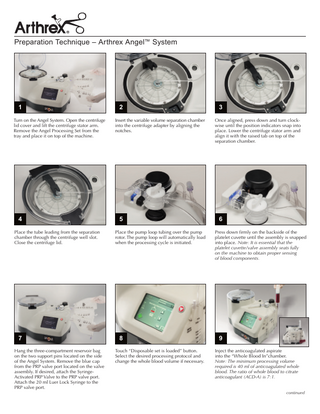
1 Turn on the Angel System. Open the centrifuge lid cover and lift the centrifuge stator arm. Remove the Angel Processing Set from the tray and place it on top of the machine.
4 Place the tube leading from the separation chamber through the centrifuge well slot. Close the centrifuge lid.
7 Hang the three-compartment reservoir bag on the two support pins located on the side of the Angel System. Remove the blue cap from the PRP valve port located on the valve assembly. If desired, attach the SyringeActivated PRP Valve to the PRP valve port. Attach the 20 ml Luer Lock Syringe to the PRP valve port.
2 Insert the variable volume separation chamber into the centrifuge adapter by aligning the notches.
5 Place the pump loop tubing over the pump rotor. The pump loop will automatically load when the processing cycle is initiated.
8 Touch “Disposable set is loaded” button. Select the desired processing protocol and change the whole blood volume if necessary.
3 Once aligned, press down and turn clockwise until the position indicators snap into place. Lower the centrifuge stator arm and align it with the raised tab on top of the separation chamber.
6 Press down firmly on the backside of the platelet cuvette until the assembly is snapped into place. Note: It is essential that the platelet cuvette/valve assembly seats fully on the machine to obtain proper sensing of blood components.
9 Inject the anticoagulated aspirate into the “Whole Blood In”chamber. Note: The minimum processing volume required is 40 ml of anticoagulated whole blood. The ratio of whole blood to citrate anticoagulant (ACD-A) is 7:1. continued
Preparation Technique – Arthrex Angel™ System
10
11
12
The Angel System can process 40-180 ml of whole blood or bone marrow aspirate in a single cycle. The approximate spin time for a 40 ml sample is 15 minutes. The spin time for a 180 ml sample is 26 minutes.
The first component to be collected is platelet-poor plasma (PPP). The Angel System will then adjust the valve position to collect PRP until red blood cells are detected and the preset hematocrit is reached.
PRP collection is automated. No manual steps are required for preparation and there are no syringes to change, buffy coats to resuspend or plasma to decant.
Whole Blood vs.Citrate Anticoagulant Mixture (Approximately a 7:1 ratio; seven parts blood to one part citrate anticoagulant)
13 The cycle is complete with the collection of the red blood cells in the RBC Out compartment. To increase the volume of the PRP syringe by diluting with PPP, simply pull back on the plunger of the syringe or it may be withdrawn from the port on the PPP compartment. If another cycle is desired, simply touch “new cycle” on the touch screen. If a new cycle is not desired, touch “end case” on the touchscreen to finalize processing. Note: The Angel System can process up to 180 ml of blood in one cycle or a total of three consecutive cycles for the same patient with the same Processing Set.
www.arthrex.com © 2015, Arthrex, Inc. All rights reserved. LM1-00002-EN_A
Total Volume of Anticoagulated Whole Blood (ml)
Volume of ACD-A (ml)
Volume of Whole Blood Drawn (ml)
40
5
35
50
6
44
60
8
52
70
9
61
80
10
70
90
12
78
100
13
87
110
14
96
120
16
104
130
16
114
140
18
122
150
19
131
160
20
140
170
21
149
180
24
156