Quick Start Guide
8 Pages
Preview
Page 1
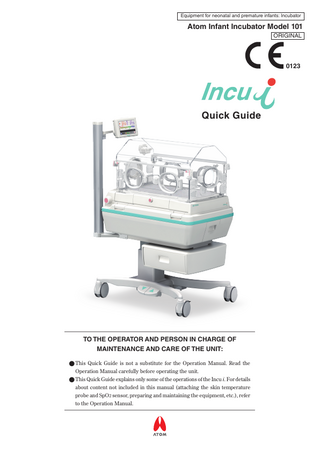
Equipment for neonatal and premature infants: Incubator
Atom Infant Incubator Model 101 ORIGINAL
0123
Quick Guide
TO THE OPERATOR AND PERSON IN CHARGE OF MAINTENANCE AND CARE OF THE UNIT: ● This Quick Guide is not a substitute for the Operation Manual. Read the Operation Manual carefully before operating the unit. ● This Quick Guide explains only some of the operations of the Incu i. For details about content not included in this manual (attaching the skin temperature probe and SpO2 sensor, preparing and maintaining the equipment, etc.), refer to the Operation Manual.
Preparation Before Use
Other Operations
■ Switching on the Power... P.3
■ Setting the Pulse Oximeter Alarm... P.7
■ Raising and Lowering the Hi-Low Stand... P.3
■ Weighing the Infant... P.8
Incubator Mode ■ Setting Incubator Air Temperature/ Skin Temperature... P.4 ■ Adjusting the Humidity... P.5 ■ Using the Oxygen Functions... P.6
[Control panel] Normal state
When switched to message area
Message area
Message area
Screen display switch area
[Rear] Sensor module
Humidity chamber cover
Foot switch
2
■ Switching on the Power Preparation Before Use
At the rear of the main body of the incubator: ① Insert the power cord in the AC inlet. ② Turn the power switch on.
① ②
Power switch
AC inlet Power cord
■ Raising and Lowering the Hi-Low Stand ● Step on the pedal of the foot switch to raise the Hi-Low stand. ● Step on the pedal of the foot switch to lower the Hi-Low stand.
When raising (
When lowering (
pedal)
pedal)
3
■ Setting Incubator Air Temperature/Skin Temperature ● Touch the temperature area to switch the message area.
● Select the control mode in the message area.
Incubator Mode
Servo Control
The incubator air temperature is automatically controlled to maintain the infant’s skin temperature.
Manual Control
The incubator air temperature is set manually.
Servo Control ● 37.5°C or lower Set the skin temperature by touching the switches.
● 37.6°C or higher (override mode) , then set the skin temperature Touch by touching the switches.
Memo If you set the temperature to 37.5°C or less, the override mode is automatically canceled.
● Touch
4
to close the message area.
Manual Control ● 37.0°C or lower Set the incubator air temperature by touching the
switches.
● 37.1°C or higher (override mode) , then set the incubator air temTouch perature by touching the switches.
Memo If you set the temperature to 37.0°C or less, the override mode is automatically canceled.
■ Adjusting the Humidity ● Make the necessary preparations.
① Open the humidity chamber cover and remove the cartridge tank. Humidity chamber
② Fill up the cartridge tank and replace it to its former position. Cartridge tank
Humidity chamber cover
Sterile distilled water Cartridge tank
Incubator Mode
● Touch the relative humidity area to switch the message area.
● Touch
in the message area for humidity control.
✽ To stop humidification, touch
.
● Adjust the humidity by touching the
● Touch
switches.
to close the message area.
5
■ Using the Oxygen Function ● Touch the oxygen area to switch the message area.
<Calibrating the oxygen sensor>
<Setting the Oxygen Concentration>
Incubator Mode
Calibrate the oxygen sensor before using the incubator. The oxygen sensor cannot be correctly calibrated while using the oxygen function.
● Touch in the message area to start the oxygen function.
Display the message area while the oxygen concentration is displayed in the oxygen area. ● Touch
in the message area.
● Set an oxygen concentration value by touching the
switches.
● The following message is displayed. ● Touch ● Pull the sensor module at the rear of the main body of the incubator slightly toward you. ① Release the sensor module lock. ② While pressing the lever, pull out the sensor module fully without removing it from the hood.
Lever
①
Sensor module
②
③ A message is displayed on the control panel and calibration is started.
● The message disappears when calibration is completed. Confirm that the message has disappeared, and return the sensor module to its original position.
6
to close the message area.
Stopping the Oxygen Function ● Touch
.
● Touch
.
■ Setting the Pulse Oximeter Alarm ● Touch the SpO2 area or pulse rate area to switch the message area.
Pulse rate area SpO2 area
<Setting the SpO2 Upper Limit/Lower Alarm Limits>
<Setting the Pulse Rate Upper Limit/Lower Alarm Limits>
● Select the lower limit or upper limit for the alarm.
● Select the lower limit or upper limit for the alarm.
Touch limit.
for the lower limit, and
for the upper
● Set the upper or lower limit values by touching the
to close the message area.
for the lower limit, and
for the upper
● Set the upper or lower limit values by touching the
● Touch
switches.
Other Operations
● Touch
switches.
Touch limit.
to close the message area.
Setting the alarm to OFF
Setting the alarm to OFF
Touch the switch with the upper limit at 99%, or the switch with the lower limit at 45%. The numerical value is displayed as “- -” and the alarm is turned off.
Touch the switch with the upper limit at 240bpm, or the switch with the lower limit at 35bpm. The numerical value is displayed as “- - -” and the alarm is turned off.
7
C6591630
■ Weighing the Infant Weights under 300g cannot be measured.
● Touch
in the screen display switch area to display the weight screen.
● Touch
, and measure the infant’s weight following the displayed instructions.
● Measurement is completed when the weight is displayed.
to record the weight, and touch ● Touch more to weigh the infant again.
once
Other Operations
If Measurement Was Not Correctly Completed Someone may be leaning on the mattress platform, or the infant may be touching the mattress platform while tare weight measurement is in progress. Perform the tare weighing process again while taking care that nothing comes into contact with the mattress platform.
Repeat weighing by touching
If the infant is actively moving, he/she cannot be weighed. Weigh the infant again when he/she has settled down.
Repeat weighing by touching
3-18-15, Hongo, Bunkyo-ku, Tokyo, Japan Tel: +81 3 38152311 Fax: +81 3 38123144 201105