Cleaning Procedure
2 Pages

Preview
Page 1
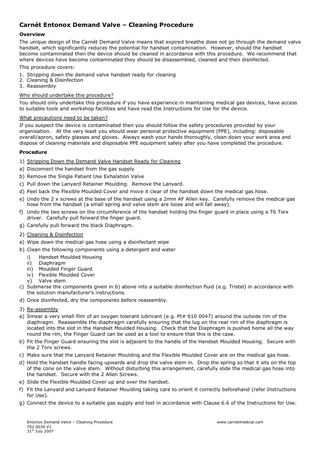
Carnét Entonox Demand Valve – Cleaning Procedure Overview The unique design of the Carnét Demand Valve means that expired breathe does not go through the demand valve handset, which significantly reduces the potential for handset contamination. However, should the handset become contaminated then the device should be cleaned in accordance with this procedure. We recommend that where devices have become contaminated they should be disassembled, cleaned and then disinfected. This procedure covers: 1. Stripping down the demand valve handset ready for cleaning 2. Cleaning & Disinfection 3. Reassembly Who should undertake this procedure? You should only undertake this procedure if you have experience in maintaining medical gas devices, have access to suitable tools and workshop facilities and have read the Instructions for Use for the device. What precautions need to be taken? If you suspect the device is contaminated then you should follow the safety procedures provided by your organisation. At the very least you should wear personal protective equipment (PPE), including: disposable overall/apron, safety glasses and gloves. Always wash your hands thoroughly, clean down your work area and dispose of cleaning materials and disposable PPE equipment safely after you have completed the procedure. Procedure 1) Stripping Down the Demand Valve Handset Ready for Cleaning a) Disconnect the handset from the gas supply b) Remove the Single Patient Use Exhalation Valve c) Pull down the Lanyard Retainer Moulding. Remove the Lanyard. d) Peel back the Flexible Moulded Cover and move it clear of the handset down the medical gas hose. e) Undo the 2 x screws at the base of the handset using a 2mm AF Allen key. Carefully remove the medical gas hose from the handset (a small spring and valve stem are loose and will fall away). f) Undo the two screws on the circumference of the handset holding the finger guard in place using a T6 Torx driver. Carefully pull forward the finger guard. g) Carefully pull forward the black Diaphragm. 2) Cleaning & Disinfection a) Wipe down the medical gas hose using a disinfectant wipe b) Clean the following components using a detergent and water i) Handset Moulded Housing ii) Diaphragm iii) Moulded Finger Guard iv) Flexible Moulded Cover v) Valve stem c) Submerse the components given in b) above into a suitable disinfection fluid (e.g. Tristel) in accordance with the solution manufacturer’s instructions. d) Once disinfected, dry the components before reassembly. 3) Re-assembly a) Smear a very small film of an oxygen tolerant lubricant (e.g. Pt# 610 0047) around the outside rim of the diaphragm. Reassemble the diaphragm carefully ensuring that the lug on the rear rim of the diaphragm is located into the slot in the Handset Moulded Housing. Check that the Diaphragm is pushed home all the way round the rim, the Finger Guard can be used as a tool to ensure that this is the case. b) Fit the Finger Guard ensuring the slot is adjacent to the handle of the Handset Moulded Housing. Secure with the 2 Torx screws. c) Make sure that the Lanyard Retainer Moulding and the Flexible Moulded Cover are on the medical gas hose. d) Hold the handset handle facing upwards and drop the valve stem in. Drop the spring so that it sits on the top of the cone on the valve stem. Without disturbing this arrangement, carefully slide the medical gas hose into the handset. Secure with the 2 Allen Screws. e) Slide the Flexible Moulded Cover up and over the handset. f) Fit the Lanyard and Lanyard Retainer Moulding taking care to orient it correctly beforehand (refer Instructions for Use). g) Connect the device to a suitable gas supply and test in accordance with Clause 6.6 of the Instructions for Use.
Entonox Demand Valve – Cleaning Procedure 702 0039 V1 31st July 2007
www.carnetmedical.com
8 1
No.
Item
1
Flexible Moulded Cover
2
Moulded Handset Housing
3
Valve Stem
4
Spring
5
Finger Guard
6
Diaphragm
7
2 mm AF Allen Screws
8
Torx 6 Finger Guard Retainer Screws
2 5 3
6 7
Entonox Demand Valve – Cleaning Procedure 702 0039 V1 31st July 2007
4
www.carnetmedical.com