care of sweden
Pressure Care Mattresses
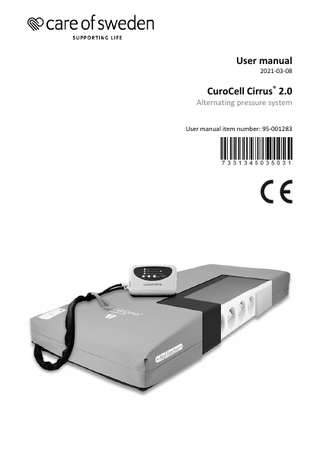
CuroCell Cirrus 2.0 Alternating pressure system Instructions for Use March 2021
Instructions for Use
24 Pages
Preview
Page 1
User manual 2021-03-08
CuroCell Cirrus® 2.0
Alternating pressure system User manual item number: 95-001283
Contents Important safety precautions
3
Introduction
4
Product description
8
Assembly/Installation
11
Operation
12
Cleaning and reconditioning
14
Storage
15
Maintenance
16
Troubleshooting
17
Technical description
18
Spare parts
20
Options and accessories
21
Warranty
22
Other information
23
2
IMPORTANT SAFETY PRECAUTIONS Read all instructions prior to use
WARNING! To minimise the risk of fire, electric shocks or bodily injury: 1
The product must only be used for its intended purpose as described in this manual. The product may not be combined, assembled or repaired with other parts (e.g. pump and mattress), accessories or spare parts other than those described in this manual or other documentation from Care of Sweden.
2
Do not use the pump in wet rooms or where there is a risk of the pump coming into contact with water or another liquid. Never handle a pump that has come into contact with water/liquid. Pull the plug out of the electrical socket immediately and send the product to an authorised service technician for servicing.
3
DO NOT USE in the vicinity of or in contact with fire sources/hot surfaces, such as fire, burning cigarettes or hot lamps. Although the product has undergone fire testing, it could become damaged if it comes into contact with fire sources.
4
Position and use the product in a manner that prevents it from becoming trapped or damaged. NOTE: Be particularly aware of trapping damage when using bed rails.
5
Never use the product if the pump power cord or plug is defective, the pump casing is damaged or it is not functioning properly. Contact a service technician for examination and repair.
6
Regularly check product functionality through a hand check (see section 4.4). Also check that the comfort setting is correct as indicated in the table on the pump.
7
Continual monitoring is required when the product is used for individuals needing special supervision, such as children.
8
The mattress is protected by a hygiene cover; avoid using multiple hygiene covers as this can affect the vapor permeability of the mattress.
9
The hygiene cover does not allow liquid or air to penetrate, but is vapour permeable. Make sure that the user is positioned correctly to avoid the risk of suffocation.
10 Prevent damage to the hygiene cover from sharp objects. 11 If the cover is equipped with side handles, these are for lifting the mattress. All other use takes place under your own liability and is not covered by the product guarantee. 12 In order to minimize the risk of wounds occurring on the feet, make sure that the user doesn’t come into contact with the hangers of the pump.
3
1. Introduction CuroCell® air mattresses operate according to the alternating pressure principle, a technique that is well proven and been used for a long time. Alternating pressure is when the pressure regularly alternates between the mattress cells to replicate body movement. Variable pressure cycles are set up where there is little or no pressure. This is optimal for skin improvement or to prevent skin damage. Always read the user manual prior to use.
1.1 General information This CuroCell® mattress is a medical device in accordance to Medical Device Regulation MDR (2017/745). According to statutory regulations made by the authorietes regarding medical devices, the manufacturer is required to report all accidents or incidents involving there products. We would be very grateful for all information involving accidents or incidents relating to our products, by reporting them immediately to us, here at Care of Sweden. The system has been tested and approved according to the following standards: IEC 600601-1, IEC 60601-1-2, SS-EN ISO 12182, SS-EN ISO 14971, SS-EN ISO 10993, EN 597-1, EN 597-2.
1.2 Intended use CuroCell Cirrus® 2.0 combines alternating pressure with soft foam and can be used in all types of health environments, to prevent pressure ulcers, and as an aid in the treatment of category 4(1)(*). It is suitable for lightweight and sensitive people. The mattress has a built in heel function for added relief of heels and reinforced sidewalls for better stability. The mattress is placed directly on the bed. Recommended user weight up to 230 kg. Cleaning of the mattress shall be made between replacements of each user. We recommend that position changes are made regularly. The time interval must be evaluated by the responsibel personnel, depending on the user´s status diagnosis and general condition.
4
NOTE!
• When used together with positioning pillows, read the pillow user manual carefully for correct positioning of the user. • If you are using this product with an evacuation sheet/evacuation cover, it is the user’s responsibility to ensure that it is safe to use for evacuation. • Be careful when using bed rails or other protection on the bed so that the mattress does not become trapped or damaged. • The mattress must not be lifted with a person lying on it or used for any other type of transport other than a possible evacuation using an evacuation sheet. • This mattress is unsuitable for x-ray examinations because of the risk of blurred images or artefacts that may lead to diagnostics error. (1) National Pressure Ulcer Advisory Panel, European Pressure Ulcer Advisory Panel and Pan Pacific Pressure Injury Alliance. Prevention and Treatment of Pressure Ulcers: Quick Reference Guide. Emily Haesler (Ed.). Cambridge Media: Osborne Park, Western Australia; 2014.
1.3 Other information Action plan Pressure ulcers For the best possible results when using this product, we recommend a structured and planned approach. Examples that can be applied to the use of our products can be found in the ‘Action plan for pressure ulcers’ guidelines. Mattress guide This guide provides guidance to personnel and prescribers when choosing a mattress from Care of Sweden. CuroCell Cirrus 2.0 is a mattress in function group C. This information can be obtained from our website, www. careofsweden.com, or ordered from Customer Services (see contact information on the final page). Evac-cover A cover with protected zipper on all sides, divisible (top and bottom part). Functional handles for evacuation, moving and transport. Colour grey/black.
1.4 Evacuation instructions Evac is a mattress cover with a built-in function for evacuation of bed-bound users. In case of fire or other emergency, there is no time to think about what to do next. Therefore, it is very important that the safety equipment, as well as the evacuation procedures, are well planned and known in advance. The Evac cover is equipped with three handles on the head and foot end. On the sides, there are handles with Velcro straps. These straps are to be used to fixate the user to the mattress before commencing the evacuation. The straps are folded in the protective pockets on the side of the mattress with the ends sticking out to ensure that they are easy to pull out. WARNING! Person to perform an evacuation needs to have the necessary training. Always check the equipment, cover and mattress before commencing, to make sure an evacuation can be carried out safely. It is the user’s responsibility to ensure that it is safe to use for evacuation. 5
Evacuation instructions
Down from the bed • Inform the user about what will happen. • Lower and lock the bed in position. • Disconnect the tubes from the pump. • Pull out and fasten the Velcro straps. • Use the outer handles at the foot end of the mattress and turn the mattress out from the bed. • Slowly pull the user down on to the floor. On an even surface • Pull on the outer handles at the foot end of the mattress. • Working position should be a little bit leaning back. Down the stairs • Walk backwards until the main part of the mattress has slide pass the top stair. • Turn the back to the user and look in the moving direction. • Hold one hand on the stair handle and pull with the other hand on the middle handle of the mattress. • Walk down the stairs. It is important to maintain speed, without running.
Training/practise
To bear in mind when training. Pulling down from the bed: • The user in the bed should not be at the very top of the mattress. There could be a risk of hitting the head in the bed when pulling down. Pulling in the stairs: • Start with pulling an empty mattress down the stairs, in order to practice the technique. • When training with a person on the mattress, a string or rope can be fasten in the handles at the head end. Another person can then walk behind the mattress and help out if problems should occur. • It is advisable to practice in the same stairs where an evacuation can be necessary. 6
General: • The main purpose of the training is not to reach high speed, but to learn the correct technique. Training covers • Because of the heavy strain on the equipment when evacuating, always check the seams and handles at the end of training. We recommend that equipment used for training is marked with “Training equipment” and is only used for this purpose.
Explanations
• If the Velcro straps are not used, there is a risk of the user sliding/rolling down from the mattress. • Pulling at the foot end reduces the strain on the puller, which means faster and safer evacuation is possible. • Pulling in the stairs is the most difficult part of the evacuation and should be practiced extra carefully. • The arms of the user shall be inside of the Velcro straps. This way reduces the risk of the user grabbing hold to something out of fear.
NOTE!
When using wider mattresses, make sure that the evacuation routes are clear (size of doors etc.). Responsible personnel have to ensure that the evacuation can be performed safely. To ensure proper function of the Evac cover, it is important to regularly check the quality of the mattress. Check for damages that could cause problems when evacuating.
7
2. Product description 2.1 Pump and mattress CuroCell Cirrus® 2.0 has eight alternating air cells which are encased in HR-foam (high resilient foam). On top of the HR-foam, closest to the user, is a thin layer of visco-elastic foam. 1. CPR (rapid deflation) 2. Pump 3. Mattress 4. Pump connector 3 3
1
1. Air cells
42
2. Foam core
4
1
3. CPR (rapid deflation) 4. Tubes
Cross-section of mattress
1
2
3
4
2.2 Pump The CuroCell Cirrus® 2.0 pump applies alternating pressure that is adapted to the weight of the user. The air cells inflate and deflate with different cycle times. 3
2 4
6
5
1
7 1. Quick connector unit, air 2. Front panel
3. Fuses (2 pcs) 4. Off/On (0/1) 5. Power cord
8
6. Bed hooks 7. Air filter
2.3 Pump functions – control panel 2 1
3
4
6 7
5 1 COMFORT – COMFORT SETTING The appropriate air pressure is selected using the comfort arrows (1-10). Recommendations for different user weights are provided in a table on the pump. 2 CYCLE TIME There are four selectable cycle times. Press the button to select cycle time. 3 PROGRAM (THERAPY) Change the mode by pressing the button, the chosen mode is indicated by the green light. The modes’ order is: Autofirm, Alternate, Static, Alternate - seat inflation, Static - seat inflation. A. Autofirm Autofirm is used to fill the mattress with air completely for firm support. The pump always starts in this mode. When the correct pressure is reached, it changes automatically to the previous setting or to the presetting outlined below. Presetting features for Autofirm process 1. Program (Therapy): Select the required program. 2. Comfort setting: Set the required air pressure (1-10). 3. Cycle time: Select from 10, 15, 20 or 25 minutes. Note: The preset Cycle Time, Comfort Level and Therapy mode will be illuminated to indicate the settings during the Autofirm process. (Autofirm LED is also illuminated.) After mattress is inflated, Autofirm LED will be turned off automatically. B. Alternate In this mode, the pressure alternates between the cells and there are four different cycle times to choose from. C. Static When "Static" is chosen, the alternating process is terminated and the pressure betweenthe cells evens out. The function can be used in association with user care, repositioning/transferring in and out of bed. The function is turned off by pressing the button again, or it will automatically go back to alternating mode after 20 minutes. D. Seat inflation This mode gives extra support when sitting up and can be set for both alternating and static mode. 4 PANEL LOCK Press down the Panel lock button for about 2 seconds to lock or unlock the panel.
9
5 ALARM MUTE Press the ALARM MUTE button to temporarily turn off the alarm. Should the situation not be resolved within 5 minutes, the alarm will be activated again. Please refer to section 8 to troubleshoot any problems with the alarm. A. Power failure alarm During a power failure, both the sound and light alarm will go on. Turn it off by pressing the ALARM MUTE button. B. Low pressure alarm When the low pressure light is on, the pressure in the mattress is below normal. Both the light and sound alarm will activate. The alarm will sound until the ALARM MUTE button is pressed. If the problem remains, see chapter 8 for trouble shooting. 6 SERVICE This light indicates a technical failure in the pump. First check that the air filter is clean and that the pump is not covered by anything (such as a pillow or a blanket). If the problem remains, please contact the manufacturer or your local dealer for further information. 7 POWER Power on/off.
10
3. Assembly/Installation When unpacking the mattress, check that none of the parts are damaged. In the event of damage, contact your distributor before using the product. 1. Place the mattress on the bed base. Note! • Make the bed with sheets for added comfort. • Check that the CPR valve is closed.
2. Hang the pump at the foot end of the bed or place it on a flat, sturdy surface. Route the power cord so that there is no risk of it causing someone to trip, being run over by the bed wheels or getting pinched when the bed is raised or lowered. If a cable holder is used (optional): open the press studs, position the power cord in the pocket and close the press studs. Note! In order to minimize the risk of wounds occurring on the feet, make sure that the user doesn’t come into contact with the hangers of the pump. 3. Connect the air tubes from the mattress to the side of the pump. There is an audible “click” sound when the quick connectors are properly attached.
4. Check that the switch on the pump is in the “0” position (Off). Connect the plug to an approved electrical socket (220 V).
11
4. Operation Note! Always read the user’s manual prior to use.
4.1 Start-up 1. Start the pump by pressing “1” (On) on the side of the pump, as well as pressing the ’Power’ button on the front panel. 2. Air starts to fill up the mattress. It takes about 15 minutes until the mattress is ready for use. Note! The pump always starts in Autofirm mode. 3. The light for ’Low pressure’ is lit until the mattress has reached the set pressure. When the light goes out, the system changes mode (to previous settings) and the mattress is ready to be used.
4.2 Program selection There are four different programs. Please refer to section 2.3 for more details. As a standard setting, we recommend an alternating mode and a 10 minute cycle time.
4.3 Comfort settings
kg
The air pressure in the mattress can be adjusted according to the user´s desire for comfort. ALWAYS consult the prescriber or other authorised personnel for the appropriate setting.
0-44 45-54 55-64 65-74 75-94 95-114 115-144 145-164 165-184 185-230
The mattress is now ready for use. Use the comfort buttons (1-10) to set a suitable air pressure based on the table on the pump. Note! The pump always starts in the Autofirm mode. When the mattress has reached the required pressure, the pump is set automatically to the previously used setting or to the settings made in the Autofirm program. Please refer to section 2.3 for more details.
1 2 3 4 5 6 7 8 9 10
NOTE!
• We recommend the Seat inflation mode for all situations where the head of the bed is raised. • When only parts of the mattress are under load, e.g. if the user is an amputee, the pressure should be increased (1-2 levels). • Always check the set pressure with a “hand check”, see 4.4 for more information.
12
4.4 Hand check (function control) Hand check is used to ensure that the mattress is properly inflated. This should be done regularly, once per shift and after changing the position in the bed or changing the comfort settings. Insert your hand between the air cells directly underneath the user’s pelvic region, use a vertical hand. There should be a clearance of 2-3 fingers between mattress base and the user. If not, you need to adjust the pressure setting.
4.5 CPR To empty the air cells, pull the CPR (cardiopulmonary resuscitation) band placed between §mattress and pump. In case of an emergency where CPR is necessary, follow local instructions. Note! Make sure that the CPR connector is properly connected after use.
4.6 Alarms When the pressure drops to an abnormally low level, the Low Pressure diode lights up together with an audio alarm. Please refer to section 8 for troubleshooting. The alarm is deactivated by pressing the ALARM MUTE button on the pump's control panel. If the problem is not resolved within 5 minutes, the alarm will start again. The diode remains on until the pressure level is remedied and reset. The pump is also fitted with a Power Failure alarm. An alarm sounds and flashes when the pump is disconnected from the electric power. Turn off the alarm by pressing the ’ALARM MUTE’ button.
WARNING!
If the air pressure remains low, check the mattress and tubes for damage. Repair if necessary or contact the manufacturer or your local dealer for help.
4.7 Transport function If the user must be moved in bed, the tubes can be connected together (detached from the pump) and the mattress is put in “transport mode”. We recommend that this function is only used for short periods of time.
13
5. Cleaning and reconditioning It is important to follow the instructions below before using the product for another user. Consult the Clinician responsible or the supplier for help and instructions when unsure.
5.1 Cleaning PUMP
WARNING!
• Do not open the pump housing – risk of electric shock. Service and maintenance must be performed by authorised technicians. • Do not get the pump wet or submerge it in any liquid. Wipe of the pump with a damp cloth and a mild cleaning solution for this purpose such as: alcohol with or without tensides, Isopropanol 70 %, oxidating solutions or chlorine max 1 %. If using a different agent, choose one that does not affect the pump housing. MATTRESS COVER Covers can be wiped off with a mild cleaning solution for this purpose such as: alcohol with or without tensides, Isopropanol 70 %, oxidating solutions or chlorine max 1 %. Excrements and blood spots must be removed immediately with cold water. Multi-layer covers should be divided before washing. Wash with similar colours. Chlorine and phenol-based cleaners could have a negative impact on the PU surface and should be avoided. If chlorine is used, we recommend a mixture of max. 1%. INNER COVER ELASTIC Clean the affected area with a mild cleaning solution for this purpose such as: alcohol with or without tensides, Isopropanol 70 %, oxidating solutions or chlorine max 1 %.
14
5.2 Reconditioning PUMP See section 5.1 for instructions. MATTRESS 1. Remove the covers. See instructions in chapter 5.1 for cleaning covers. 2. Disconnect the tubes from the pump. 3. Carefully pull the air cells out from the foam core. Note! Be cautious when handling the sidewall. 4. Place the air cells and the tubes on a clean area which is suitable for washing. 5. Wipe off the cells, all tubes and the CPR valve with a mild cleaning solution for this purpose such as: alcohol with or without tensides, Isopropanol 70 %, oxidating solutions or chlorine max 1 %. 6. Place the air cells back into the foam core. Check that all the tubes and connectors are secure and tight, before closing the cover. 7. Wipe off work surfaces with a mild cleaning solution for this purpose such as: alcohol with or without tensides, Isopropanol 70 %, oxidating solutions or chlorine max 1 %. If cells for any reason have loosened from the tubes, these must be replaced according to drawing in chapter 2.1 FOAM CORE Clean the affect area with a mild cleaning solution for this purpose such as: alcohol with or without tensides, Isopropanol 70 %, oxidating solutions or chlorine max 1 %. Press out the water carefully. Let the foam core dry in a warm, ventilated area, without direct exposure of sunlight. The foam core needs to be completely dry before it is used again.
NOTE!
Check the hygiene cover each time the product is cleaned. If damaged, it must be replaced or repaired. Also check the pump, tube connectors and power cord during cleaning. Damaged parts must be replaced or repaired.
6. Storage Store the mattress on a flat surface or carefully rolled/folded with the zipper closed. Always store at room temperature in a dry area. Make sure the mattress is stored where it will not be exposed to thrusts, impact or other things that can damage it. Avoid direct exposure of sunlight. If the mattress is to be stored more than 3 months, we recommend it is stored on a flat surface (not folded or rolled up).
15
7. Maintenance 7.1 General 1. Check the power cord and plug for damage and scratches. 2. Check that the mattress cover is intact and that the cover and air cells are correctly assembled. 3. Check that the air flow alternates between each outlet on the side of the pump. 4. Check for damaged or pinched tubes and connectors. Contact the manufacturer or your local dealer for spare parts.
7.2 Changing fuses 1. Pull the plug out of the electrical socket before replacing fuses. 2. Remove the cover from the fuses with a screwdriver. Pull out the fuse holder. 3. Fit a new fuse of the same type (T1A/250V) and screw the protective cover back in place. There are two fuses.
7.3 Changing the air filter 1. Unscrew the round safety plate on the back of the pump. 2. Lean the pump backwards in order for the filter to fall out from the holder. 3. Place the cleaned/new filter in the filter holder and replace the safety plate. If the pump is used in a dirty environment, the filter should be checked regularly.
16
8. Troubleshooting Problem Pump does not start
Solution Check that the power cord is connected to an approved electrical socket. Check the fuses. Make sure the power switch on the pump side is set to “1”.
Alarm is on and mattress is losing air
Check that the quick connectors on the air tubes are properly connected to the side of the pump. Check that the CPR valve is closed. Check that all tube connectors are properly seated and connected. Open the mattress and check for leaks from air cells or tubes.
The user is bottoming out
The pressure might be incorrectly set. Adjust according to the weight table and wait a few minutes. Check again using a hand check (see section 4.4). Check that the CPR valve is closed.
Some cells have less air
This is normal since the cells are alternately inflated and deflated when the system is set to alternating mode.
Pump is noisy, vibrations are felt
Check that the pump hangs correctly on the bed. Resonance can occur in parts of the bed. Remove the pump and listen whether this makes a difference. Can be resolved by putting the pump on a flat, steady surface or by placing a towel between the pump and bed.
If your questions are not answered by the above information, please contact the manufacturer or your local dealer.
17
9. Technical key 9.1 Technical specification PUMP
Model Voltage Current consumption Fuse type Cycle time Dimensions (BxLxH) Weight Surroundings
SPECIFICATION
Temperature Humidity
Classification
Athmospheric pressure
MATTRESS
CuroCell Vari 220 V-240 V / 50-60 Hz 0.07 A T1A/250V 10, 15, 20 or 25 min 29.1 x 11.7 x 20 cm 2.2 kg Operations: 10°C ˜ 40°C Storage: -15°C ˜ 50°C Shipping: -15°C ˜ 70°C Operations: 10% ˜ 90% non-condensing Storage: 10% ˜ 90% non-condensing 700hPa-1060hPa Class II, Type BF, IP41
SPECIFICATION CuroCell Cirrus® 2.0
Model Dimensions (BxLxH) Weight
80/85/90/105/120x200x21 cm 18 kg (width 85 cm)
NOTE: The manufacturer retains the right to modify the product specification at any time.
WARNING!
Follow the operations and maintenance instructions carefully in order to prevent bodily injuries, as well as damages to the product or other equipment.
9.2 Labelling The mattress is labelled with product name, production date, article number, size, care and wash instructions, EAN-bar code, as well as space for own labelling. The product also displays which side is up/down and head/foot.
18
9.3 Symbol Definitions XXXX-XX-XX Article No
Manufacturer
Year-Month-Day
Foot placement
Read the user manual
Group of function
CE marked acc. to Medical Device Regulation MDR (2017/745)
Recycling
Do not dispose of with household waste; follow recycling instructions
Recommended user weight
User information – category
Directly on bed base
Recommended user weight when using Evac function
Counteract shear force
Heel function
Do not wash
Machine wash at 70 °C
Machine wash at 95 °C
Do not tumble dry
Drip dry
Do not iron
Do not dry clean
Wipe off
Class II equipment (Double Insulated)
Type BF
IP-class (Ingress Protection Rating)
Temperature range
The mattress should only be used lying in the lengthwise direction on the
Chlorine
Distributed by
UDI
19
Tumble dry
Medical Device
10. Spare parts Cover Stone/Evac Size
Art. no. Top part Stone
Art. no. Bottom part Evac
80x200 cm 80x210 cm 85x200 cm 85x210 cm 90x200 cm 90x210 cm 105x200 cm 105x210 cm 120x200 cm 120x210 cm
CC-926010 CC-926011 CC-926012 CC-926013 CC-926014 CC-926015 CC-926016 CC-926017 CC-926018 CC-926019
CC-926210 CC-926211 CC-926212 CC-926213 CC-926214 CC-926215 CC-926216 CC-926217 CC-926218 CC-926219
Art. no. CC-901801 CC-901802 CC-901803 CC-901804 CC-901805
Description Air cell for mattress width 80 cm Air cell for mattress width 85 cm Air cell for mattress width 90 cm Air cell for mattress width 105 cm Air cell for mattress width 120 cm
CC-8217 CC-8202
Fuse (set of 2) Air filter
If other spare parts are needed, please contact your distributor.
20
Art. no. Complete Stone/Evac
CC-925810 CC-925811 CC-925812 CC-925813 CC-925814 CC-925815 CC-925816 CC-925817 CC-925818 CC-925819