CARESCAPE
Anaesthesia System Aisys
DIVA Labs Cable Management Kit for D19KT LCD Display Model 1926A Assembly Instructions
Assembly Instructions
4 Pages
Preview
Page 1
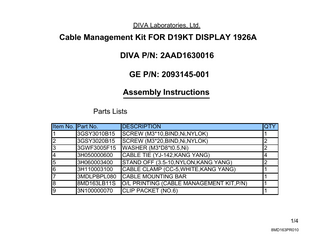
DIVA Laboratories, Ltd.
Cable Management Kit FOR D19KT DISPLAY 1926A DIVA P/N: 2AAD1630016 GE P/N: 2093145-001 Assembly Instructions Parts Lists Item No. Part No. DESCRIPTION 1 3GSY3010B15 SCREW (M3*10,BIND,Ni,NYLOK) 2 3GSY3020B15 SCREW (M3*20,BIND,Ni,NYLOK) 3 3GWF3005F15 WASHER (M3*D8*t0.5,Ni) 4 3H050000600 CABLE TIE (YJ-142,KANG YANG) 5 3H060003400 STAND OFF (3.5-10,NYLON,KANG YANG) 6 3H110003100 CABLE CLAMP (CC-5,WHITE,KANG YANG) 7 3MDLPBPL080 CABLE MOUNTING BAR 8 8MD163LB11S O/L PRINTING (CABLE MANAGEMENT KIT,P/N) CLIP PACKET (NO.6) 9 3N100000070
QTY 1 2 2 4 2 1 1 1 1
1/4 8MD163PR010
STEP 1: Pre assemble cable ties (4) to the mounting bar. Note orientation of cable ties heads.
STEP 3: Install pre assembled cable ties to the stand off along with M3 X 20L screw (2)
DISPLAY Model D19KT or D15K (Ref)
STEP 4: Screw in M3 X 20L screw using #2 Phillips screw driver.
STEP 2: Install stand off (2) to the existing threaded insert in the display.
STEP 5: Install USB cables.
2/4 8MD163PR010
DISPLAY Model D19KT or D15K (Ref)
STEP 6: Tie cable ties as shown. Cut excess material as shown.
NOTE: Ensure cable ties head to be Perpendicular facing each other as shown To prevent exposure of sharp edges.
3/4
8MD163PR010
POWER CORD MANAGEMENT
Install Cable clamp as show
Install M3 X 10L screw with M3 flat Washer as shown
Power Cord (ref)
Install M3 Flat washer aligned To existing threaded insert
DISPLAY Model D19KT or D15K (Ref)
Finish
Screw in Cable Clamp assembly
4/4 8MD163PR010