Connex
WelchAllyn CP Series Electrocardiographs
CP 150 Spirometry Option Directions for Use sw ver 2.00.XX Ver F
Directions for Use
68 Pages
Preview
Page 1
CP 150 spirometry option
Directions for use
© 2014 Welch Allyn, Inc. To support the intended use of the product described in this publication, the purchaser of the product is permitted to copy this publication, for internal distribution only, from the media provided by Welch Allyn. Caution: Federal US law restricts sale of the device identified in this manual to, or on the order of, a licensed physician. Welch Allyn assumes no responsibility for any injury, or for any illegal or improper use of the product, that may result from failure to use this product in accordance with the instructions, cautions, warnings, or indications for use published in this manual. Welch Allyn is a registered trademark of Welch Allyn, Inc. CP 150, and CardioPerfect are trademarks of Welch Allyn, Inc. Patent information For patent information, please visit www.welchallyn.com/patents. Software in this product is copyright Welch Allyn or its vendors. All rights are reserved. The software is protected by United States of America copyright laws and international treaty provisions applicable worldwide. Under such laws, the licensee is entitled to use the copy of the software incorporated within this instrument as intended in the operation of the product in which it is embedded. The software may not be copied, decompiled, reverse-engineered, disassembled or otherwise reduced to human-perceivable form. This is not a sale of the software or any copy of the software; all right, title and ownership of the software remains with Welch Allyn or its vendors. Welch Allyn Technical Support: http://www.welchallyn.com/about/company/locations.htm 105661 (CD) DIR 80018004 Ver. F
Material Number 720167, DIR 80018004 Ver. F
Regulatory Affairs Representative Welch Allyn, Inc. 4341 State Street Road
Welch Allyn Limited
Skaneateles Falls, NY 13153-0220 U.S.A.
Dublin Road
www.welchallyn.com
Navan Business Park Navan, County Meath Republic of Ireland
iii
Contents Introduction ... 1
About this document ... 1 Intended use ... 1 Indications for use ... 2 Contraindications ... 2 Description ... 2 Features ... 2 Controls, indicators, and connectors ... 4 Symbols ... 7 General warnings ... 8 General cautions ... 9
Setup ... 11 Connecting the Spirometer ... 11
Settings ... 15
Viewing or changing the spirometry settings ... 15
Spirometry home screen ... 17
Spirometry home screen ... 17
About calibration ... 21 Performing a calibration ... 21 Calibrate multiple flows ... 24
Preparing the patient ... 27 Spirometry tests ... 29
Overview of the testing process ... 29 Performing a new Forced Vital Capacity spirometry test ... 30 Continue saved test ... 34 Performing a spirometry post test ... 36 Working with a Saved test ... 37
Troubleshooting ... 39
Symptoms and solutions ... 39
Maintenance ... 41 Cleaning the spirometer, calibration syringe, and patient handle ... 41 Limited warranty ... 42 Service policy ... 42
iv Contents
CP 150 spirometry option
Specifications ... 43 Spirometry protocols ... 45
About the PCP protocol ... 45 About the NIOSH protocol ... 45
About the patient help sheets ... 47 Adult smokers help sheet ... 48 Asthma symptoms help sheet ... 49
Predictive Norms, etc. ... 51 About Norm extrapolation ... 51 About race adjustment ... 51 About composite Norm values ... 52 About lung age ... 52 List of Norm-related clinical studies ... 54 About quality feedback ... 56 Understanding your interpretation results ... 57 References ... 58
Glossary ... 59
1
Introduction About this document This manual is written for clinical professionals performing pulmonary function testing. Users must be familiar with measurements and the clinical significance of basic spirometry products. Before using the spirometer, all users and technicians must read and understand this manual and all other information accompanying the CP 150 spirometry option and the CP 150 electrocardiograph. Caregivers need to know how to properly coach patients, to recognize acceptable waveforms, and to know whether results meet ATS reproducibility criteria. The hospital's Biomedical/IT support staff shall require primary skills including disciplines related to maintenance and servicing computer controls/platforms. It is recommended that users attend a certified spirometry training course. The instructions given here are only a guide and should not be used to train a technician. Note
This manual supplements the CP 150 electrocardiograph manual, entitled CP 150 12-lead resting electrocardiograph Directions for use.
See the electrocardiograph manual for procedures that are common to both ECG and spirometry functions, such as how to move through the menus or how to search for patient data.
Intended use The CP 150 spirometry option allows the user to acquire, view, store, and print measures and waveforms of pulmonary function including, but not limited to, maximal volume and flow of air that can be moved in and out of a patient's lungs. These measures are used in the diagnosis and monitoring of lung diseases and interventions for the treatment of certain lung diseases. The spirometer should only be used with patients who are able to understand the instructions for performing the test.
2
Introduction
CP 150 spirometry option
Indications for use The spirometer is a device that measures lung air volume and airflow rate for pulmonary disease diagnosis and screening. These measurements provide information about a patient's pulmonary function which may be compared with normal values or the patient's previous values. The device is designed to test pulmonary function and obtain spirometric indices for •
adult and pediatric patients 12 years and older,
•
hospital and clinic use only.
Contraindications Relative contraindications to performing spirometry: •
hemoptysis of unknown origin (forced expiratory maneuver may aggravate the underlying condition)
•
pneumothorax
•
unstable cardiovascular status (forced expiratory maneuver may worsen angina or cause changes in blood pressure) or recent myocardial infarction or pulmonary embolus
•
thoracic, abdominal, or cerebral aneurysms (danger of rupture due to increased thoracic pressure)
•
presence of an acute disease process that might interfere with test performance (e.g., nausea, vomiting)
•
recent eye (for example, cataract), thoracic and abdominal surgery
•
chest and abdominal pain
Description •
The CP150 is a 12-lead diagnostic ECG device with a spirometry function.
•
The CP150 spirometry option provides the ability to print test records on an internal printer.
•
The CP150 spirometry option allows storage of test records in device memory, external storage media, and external software applications.
•
Automatic interpretation and comparison of best pre-bronchodilator effort to best post-bronchodilator effort
•
Real-time flow/volume and volume/time graphs on full-color LCD display
•
Incentive graphics for patient coaching
•
Multiple predictive norms, including NHANES III
•
Reduced risk of cross-contamination with Welch Allyn single-use, disposable flow transducers
•
Patient education help sheets
•
Instant quality and variability checks for proper test performance
•
Customizable report formats
Features
Directions for use
Introduction
•
Meets ATS/ERS 2005 spirometry standards
•
Single-flow and multiple-flow calibration protocols
•
NIOSH protocols to create reports that meet agency requirements
•
PCP (primary care practitioner) protocol that follows NLHEP guidelines
•
Meets all industry standards, including ATS and NIOSH
•
Transfer results into the CardioPerfect workstation for easy analysis, reviewing, storing, printing, and exporting
•
Compliant with the National Lung Health Education Program (NLHEP) guidelines for office spirometers. For more information about NLHEP criteria, visit http:// www.nlhep.org/spirometer-review-process.html.
3
4
Introduction
CP 150 spirometry option
Controls, indicators, and connectors
No. Feature
Description
1
LCD screen
800 x 480 pixels color touchscreen provides a graphical user interface.
2
Power switch and LED
Power-on/Standby switch. The LED indicates the charging status when connected to AC power: • Green: The battery is charged. • Amber: The battery is charging.
3
Patient cable connector
Provides connection for patient cable.
4
Printer
Spirometry FVC report Efforts: • All efforts: Prints all efforts. • Three best efforts: Prints the three best efforts of each type that was saved. • Only the best effort: Prints only the best effort of each type that was saved - best FVC, FVC-pre, FVC-post.
Note
The printer also provides a printout of patient Auto ECG, Stat ECG, or Rhythm ECG.
Directions for use
Introduction
5
Back view No. Feature
Description
1
Ethernet connector
Provides a hardwired connection to the computer network. The LEDs indicate active network status when the ethernet cable is connected to a network.
2
Clients USB
USB, type "mini B." Provides connection to an enabled host.
3
Host USB
USB, type "A." Provides four host USB connections for optional accessories.
4
Power connection
Provides an external AC power connection.
5
AC fuse
Provides access to AC fuse.
6
Ground lug (equipotential terminal)
Provided for electrical safety testing and as a means for connection of a potential equalization conductor.
7
Battery compartment (behind cover)
Houses the Li-ion battery.
6
Introduction
CP 150 spirometry option
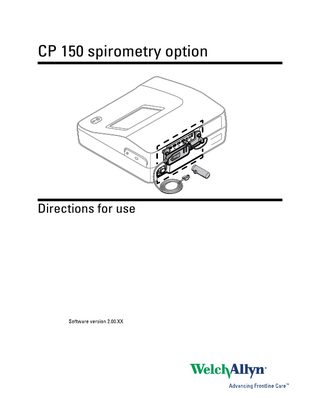
Spirometry option back view
No. Feature
Description
1
Bracket
Spirometer sensor mounting bracket
2
Thumb screws
Thumb screws to attach bracket to device
3
USB cable
Provides spirometer sensor connection to device
4
Spirometer sensor
USB spirometer sensor
5
Disposable flow transducers
Measures patient air velocity. Connects to pressure tubing.
6
Pressure tubing
Connects flow transducer to USB spirometer sensor
7
Patient handle
Holds flow transducer and pressure tubing
Directions for use
Introduction
7
Symbols Documentation symbols WARNING The warning statements in this manual identify conditions or practices that could lead to illness, injury, or death.
Caution The caution statements in this manual identify conditions or practices that could result in damage to the equipment or other property, or loss of data. This definition applies to both yellow and black and white symbols.
Consult Directions for Use, Electronic version available at Welchallyn.com, or Hard copy DFU available from Welch Allyn within 7 days.
Meets essential requirements of European Medical Device Directive 93/ 42/EEC.
Shipping, storing, and environment symbols This end up
Keep dry
Fragile
Relative humidity limit
Temperature limits
Atmospheric air-pressure limits
Separate the battery from other disposables for recycling
Recycle
Separate the device from other disposables for recycling.
China RoHS (restriction of hazardous substances) symbols for control of pollution caused by electronic information products. 5-year environment-friendly use period (EFUP) for batteries. 10-year EFUP for the device. For details, see the accompanying documentation.
See www.welchallyn.com/weee.
Lithium ion battery
Keep away from sunlight
8
Introduction
CP 150 spirometry option
Expiration date 20XX-XX
IP20
Protected against the ingress of solid foreign objects ≥ 12.5 mm diameter, not protected against the ingress of water.
Miscellaneous symbols Manufacturer
Type BF applied part
Reference/Model number
Serial number
Reorder/Catalog number
Batch code
Professional use only
Do not reuse
Conforms with IEC/UL/CSA/EN 60601-1
Intertek ETL listed
General warnings The following warning statements apply to spirometer use in general. Warning statements that apply specifically to particular procedures, such as preparing the patient for testing, appear in the corresponding sections of the manual. Warnings indicate conditions or practices that could lead to illness, injury, or death. WARNING The spirometer captures and presents data reflecting a patient’s physiological condition. When reviewed by a trained physician or clinician, this data can be useful in determining a diagnosis. However, the data should not be used as a sole means for determining a patient’s diagnosis. WARNING To minimize the chance of a misdiagnosis, it is the physician’s responsibility to assure that spirometry tests are properly administered, evaluated, and interpreted. WARNING To prevent the spread of infection, do not try to clean the flow transducers and nose clips. Discard these items after a single patient use. WARNING Keep the reusable patient handle clean. Patient contact with contaminated equipment can spread infection.
Directions for use
Introduction
9
WARNING Read and observe all safety information provided in the flow transducer instructions.
General cautions The following caution statements apply to spirometer use in general. Caution statements that apply specifically to particular procedures appear in the corresponding sections of the manual. Cautions indicate conditions or practices that could damage the equipment or other property. CAUTION Do not clean the spirometer or any of its components. Trapped moisture in the pressure tubing or sensor could affect their accuracy. Replace the pressure tubing when it becomes dirty. Replace the sensor when it becomes faulty. Recalibrate the spirometer after replacing any components. CAUTION Do not immerse any part of the spirometer into a cleaning liquid or sterilize it with hot water, steam, or air. CAUTION Do not use aromatic hydrocarbons, rubbing alcohol, or solvents on the spirometer. CAUTION If you choose to clean the calibration syringe, wipe the outer surface of the calibration syringe with a clean cloth slightly dampened with 70 percent isopropyl alcohol. CAUTION Use only parts and accessories supplied with the device and available through Welch Allyn. The use of accessories other than those specified may result in degraded performance of this device. CAUTION When you put the spirometer away, store its pressure tubing in a basket or drawer or other place that prevents compression or kinking. CAUTION Avoid installing the spirometer in direct sunlight or in a location where it may be affected by significant changes in humidity, ventilation, or airborne particles containing dust, salt, or sulfur. CAUTION Keep the spirometer away from splashing fluids.
10
Introduction
CP 150 spirometry option
11
Setup Connecting the Spirometer WARNING To prevent the spread of infection, use a new flow transducer for each patient. Use rubber gloves when replacing used flow transducers, and wash hands after touching them. Discard flow transducers after a single patient use.
Connecting the spirometer components 1. Attach the right side of the spirometer mounting bracket to the device using one of the thumb screws. Tighten the thumbscrew.
2. Insert the spirometer sensor into the mounting bracket. Ensure that the spirometer sensor label is visible in the mounting bracket window so that the mini USB cable connector installs correctly during the next steps.
3. Attach the left side of the spirometer mounting bracket to the device using the second thumb screw. Tighten the thumbscrew.
12
Setup
CP 150 spirometry option
4. Insert the mini USB cable connector into the spirometer sensor mini USB port. a.
Insert the USB cable into the spirometer sensor mounting bracket groove to secure the cable.
b. Insert the USB cable connector into the device's first USB port, furthest to the right.
Note
The mounting bracket is designed to protect the spirometer sensor and USB cable and only accepts the USB cable mini connector when the spirometer sensor label faces outward.
5. Verify that the spirometer sensor and pressure tubing are clean and undamaged. Look for signs of deterioration, including but not limited to cracks, cuts, discoloration, or oxidation. If any part exhibits any of these symptoms, replace it. a.
Attach the pressure tubing to the spirometer sensor.
b. Attach a flow transducer to the pressure tubing.
CAUTION Hand-tighten the spirometer sensor and flow transducer connectors to avoid damaging the connectors.
The CP 150 software automatically activates the spirometry functions throughout the software. Once the software recognizes the sensor, the Spirometry button appears in the Content area.
Directions for use
Setup
6. Push the flow transducer down onto the patient handle until it is secure.
WARNING Keep the reusable patient handle clean. Patient contact with contaminated equipment can spread infection. Note
Clean the patient handle after each patient use.
13
14
Setup
CP 150 spirometry option
15
Settings Viewing or changing the spirometry settings •
The spirometry settings control the predictive norms, parameters, formulas, and content of your report.
To view or change the settings 1. Touch the Settings tab. The ECG tab and the vertical ECG configuration tab appear. 2. Touch the Spirometry tab. The vertical Spirometry configuration tab appears. Modify the settings as desired: The following settings are saved as they are selected.
Note •
Protocol
•
Predictive norm
•
Incentive options
•
Best effort formula
•
FVC reversibility formula
Touch the
(Next) button.
Modify the settings as desired: •
FEV1% formula
•
Printer ○ Internal ○
PDF to USB
○
PDF to remote file location
○
Internal and PDF to USB
○
Internal and PDF to remote file location
•
Enable ATS interpretation
•
Composite norm values
Touch the
(Next) button.
Modify the settings as desired: •
Temperature unit
16
Settings
CP 150 spirometry option
•
Pressure unit
•
Flow unit
Touch the FVC report tab. Modify the settings as desired: •
Efforts
•
Lung age
•
Quality grades
•
Print “ATS Reproducibility Not Met”
Touch the
(Next) button.
Modify the settings as desired: •
First name
•
Smoke years
•
Packs/day
•
Age or Birth date
•
Middle initial
•
Weight
•
Comments
Touch the Parameters tab. Modify the settings as desired: Note Touch the
Select up to eight parameters to display and print. (Next) button to view additional parameters.
Touch the Spirometry calibration tab. Modify the settings as desired: •
Touch Calibrate single flow.
•
Touch Calibrate multiple flows.
•
Touch Print report.
•
Enable daily reminder