Supplement
26 Pages
Preview
Page 1
Aestiva/5 MRI Anesthesia Machine Technical Reference Manual Supplement
Aestiva/5 MRI Datex-Ohmeda, Inc., a General Electric Company, doing business as GE Healthcare. Datex-Ohmeda products have unit serial numbers with coded logic which indicates a product group code, the year of manufacture, and a sequential unit number for identification. The serial number can be in one of two formats. AAA X 11111
AAA XX 111111AA
The XX represents a number indicating The X represents an alpha character the year the product was manufactured; indicating the year the product was manufactured; H = 2004, J = 2005, etc. 04 = 2004, 05 = 2005, etc. I and O are not used.
Aestiva is a registered trademarks of Datex-Ohmeda, Inc. Other brand names or product names used in this manual are trademarks or registered trademarks of their respective holders.
09/09
1006-0858-000
Technical Reference Manual
Aestiva/5 MRI Anesthesia Machine This document is a supplement to the following Aestiva Technical Reference manuals, which are also required to fully service the Aestiva/5 MRI Anesthesia Machine: • Aestiva Machine Technical Reference manual number 1006-0452-000 • Aestiva 7900 Anesthesia Ventilator Technical Reference manual number 1006-0453-000
This document is not to be reproduced in any manner, nor are the contents to be disclosed to anyone, without the express authorization of the product service department, Datex-Ohmeda, Ohmeda Drive, PO Box 7550, Madison, Wisconsin, 53707.
© 2009 Datex-Ohmeda Inc.
1006-0858-000 09/09
i
Aestiva/5 MRI
Important The information contained in this Technical Reference manual pertains only to those models of products which are marketed by Datex-Ohmeda as of the effective date of this manual or the latest revision thereof. This Technical Reference manual was prepared for exclusive use by Datex-Ohmeda service personnel in light of their training and experience as well as the availability to them of parts, proper tools and test equipment. Consequently, Datex-Ohmeda provides this Technical Reference manual to its customers purely as a business convenience and for the customer's general information only without warranty of the results with respect to any application of such information. Furthermore, because of the wide variety of circumstances under which maintenance and repair activities may be performed and the unique nature of each individual's own experience, capacity, and qualifications, the fact that customer has received such information from Datex-Ohmeda does not imply in anyway that DatexOhmeda deems said individual to be qualified to perform any such maintenance or repair service. Moreover, it should not be assumed that every acceptable test and safety procedure or method, precaution, tool, equipment or device is referred to within, or that abnormal or unusual circumstances, may not warrant or suggest different or additional procedures or requirements. This manual is subject to periodic review, update and revision. Customers are cautioned to obtain and consult the latest revision before undertaking any service of the equipment. Comments and suggestions on this manual are invited from our customers. Send your comments and suggestions to the Manager of Technical Communications, Datex-Ohmeda, Ohmeda Drive, PO Box 7550, Madison, Wisconsin 53707.
w CAUTION
Servicing of this product in accordance with this Technical Reference manual should never be undertaken in the absence of proper tools, test equipment and the most recent revision to this service manual which is clearly and thoroughly understood.
Technical Competence The procedures described in this Technical Reference manual should be performed by trained and authorized personnel only. Maintenance should only be undertaken by competent individuals who have a general knowledge of and experience with devices of this nature. No repairs should ever be undertaken or attempted by anyone not having such qualifications. Datex-Ohmeda strongly recommends using only genuine replacement parts, manufactured or sold by Datex-Ohmeda for all repair parts replacements. Read completely through each step in every procedure before starting the procedure; any exceptions may result in a failure to properly and safely complete the attempted procedure.
ii
09/09 1006-0858-000
Technical Reference Manual Supplement
Table of Contents Overview... 2 Configuration Options... 2 Vaporizer Compatibility... 2 Enhanced MRI... 2 Service Requirements... 4 Battery information... 4 Aestiva MRI Parts... 5 CriticalMRI Components... 5 Parts Notation... 5 Warning Labels... 5 Test procedures... 18 Testing the LED lights... 18 Testing in MRI environment... 19
1006-0858-000 09/09
1
Aestiva/5 MRI
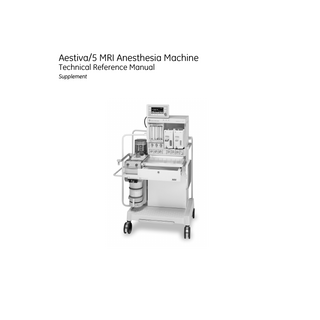
Overview The Aestiva/5 MRI is a special adaptation of the Aestiva/5 anesthesia machine that allows it to operate in an MRI environment up to 300 gauss (tested with an active shielded 1.5 Tesla MRI unit and a 3.0 Tesla MRI unit in a magnetic fringe field ≤ 300 gauss). The Aestiva/5 MRI shares most of its components with a standard Aestiva anesthesia machine. The distinguishing features that identify an Aestiva MRI machine are the central mounting of the ventilator display and the handle bars surrounding the breathing system. The Aestiva/5 MRI functions are identical to a comparably configured Aestiva anesthesia machine.
Configuration Options
The Aestiva/5 MRI is a two-vaporizer machine that can be configured in ANSI or ISO gas order and color.
Vaporizer Compatibility
The Tec 4, Tec 5, and Tec 7 Vaporizers are compatible for use with the Aestiva/5 MRI anesthesia machine. The Tec 6 and the Tec 6 Plus Vaporizers are not MRI compatible.
Enhanced MRI
The Aestiva/5 MRI now incorporates the following enhancements: • A redesigned (Enhanced) Sensor Interface Board (ESIB) with new pressure transducers unaffected by a magnetic field. This helps eliminate need for magnetic shielding around the ESIB and reduces ferrous metal content. • Shielding of the power supply to increase robustness and improve reliability. • Localized shielding of Vent Engine components to help reduce ferrous metal content. • A teal colored border has been added around the Gauss Alarm LEDs on the bezel to identify the enhanced variant of the Aestiva MRI from its predecessor. These improvements do not make the Aestiva MRI a completely non-ferrous anesthesia system, nor does it eliminate the 300 gauss line restriction. The improvements focus upon removing as much ferrous metal content as possible to improve performance with stronger magnets and reduce the attractive force to the magnet in misuse situations. Field Upgrade Kit M1063954 is available to upgrade an Aestiva/5 MRI anesthesia machine with enhanced MRI components. The enhance MRI kit can only be installed on machines that include the Gauss Alarm (Gauss Alarm Kit 1006-8303-000).
2
09/09 1006-0858-000
Technical Reference Manual Supplement
1
3
2
1. Ventilator Display (centrally mounted) 2. Handle Bars to protect breathing system 3. Green border around Gauss Alarm to identify Enhanced MRI machine Figure 1 • Aestiva/5 MRI
1006-0858-000 09/09
3
Aestiva/5 MRI
Service Requirements w WARNING
Do not set up or service this machine in MRI room.
w
Do not add or remove accessories or components in MRI room.
w
Use only MRI compatible accessories. When replacing parts, refer to the following pages for Stock Numbers of MRI specific parts.
Testing and Calibration To test or calibrate the Aestiva MRI machine, follow the procedures in the standard Aestiva Machine or Aestiva Ventilator service manuals. To test the Gauss Alarm, refer to "Test procedures" on page 18.
Maintenance This supplement covers Aestiva/5 MRI specific requirements. Refer to the Aestiva Machine and the Aestiva (7900) Ventilator service manuals for complete maintenance requirements.
Every Six (6) months • Replace the backup battery 1503-3045-000
Battery information
The sealed lead acid battery supplies battery backup for the Aestiva/5 MRI and the Gauss Alarm.
w CAUTION
The Gauss Alarm uses battery power even when the system is in Standby mode. To maintain a fully charged battery, always store the machine with the power cord connected to an AC mains supply. New systems ship from the factory with the alarm switched off. Likewise, if the Aestiva MRI is to be stored long term without being connected to an AC mains supply, the Gauss Alarm should be turned off to prevent draining the battery. Be sure to activate the Gauss Alarm prior to use.
4
09/09 1006-0858-000
Technical Reference Manual Supplement
Aestiva MRI Parts Critical MRI Components
Parts Notation
The Aestiva MRI includes several critical component differences that allow it to operate in an MRI environment: • a magnetically shielded AC Inlet - no outlets. • a magnetically shielded sensor interface board (SIB). • a magnetically shielded flow valve (part of Vent Engine). • the Vent Engine is enclosed in a magnetically shielded housing and access cover. • a magnetically shielded electronic display. • non-ferrous casters and worksurface supports. The following figures identify Aestiva MRI parts.
•Item marked “MRI” and appearing in boldface have comparable parts in a standard Aestiva machine; however, these parts are specifically designed to work in an MRI environment. Do not substitute parts from a standard Aestiva machine. •Item marked “MRI” but not in boldface are used exclusively with the Aestiva MRI machine. They do not have equivalent uses in the standard Aestiva machine. •Item numbers included in parentheses are also used in the standard Aestiva machine. The standard machine may be configured with other options in these areas; however, the Aestiva MRI machine can only be configured with the items identified. Do not substitute other options. •Items not marked can be used in any Aestiva configuration.
Warning Labels
1006-0858-000 09/09
Several of the parts in this parts list have labels affixed to them from the complete label set that is shown in Figure 11. The parts you receive will not include the attached labels. You must order the appropriate language label set separately and affix the labels as they are on the part you are replacing.
5
Aestiva/5 MRI
4
5 “C” 6 Datex-Ohmeda Tec 4, 5, 7
“D” Important: The Aestiva/5 MRI is MRI Compatible* *Tested with active shielded 1.5 and 3.0 Tesla MRI units in magnetic fringe fields ≤ 300 gauss. WWarning: Do not set up or service this machine in MRI room. Do not add or remove accessories or components in MRI room. Use only MRI compatible accessories.
3
“F” WWarning: The Aestiva/5 MRI will function to specifications in an MRI environment that does not exceed 300 gauss. Refer to the operation manual of the MR Imager to determine the location of the 300 gauss line for your unit. Do not store or operate the Aestiva/5 MRI within the 300 gauss line for your unit.
“J” 2
WWarning: Do not store any items in the drawer that are not MRI compatible.
WImportant: Set brake during use or storage in MRI room.
“E” 1
Figure 2 • Aestiva MRI (front view)
Item
Description
Stock Number
1 (MRI)
Casters, front (locking) 1001-3705-000 Casters, rear (non-locking) 1001-3706-000 (2) Cover Panel 1006-1360-000 (no optional shelves or drawers) 3 (MRI) Drawer, locking Refer to Figure 3 See Note Cover, MRI 1006-4387-000 (4) Flowmeter shield 1006-1426-000 (affix labels “C” and “D” from MRI warning label set) (Refer to Figure 11) 5 Display (with shield) 1006-8020-000 6 EMC Shield 1605-3167-000 Note: Early production machines that have not been updated with a Drawer Kit have a cover in place of the drawer.
6
09/09 1006-0858-000
Technical Reference Manual Supplement
WWarning: Do not store any items in the drawer that are not MRI compatible.
“F”
“J”
1
2
4
5
3
8
7
6
Figure 3 • Aestiva MRI Drawer
Item 1 (MRI)
Description
Drawer Kit, Locking MRI 11-cm (without lock, slides, and labels) (affix labels “F” and “J” from MRI warning label set) 2 Lock assembly 3* Screw, M4x6 SST Black Conductive (for attaching drawer to slides) 4 (MRI) Slide, SST MRI 5* Screw, M4x8 BT SKT HD (for attaching slide to support) 6 (MRI) Brace, Drawer MRI 7 Screw, M6x12 SKT HD Sems 8 (MRI) Side support * Apply Loctite 242
1006-0858-000 09/09
Stock Number 1006-8319-000 1006-3184-000 9211-1040-067 1006-3060-000 0140-6226-118 1006-3064-000 0144-2436-106 1006-5211-000
7
Aestiva/5 MRI
1
2
3 (4)
5
6 7
5
8
12 9
10
11
Figure 4 • Aestiva MRI Gauss Alarm
Item
Description
1 (MRI)
Bezel, Aestiva/5 MRI Bezel, Aestiva/5 MRI (green border around Gauss Alarm Alarm board, MRI Standoff, hex M4x25 Lockwasher, M4 external Screw, M4x8 Light Pipe Service Kit Clamp, fiber optic guide Guide, self-adhesive Harness (with switch, includes hardware and knob) Bracket, switch mounting Screw, M3x8 Harness, power connector to Alarm board
2 (MRI) 3 (MRI) 4 5 (MRI) 6 (MRI) 7 (MRI) 8 9 (MRI) 10 (MRI) 11 12 (MRI) 8
Stock Number (enhanced)
1006-4504-000 M1047135 1006-4507-000 1006-4513-000 9213-0540-003 0144-2436-108 1006-8311-000 1006-4484-000 1006-4514-000 1006-4512-000 1006-4474-000 1406-3297-000 1006-4511-000 09/09 1006-0858-000
Technical Reference Manual Supplement
4
2
3 1
5
Note: Be careful not to pinch or abrade the wires while installing the cover.
6
Figure 5 • Aestiva MRI enhanced power supply components
Item
Description
Stock Number
1 (MRI) 2 (MRI) 3 4 (MRI) 5 (MRI) 6
Power Supply Box Base Screw, 6-32x3/16 stainless steel Power Supply, Service Harness, Power Supply with ferrite bead Power Supply Box Nut, M4 Keps
1006-4691-000 M1049027 1006-4258-000 1006-4692-000 1006-4690-000 0144-3717-314
1006-0858-000 09/09
9
Aestiva/5 MRI
WWarning: The Aestiva/5 MRI does contain some ferromagnetic material and will be attracted to the MR Imager if positioned closer than 300 gauss. Always keep the Aestiva/5 MRI in magnetic fringe field of 300 gauss or less.
“G” WWarning: Use only MRI compatible cylinders.
“A”
1
WWarning: User shall read all Operation and Maintenance manuals, all accompanying documents and understand the operation of this anesthesia system before use. Improper use of this Anesthesia Machine in an MRI or Operating Room can cause significant personnel or patient injury and significant equipment damage.
“B”
“B”
2 WWarning: Use only MRI compatible cylinders.
WWarning: Use only MRI compatible cylinders.
3 4
5
Figure 6 • Aestiva MRI (rear view)
Item
Description
(1)
AC Inlet Module, no outlets (100–120 V) AC Inlet Module, no outlets (220–240 V) AC Inlet Module, no outlets (220–240 V) AC Inlet Module, no outlets (220–240 V) AC Inlet Module, no outlets (220–240 V) AC Inlet Module, no outlets (220–240 V) AC Inlet Module, no outlets (100–120 V) AC Inlet Module, no outlets (220–240 V) Rear Panel Cover Panel, rear(no optional fold-down panel) Cover, Vent Engine (original) Cover, Vent Engine (enhanced) - includes knob Knob (for cover 4a only)
(2) (3) 4a (MRI) 4b 5 (MRI)
w WARNING
10
with Power Cord US (NEMA) EURO/France (CEE7/7) UK (BS-1363) Australia (AS3112) India (BS-546) Switzerland (SEV 1011) Japan (JIS-C3306) China (GB2099)
Stock Number 1006-7077-000 1006-7078-000 1006-7081-000 1006-7082-000 1006-7083-000 1006-7085-000 M1149314 M1054567 1006-1350-000 1006-4388-000 1406-3470-000 1406-3455-000 1006-4420-000
Ensure all covers are tightly in place to provide electromagnetic shielding required for proper operation. 09/09 1006-0858-000
Technical Reference Manual Supplement
WWarning: Do not use or mount monitors or other accessories that are not MRI compatible at the 300 gauss line. Check with the manufacturer of the monitor or accessory equipment for MRI compatibility information.
(each side)
2a
2d 2c
“H”
2b 2e (2f)
1 (original)
(enhanced)
Figure 7 • Aestiva MRI (side view)
Item
Description
Stock Number
1 (MRI)
Sensor Interface Board (SIB) Enhanced Sensor Interface Board (ESIB)
1503-7012-000 1503-7014-000
2 (MRI)
Ventilator display mounting hardware Dovetail Extrusion, display mount Screw, M8x20 Bracket, Vent Display Mount Screw, M5x12 Screw, M4x12 Pozidriv Pan Lockwasher, M4 Internal
1006-4369-000 0144-2440-821 1006-4370-000 1406-3236-000 0140-6226-111 0144-1118-128
2a *2b 2c *2d 2e 2f *
1006-0858-000 09/09
Apply Loctite 242.
11
Aestiva/5 MRI
1a 1d 1
“H”
1
1b 3a
1c
3b 3c
3b
2a
3g 1 3 3h
2 3d 3f 3e (x2) 2b
3d
3e
Figure 8 • Aestiva MRI (Handle Bars)
Item 1 (MRI) 1a 1b *1c **1d 2 (MRI) 2a *2b 3 (MRI) 3a 3b 3c 3d 3e 3f 3g *3h 4 (MRI) 3b 3d 3f * ** 12
Description Dovetail Block mounting components Wedge Block, dovetail handle Screw, M8x30 Skt Hd Cap Screw, M6x16 Sems Rear Base Block components Block, handle base rear Screw, M6x6 Setscrew Front Base Block components Block, handle base front Screw, M6x16 Button Hd Washer, M6 Flat Screw, Shoulder Washer, Belleville (use two - dome side to head) Washer, flat Washer, Delrin Screw, M6x6 Setscrew Breathing system “handle bar” components Bar, handle rear Bar, cross handle Bar, handle front Apply Loctite 242 Apply Loctite 680
Stock Number 1006-1282-000 1006-4371-000 0144-2140-244 0144-2436-109 1006-4372-000 1007-3329-000 1006-4373-000 0144-2436-103 9213-0160-006 1006-3832-000 1006-3830-000 1006-3828-000 1006-3829-000 1007-3329-000 1006-4375-000 1006-4374-000 1006-4376-000 0220-5017-300 0220-5037-300
09/09 1006-0858-000
Technical Reference Manual Supplement
AA.96.365
B
A
C
Figure 9 • Aestiva MRI (Vent Engine access)
To gain access to the inboard screws that hold the Vent Engine to the housing: • Remove the screw ( A) that holds the cross bar to the back handle. • Remove the screw ( B) that holds the front handle to the display mount dovetail. • Rotate the loosened front handle forward ( C) to allow the Breathing System to swing further away from the machine. 1006-0858-000 09/09
13
Aestiva/5 MRI Vent Engine components Item
Description
Stock Number (original)
Stock Number (Enhanced)
1 (MRI) Vent Engine, MRI service ** 1503-8102-000 2 (MRI) Flow Control Valve 1503-3484-000 1503-3484-000 3 (MRI) Housing, Vent Engine 1503-3490-000 4 (MRI) Cover, Vent Engine 1503-3489-000 5 Screw, M4x8 SKT HD 0140-6226-118 6 Lockwasher, M4 internal 0144-1118-128 7 (MRI) Gasket, FAS Valve 1006-4689-000 8 (MRI) GIV Spacer 1503-3492-000 9 (MRI) Screw, GIV Spacer M1048576 10 (MRI) GIV Shield 1503-3496-000 11 Cable Tie 1006-4666-000 12 (MRI)*** Valve Cover, MRI 1503-3495-000 13 Set Screw, M4 0141-4227-105 14 Vent Engine Housing, non-ferrous 1503-3493-000 ** The service Vent Engine for the MRI now includes the Enhance MRI components. When used in original production machines, transfer the cover mounting stud (Item 15) to the replacement Vent Engine. *** Make sure that the wires from the valve are routed through the notch in the corner of the cover and that the cover sits flush on the manifold.
14
09/09 1006-0858-000
Technical Reference Manual Supplement
1
3
2
4
15
9
5, 6
12
14 8 7
10
11 13
Figure 10 • Aestiva MRI Vent Engine
1006-0858-000 09/09
15
Aestiva/5 MRI
A
F WWarning: Do not store any items in the drawer that are not MRI compatible.
G WWarning: The Aestiva/5 MRI does contain some ferromagnetic material and will be attracted to the MR Imager if positioned closer than 300 gauss. Always keep the Aestiva/5 MRI in magnetic fringe field of 300 gauss or less.
WWarning: Use only MRI compatible cylinders. WWarning: User shall read all Operation and Maintenance manuals, all accompanying documents and understand the operation of this anesthesia system before use. Improper use of this Anesthesia Machine in an MRI or Operating Room can cause significant personnel or patient injury and significant equipment damage.
H WWarning: Do not use or mount monitors or other accessories that are not MRI compatible at the 300 gauss line. Check with the manufacturer of the monitor or accessory equipment for MRI compatibility information.
H B
B
WWarning: Use only MRI compatible cylinders.
WWarning: Use only MRI compatible cylinders.
WWarning: Do not use or mount monitors or other accessories that are not MRI compatible at the 300 gauss line. Check with the manufacturer of the monitor or accessory equipment for MRI compatibility information.
I
C Important: The Aestiva/5 MRI is MRI Compatible* *Tested with active shielded 1.5 and 3.0 Tesla MRI units in magnetic fringe fields ≤ 300 gauss. WWarning: Do not set up or service this machine in MRI room. Do not add or remove accessories or components in MRI room. Use only MRI compatible accessories.
Datex-Ohmeda Tec 4, 5, 7
I
D
Datex-Ohmeda Tec 4, 5, 7
WWarning: The Aestiva/5 MRI will function to specifications in an MRI environment that does not exceed 300 gauss. Refer to the operation manual of the MR Imager to determine the location of the 300 gauss line for your unit. Do not store or operate the Aestiva/5 MRI within the 300 gauss line for your unit.
J
WImportant: Set brake during use or storage in MRI room. Label Set, Aestiva MRI Stock No.1006-4416-000 06-03
AA.96.281
E
Figure 11 • Aestiva MRI Label Set (English) 16
09/09 1006-0858-000