Quick Reference User Guide
2 Pages
Preview
Page 1
Quick Reference User Guide ®
enFlow IV Fluid Warmer
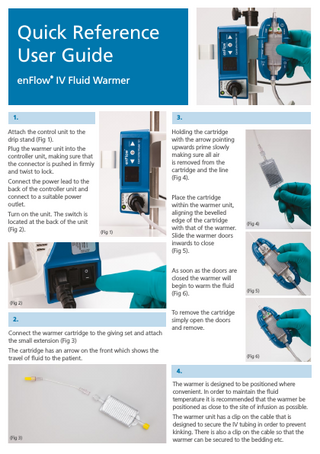
1.
3.
Attach the control unit to the drip stand (Fig 1).
Holding the cartridge with the arrow pointing upwards prime slowly making sure all air is removed from the cartridge and the line (Fig 4).
Plug the warmer unit into the controller unit, making sure that the connector is pushed in firmly and twist to lock. Connect the power lead to the back of the controller unit and connect to a suitable power outlet. Turn on the unit. The switch is located at the back of the unit (Fig 2).
®
SmartSite needle-free system
(Fig 1)
Place the cartridge within the warmer unit, aligning the bevelled edge of the cartridge with that of the warmer. Slide the warmer doors inwards to close (Fig 5). As soon as the doors are closed the warmer will begin to warm the fluid (Fig 6).
(Fig 4)
(Fig 5)
(Fig 2)
2. Connect the warmer cartridge to the giving set and attach the small extension (Fig 3)
To remove the cartridge simply open the doors and remove.
The cartridge has an arrow on the front which shows the travel of fluid to the patient.
(Fig 6)
4. The warmer is designed to be positioned where convenient. In order to maintain the fluid temperature it is recommended that the warmer be positioned as close to the site of infusion as possible.
(Fig 3)
The warmer unit has a clip on the cable that is designed to secure the IV tubing in order to prevent kinking. There is also a clip on the cable so that the warmer can be secured to the bedding etc.
Quick Reference User Guide ®
enFlow IV Fluid Warmer Further Information Cautions:A flashing RED LED, a flashing RED controller display, and an audible alarm, indicate that the infusate is over temperature. Stop the fluid flow, and slide the warmer covers open to stop warming. This condition is not standard and should not be experienced. If it occurs, replace the warmer and contact technical support.
!
Caution
Consult Instructions for Use
!
4400-0014- D
System Fault
The warmer contains magnets; do not operate within 15 cm (6 in.) of a pacemaker or other devices that may be sensitive to strong magnetic fields. Do not encase the Warmer with any external coverings like: towels, sheets, blankets or drapes. Covering the Warmer restricts the natural convection of heat.
XX
In transport applications it is advised to cushion and insulate the Warmer from the patient’s skin. Apply the Warmer as loosely as acceptable checking regularly for signs of potential pressure or thermal related injury.
Low Battery
The disposable cartridge should not be used for greater than 24 hours. Normal Operation
If the IV line runs dry, disconnect the disposable cartridge from the warmer. Re-prime the entire IV system using aseptic techniques. Ensure all the air is removed from both the line and the disposable cartridge. Replace the disposable cartridge in the warmer. Power Present
TM
4400-0200_E
Do not encase the warmer with any external coverings like towels, sheets, blankets or drapes. Covering the warmer restricts the natural convection of heat. POWER
In transport applications it is advised to cushion and insulate the warmer from the patients skin. Apply the warmer loosely as acceptable, checking regularly for signs of potential pressure related injury. TEMP TM
4400-0200_E
< 33 C
Do not encase the Warmer with any external coverings like: towels, sheets, blankets or drapes. Covering the Warmer restricts the natural convection of heat.
33 C < 35 C 35 C < 43 C
In transport applications it is advised to cushion and insulate the Warmer from the patient’s skin. Apply the Warmer as loosely as acceptable checking regularly for signs of potential pressure or thermal related injury.
43 C < 45 C ≥ 45 C
Consult Instructions for Use
!
Caution
Please refer to main user guide for full warnings and cautions.
carefusion.co.uk Terre Bonne Park – A4 Route de Crassier 17 1262 Eysins, Switzerland
EC REP
Vital Signs
®
CareFusion France 309 S.A.S. 8 bis rue de la Renaissance 44110 Chateaubriant, France
CareFusion 22745 Savi Ranch Parkway Yorba Linda, CA 92887, USA
0086
© 2017 CareFusion Corporation or one of its subsidiaries. All rights reserved. Vital Signs, enFlow, CareFusion and the CareFusion logo are trademarks or registered trademarks of CareFusion Corporation or one of its subsidiaries. All other trademarks are property of their respective owners. Medical devices class I, IIa and IIb according to Medical Devices Directive 93/42/EC. Please read the complete Instructions For Use that come with the devices or follow the instructions on the product labelling. CF/805/17/0046 Issue 1