Hill-Rom
Liko Mobile Patient Lifts and Sit & Stands
Viking Lift Instruction Guidelines for Training Rev 1 Nov 2015
Instruction Guidelines for Training
1 Page
Preview
Page 1
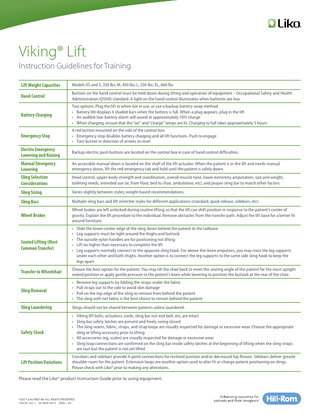
Viking® Lift Instruction Guidelines for Training Lift Weight Capacities
Models XS and S, 350 lbs; M, 450 lbs; L, 550 lbs; XL, 660 lbs
Hand Control
Buttons on the hand control must be held down during lifting and operation of equipment – Occupational Safety and Health Administration (OSHA) standard. A light on the hand control illuminates when batteries are low.
Battery Charging
Two options: Plug the lift in when not in use, or use a backup battery swap method. • Battery life displays 4 shaded bars when the battery is full. When a plug appears, plug in the lift • An audible low-battery alarm will sound at approximately 10% charge • When charging, ensure that the “on” and “charge” lamps are lit. Charging to full takes approximately 5 hours
Emergency Stop
A red button mounted on the side of the control box • Emergency stop disables battery charging and all lift functions. Push to engage • Turn button in direction of arrows to reset
Electric Emergency Lowering and Raising
Backup electric push buttons are located on the control box in case of hand control difficulties.
Manual Emergency Lowering
An accessible manual down is located on the shaft of the lift actuator. When the patient is in the lift and needs manual emergency down, lift the red emergency tab and hold until the patient is safely down.
Sling Selection Considerations
Head control, upper-body strength and coordination, overall muscle tone, lower extremity amputation, size and weight, toileting needs, intended use (ie, from floor, bed to chair, ambulation, etc), and proper sling bar to match other factors.
Sling Sizing
Varies slightly between styles; weight-based recommendations.
Sling Bars
Multiple sling bars and lift stretcher styles for different applications (standard, quick release, sidebars, etc).
Wheel Brakes
Wheel brakes are left unlocked during routine lifting so that the lift can shift position in response to the patient’s center of gravity. Explain the lift procedure to the individual. Remove obstacles from the transfer path. Adjust the lift base for a better fit around furniture.
Seated Lifting (Most Common Transfer)
• • • • •
Slide the lower-center edge of the sling down behind the patient to the tailbone Leg supports must be tight around the thighs and buttock The outside nylon handles are for positioning not lifting Lift no higher than necessary to complete the lift Leg supports normally connect to the opposite sling hook. For above-the-knee amputees, you may cross the leg supports under each other and both thighs. Another option is to connect the leg supports to the same side sling hook to keep the legs apart
Transfer to Wheelchair
Choose the best option for the patient. You may tilt the chair back to meet the seating angle of the patient for the most upright seated position or apply gentle pressure to the patient’s knee while lowering to position the buttock at the rear of the chair.
Sling Removal
• • • •
Sling Laundering
Slings should not be shared between patients unless laundered.
Safety Check
• Viking lift bolts, actuators, cords, sling bar nut and bolt, etc, are intact • Sling bar safety latches are present and freely swing closed • The sling seams, fabric, straps, and strap loops are visually inspected for damage or excessive wear. Choose the appropriate sling or lifting accessory prior to lifting • All accessories (eg, scales) are visually inspected for damage or excessive wear • Sling loop connections are confirmed on the sling bar inside safety latches at the beginning of lifting when the sling straps are taut but the patient is not yet lifted
Lift Position Variations
Crossbars and sidebars provide 4-point connections for reclined position and/or decreased hip flexion. Sidebars deliver greater shoulder room for the patient. Extension loops are another option used to alter fit or change patient positioning on slings. Please check with Liko® prior to making any alterations.
Remove leg supports by folding the straps under the fabric Pull straps out to the side to avoid skin damage Pull on the top edge of the sling to remove from behind the patient The sling with net fabric is the best choice to remain behind the patient
Please read the Liko® product Instruction Guide prior to using equipment.
©2015 Liko R&D AB. ALL RIGHTS RESERVED. 193101 rev 1 05-NOV-2015 ENG – US