Quick Tips
1 Page
Preview
Page 1
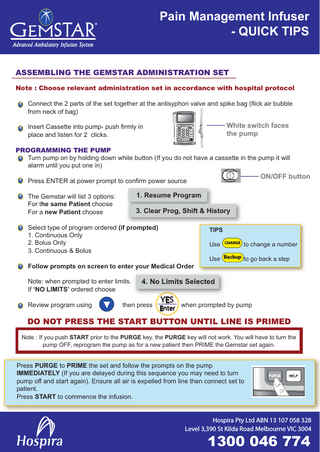
Pain Management Infuser - QUICK TIPS ASSEMBLING THE GEMSTAR ADMINISTRATION SET Note : Choose relevant administration set in accordance with hospital protocol Connect the 2 parts of the set together at the antisyphon valve and spike bag (flick air bubble from neck of bag)
White switch faces the pump
Insert Cassette into pump- push firmly in place and listen for 2 clicks.
PROGRAMMING THE PUMP Turn pump on by holding down white button (If you do not have a cassette in the pump it will alarm until you put one in)
ON/OFF button
Press ENTER at power prompt to confirm power source
1. Resume Program
The Gemstar will list 3 options: For the same Patient choose For a new Patient choose
3. Clear Prog, Shift & History
Select type of program ordered (if prompted) 1. Continuous Only 2. Bolus Only 3. Continuous & Bolus
TIPS Use
Follow prompts on screen to enter your Medical Order Note: when prompted to enter limits. If ‘NO LIMITS’ ordered choose Review program using
CHANGE
to change a number
Use Backup to go back a step
4. No Limits Selected
then press
YES
Enter
when prompted by pump
DO NOT PRESS THE START BUTTON UNTIL LINE IS PRIMED Note : If you push START prior to the PURGE key, the PURGE key will not work. You will have to turn the pump OFF, reprogram the pump as for a new patient then PRIME the Gemstar set again.
Press PURGE to PRIME the set and follow the prompts on the pump IMMEDIATELY (If you are delayed during this sequence you may need to turn pump off and start again). Ensure all air is expelled from line then connect set to patient. Press START to commence the infusion.
Hospira Pty Ltd ABN 13 107 058 328 Level 3,390 St Kilda Road Melbourne VIC 3004
1300 046 774