Quick Start Guide
2 Pages
Preview
Page 1
5. Viewing the Data
This is typical of the type of display you will see when you open View once your system is set up and has been running long enough to collect a reasonable quantity of data. The main areas of the display are: Toolbar Buttons (see 6), Graph window, Readings List, Sensor List and Alarms List. Note that all sensors will be in Zone 0 to start with – see 7. Graph window One or more graphs may be displayed depending on the chosen graph option. Readings list The top right hand side displays sensor readings in tabular form: Date & Time with list of sensors by name/serial number. The table shows the recorded data, one column per sensor, at the chosen time intervals. Sensor List Below the Readings list is the Sensor list. Each sensor is listed by name and/or serial number in tabular form. You will see the set-up for each Sensor in this window. Alarm List This is the lower right hand table and lists all alarms – both acknowledged and current.
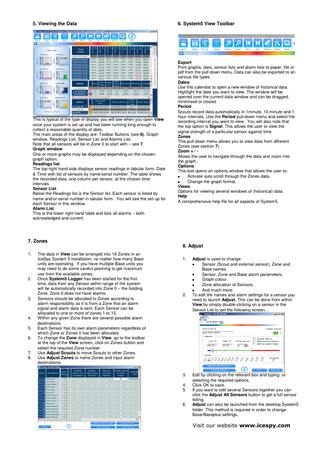
6. System5 View Toolbar
Export Print graphs, data, sensor lists and alarm lists to paper, file or pdf from the pull down menu. Data can also be exported to an various file types Dates Use this calendar to open a new window of historical data. Highlight the date you want to view. The window will be opened over the current data window and can be dragged, minimised or closed. Period Scouts record data automatically in 1minute, 10 minute and 1 hour intervals. Use the Period pull-down menu and select the recording interval you want to view. You will also note that the top option is Signal. This allows the user to view the signal strength of a particular sensor against time. Zones This pull down menu allows you to view data from different Zones (see section 7). Zoom + / Allows the user to navigate through the data and zoom into the graph. Options This tool opens an options window that allows the user to: Activate auto scroll through the Zones data. Change the graph format. Views Options for viewing several windows of (historical) data. Help A comprehensive help file for all aspects of System5.
7. Zones 8. Adjust 1.
2.
3.
4. 5. 6.
7. 8.
The data in View can be arranged into 16 Zones in an IceSpy System 5 installation, no matter how many Base units are operating. If you have multiple Base units you may need to do some careful planning to get maximum use from the available zones. Once System5 Logger has been started for the first time, data from any Sensor within range of the system will be automatically recorded into Zone 0 – the holding Zone. Zone 0 does not have alarms. Sensors should be allocated to Zones according to alarm responsibility as it is from a Zone that an alarm signal and alarm data is sent. Each Sensor can be allocated to one or more of zones 1 to 15. Within any given Zone there are several possible alarm destinations. Each Sensor has its own alarm parameters regardless of which Zone or Zones it has been allocated. To change the Zone displayed in View, go to the toolbar at the top of the View screen, click on Zones button and select the required Zone number. Use Adjust Scouts to move Scouts to other Zones. Use Adjust Zones to name Zones and input alarm destinations.
1.
2.
3. 4. 5. 6.
Adjust is used to change: Sensor (Scout and external sensor), Zone and Base names. Sensor, Zone and Base alarm parameters. Graph colour. Zone allocation of Sensors. And much more. To edit the names and alarm settings for a sensor you need to launch Adjust. This can be done from within View by simply double-clicking on a sensor in the Sensor List to get the following screen…
Edit by clicking on the relevant box and typing or selecting the required options. Click OK to save. If you want to edit several Sensors together you can click the Adjust All Sensors button to get a full sensor listing. Adjust can also be launched from the desktop System5 folder. This method is required in order to change Base/Baseplus settings.
Visit our website www.icespy.com © Silvertree Engineering 2004-2008 MN007.51
Quick Start Guide : IceSpy System5 1. Overview IceSpy System5 A typical System5 comprises one or more Base, BasePlus or Bridge units collecting data from a combination of Scouts with one sensor measuring temperature, ScoutPlus with two sensors measuring temperature and optionally humidity or door opening events.To increase the radio range of the Scout and ScoutPlus units one or more Echo units may be used. System5 has very comprehensive software which allows you to set up a wide range of alarm parameters as well as viewing, printing and archiving data. 1.
2.
3.
4.
5. 6. 7.
The physical installation of Base/Baseplus or Bridge units and Scouts requires planning. Please refer to your supplier if you are installing these yourself. The Scout and Scoutplus have one internal temperature sensor. The Scoutplus has the facility to connect one further external sensor. Both Scout / Scoutplus store data in a memory bank which is transmitted via low power radio approximately once a minute. The Base/Baseplus needs to be connected to a PC via USB/Serial port, modem or a PC network. The Bridge needs to be connected to the PC via USB only. The Base/Baseplus collects the data sent by the Scouts and stores the data in a ‘wrap-around’ memory bank. The Baseplus unit can be set to provide optional audible and visual alarms. The System5 PC software collects data from the Base/Baseplus/Bridge and stores it in a special database from where it can be viewed by the user.
3. Client or Server Installation? / Licensing. If you are a single PC user then your PC is a Server. If your PC is part of a network then you can choose which PC on the network is to be the IceSpy Server. There should be only one Server on your network. All other PCs are a Client. Server Installation 1. This PC can be either a full network server or it may be a single workstation but in either case it must be running Windows™ 2003 / 2008 Server, XP or Windows7 2. The automatic installation will include System5 Logger and SQL database (Microsoft SQL Express). Client Installation 1. You may install the software on as many Client PCs as you wish though this is only appropriate if they are able to communicate with the Server PC. e.g. via a network connection. 2. A Multi-user license will be required – see below. 3. When starting View or Adjust for the first time on any Client PC you will need to specify the location of the database. The following dialogue will appear: “cannot find the IceSpy5 database…. please enter the server location…” Use the ‘Find’ button and then choose a database from the drop-down list. It will be in the form PCnamesystem5' - for example: OpServer1system5 Software licensing: When you first run 'System5 View' or 'System5 Adjust' you will see a licensing dialogue. ‘Network‘ and 'Extra Secure' installations will require the application of an activation code within 30 days of the software installation. If you have chosen the 'Compact' (Single PC) installation your software does not need any activation code and you have a licence to use it free-of-charge. However, some features will not be available in this installation. Refer to the Help files for detailed information about licensing.
2. Software Installation 1. 2.
3.
4.
5.
6.
7.
8. 9.
Prior to installation you need to decide if your PC is a Server or a Client (see section 3). Whatever your operating system we recommend that all appropriate Service Packs and Hot Fixes should be installed. Insert the IceSpy System5 CD into your CD drive. The installation program should start automatically. If not click Start then Run and type d:setup-system5 (if d: is the letter for your CD drive). Follow the on screen instructions. The IceSpy System5 program is installed by default into the folder ‘C:Program FilesSilvertree EngineeringIceSpy System5’. You can choose to install in a different location but we strongly recommend that you use the default. You will be given the various options during the installation. We strongly recommend that you select the default option at each stage Once the software and hardware installation is complete, Connect your Base or Bridge. Any drivrs should eb automatically installed. Open the IceSpy System5 folder on your desktop and double click on System5 Logger (logger Tools). This is the only occasion you should need to start System5 Logger manually as, once started, it will automatically restart when the PC is rebooted. Hide the System5 Logger Tools window by closing it. . If required, a full manual can be printed from the Help file. You are now ready to use System5. After System5Logger has been running for a few minutes to collect the first data, you can use View (see section 5) and/or Adjust (see section 8).
4. Desktop IceSpy System5 Folder
In this folder there are shortcuts to the programs System5 Adjust - (Adjust) The program used for making changes to system configurations (see 8). System5 Help - (Help) The system Help files. System5 View - (View) Allows you to view temperatures, alarms and other data stored in the database (see 5). System5 Logger (Logger Tools) – allows the logging service to stop and start, and to be monitored. Also resident in the desktop folder on a Server installation there is a folder called Tools which holds shortcuts to various system management tools – more details can be found in the Help files. There is also a Support Logs folder which may be required if you call for technical support.