LIMAX
Operating Lights
marLED Battery-Operated Mobile Lights Operating Mounting Instructions V1.0 Sept 2011
Operating Mounting Instructions
52 Pages
Preview
Page 1
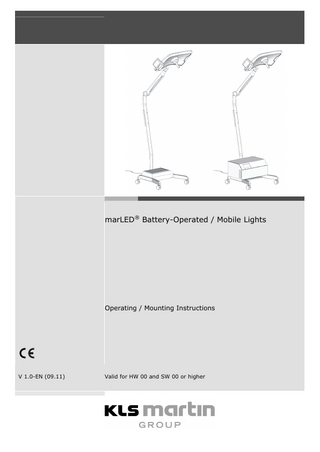
marLED® Battery-Operated / Mobile Lights
Operating / Mounting Instructions
V 1.0-EN (09.11)
Valid for HW 00 and SW 00 or higher
Operating / Mounting Instructions marLED® Battery-Operated / Mobile Lights
Table of Contents 1
Product Liability and Warranty ...4
1.1 1.2 1.3 1.4 1.5
General Information ...4 Intended Use ...4 Warranty ...4 User’s Inspection ...5 Hotline ...5
2
Notices concerning these Operating Instructions...6
2.1 2.2 2.3 2.4
Validity of these Operating & Mounting Instructions ...6 Symbols Used ...7 Symbols Used on the Product ...8 Terms & Abbreviations ...8
3
Safety Notices ...9
3.1 3.2 3.3 3.4
General Information ...9 Personal Protection ...9 Operation ... 10 Cleaning and Infection Protection ... 11
4
Description of the Lights ... 12
4.1 4.2 4.3 4.4 4.5 4.6
Description of marLED® V10 M Mobile Light ... 12 Description of marLED® V10 MB Battery-Operated Mobile Light ... 12 LED Technology ... 13 Starting Performance ... 13 Connecting the Battery-Operated Mobile Lights to the Power Supply ... 13 Connecting the Mobile Lights to the Power Supply ... 13
5
Assembling / Mounting the Light ... 14
5.1 5.2 5.3 5.4
Mounting the Stand Tube ... 15 Mounting the Spring Arm ... 17 Mounting the Light Head on the Spring Arm... 18 Adjusting the Spring Arm ... 19
5.4.1
Adjusting the Spring Tension ... 19
5.4.2
Adjusting the Height Stop of the Spring Arm ... 20
5.4.3
Adjusting the Braking Force ... 21
6
Putting the Light into Operation ... 22
6.1
Initial Startup of Battery-Operated Lights ... 22
6.1.1
Connecting the Battery Interconnect Cables ... 22
6.1.2
Charging the Batteries and Checking the State of Charge... 24
6.1.3
Charging Time ... 24
6.1.4
Standby Mode ... 24
2
V 1.0
Operating / Mounting Instructions marLED® Battery-Operated / Mobile Lights
7
Operating the Lights... 25
7.1
Switching the Power Supply On / Off ... 25
7.1.1
Switching On Battery-Operated Mobile Lights ... 25
7.1.2
Switching Off Battery-Operated Mobile Lights ... 25
7.2 7.3 7.4 7.5
Switching on Mobile Lights ... 26 Installing the Sterilizable Handle ... 26 Operation via the sensoTouch Control Panel ... 26 Using the Sterilizable Handle (sensoGrip) for Light Control... 28
8
Replacing Components ... 29
8.1 8.2
Replacing the Sterilizable Handle ... 29 Handle for Sterile Disposable Cover (Optional) ... 30
8.2.1
sensoGrip (Handle) for Sterile Disposable Covers ... 30
8.2.2
Replacing the Sterile Cover... 30
8.3 8.4 8.5
Replacing the Light Sources ... 31 Accessories ... 31 Replacing the Line Fuses... 32
8.5.1
On Mobile Lights ... 32
8.5.2
On Battery-Operated Mobile Lights ... 33
9
Cleaning and Disinfecting the Light... 34
9.1 9.2 9.3
Cleaning the Light’s Externally Accessible Parts ... 35 Disinfecting the Light’s Externally Accessible Parts... 36 Handle Disinfection and Sterilization ... 37
10
Maintenance... 38
10.1 10.2
Regular Checks to Be Carried out by Owner / Operator ... 38 Maintenance to Be Performed by Manufacturer... 38
11
Troubleshooting ... 39
12
Technical Data... 41
12.1
Technical Data marLED® V10... 42
13
Serial Number Structure ... 44
14
Periodic Safety Checks... 45
15
Guidelines and Manufacturer’s Declaration on Electromagnetic Compatibility ... 46
16
Ecological Information ... 50
16.1 16.2 16.3
Disposal of Packaging ... 50 Environmentally-Friendly Operation ... 50 Disposal of the Unit... 50
V 1.0
3
Operating / Mounting Instructions marLED® Battery-Operated / Mobile Lights
1
Product Liability and Warranty
1.1
General Information
We thank you for having decided to buy a KLS Martin product. This product carries the CE-mark, which means that it satisfies the essential requirements laid down in the EC Directive concerning medical devices. We are the manufacturer of this product: Gebrüder Martin GmbH & Co. KG Ein Unternehmen der KLS Martin Group KLS Martin Platz 1 • D-78532 Tuttlingen / Germany Postfach 60 • D-78501 Tuttlingen / Germany Tel. +49 7461 706-0 • Fax +49 7461 706-193 [email protected] • www.klsmartin.com
1.2
Intended Use
These lights may only be used for the specific purpose for which they have been designed: Illumination of a surgical or examination field by surgeons, physicians and adequately trained assistant personnel These operating lights may only be operated in medical-use rooms whose electrical installation complies with DIN/VDE 0100 Part 710 requirements (the German standard in force since Nov. 1, 2002) or with the corresponding local regulations of the country in which they are used!
1.3
Warranty
Gebrüder Martin warrants the products described in this user manual to be free from any defects in material or workmanship for a period of two years from the date of delivery as specified on the delivery slip, provided they are used as intended. This warranty shall not cover consumables such as lamps and sterile handles or potential software updates. In any other respects, our General Conditions of Sale as updated from time to time shall apply. Under this warranty, we will remedy free of charge any defects due to faulty workmanship or the use of faulty materials, either through our Customer Service or directly at the factory. Important Notices The product may only be repaired by Gebrüder Martin or a qualified person or firm expressly authorized by Gebrüder Martin to perform such work. If the repair is carried out by a person or firm specially authorized by Gebrüder Martin, the operator of the product is required to obtain from the repairer a certificate with details about the nature and scope of the repair work done. This certificate must be dated and signed and include the firm’s details.
4
V 1.0
Operating / Mounting Instructions marLED® Battery-Operated / Mobile Lights In all cases where a party other than the product manufacturer performed the work, repaired products must be additionally marked with the repairer’s ID label. Improper interventions or alterations performed by third parties during the period of limitation shall void any and all warranty claims. Unauthorized actions performed on the product shall invalidate any liability claims vis-à-vis Gebrüder Martin.
1.4
User’s Inspection
Immediately upon receipt, the goods must be checked for completeness and potential damage in transit. Notice of any such damage must be given immediately.
1.5 •
•
Hotline
Should you have any questions on how to handle the unit / product or question on its clinical application, please do not hesitate to contact the Product Management Tel:
+49 7461 706-243
Fax:
+49 7461 706-190
Should you have any technical questions, please do not hesitate to turn to our Martin Service Center Tel:
+49 7461 706-343
Fax:
+49 7461 706-203
E-Mail: [email protected] Our service representatives are available Monday through Friday from 8 a.m. to 5 p.m. (CET). Should you have any questions concerning maintenance contracts or training courses, please contact our Technical Service Manager at +49 74 61 706-332, or send an e-mail to: [email protected].
NOTICE To answer your technical questions as efficiently as possible, our service technicians require the serial number of the product. Therefore, please have this number at hand when contacting our hotline. It is part of the information provided on the rating plate; see section 13 “Serial Number Structure”, page 44.
V 1.0
5
Operating / Mounting Instructions marLED® Battery-Operated / Mobile Lights
2
Notices concerning these Operating Instructions
Non-observance of these Operating Instructions can lead to serious or even lethal patient injury! Be sure to read, understand and follow the instructions given below! •
Every user is required to read these Instructions completely and follow them carefully.
•
In particular, be sure to heed all cautions, warnings and danger notices.
•
Keep this manual accessible to users at all times.
•
It is the user’s responsibility to inform the patient on all the application and warning notices contained herein and to ensure that he / she has understood them.
2.1
Validity of these Operating & Mounting Instructions
These Operating / Mounting Instructions are valid for marLED® battery-operated / mobile lights with software version SW 00 and hardware status HW 00. If older hardware versions are used, it may be that functions described in this user manual are not available. Upon turning on your marLED® light, the currently active software version is indicated on the sensoTouch control panel (see section 4.4 “Starting Performance”, page 13) to ensure that users are never in doubt about which version of the user manual is the currently valid edition.
6
V 1.0
Operating / Mounting Instructions marLED® Battery-Operated / Mobile Lights
2.2
Symbols Used
Throughout this manual, important information (such as general or safety-related notices) is marked with the following symbols and signal words:
WARNING Danger of death or serious injury! Indicates a situation which, if not avoided, could result in death or serious injury!
CAUTION Danger of minor injury! Indicates a situation which, if not avoided, could result in minor or moderate injury!
NOTICE Risk of material damage! Indicates a situation which, if not avoided, could lead to material damage (loss of time, data loss, device/machine failure, etc.)! •
This symbol marks enumerations. - Subordinate enumerations are marked with this symbol.
V 1.0
7
Operating / Mounting Instructions marLED® Battery-Operated / Mobile Lights
2.3
Symbols Used on the Product
Symbol
Explanation CE-mark
Protection class (acc. to IEC 60601-1): I
Observe safety notices / instructions!
Observe Operating Instructions!
Warning: Hot surface!
Warning: Dangerous electric voltage!
2.4
Terms & Abbreviations
backLite
background illumination 2% for endoscopic surgery
Cardanic system
Cardan joint integrated into suspension bracket of light head
- fully cardanic suspension
Double suspension bracket with cardan joint, rotatable in three axes
- LC cardanic suspension
Low-ceiling cardanic system: simplified suspension bracket, rotatable in two axes, for use in low rooms
Light engine
LED illumination unit with 16 individual LEDs
sensoGrip
Multifunctional handle
sensoTouch
Control panel with display as status indicator
SC
Safety check
variLUX
Switches form of light field
8
V 1.0
Operating / Mounting Instructions marLED® Battery-Operated / Mobile Lights
3
Safety Notices
3.1
General Information
KLS Martin operating lights are quality products designed and manufactured in accordance with the recognized technical rules. The products leave the factory in a perfectly safe working condition. To maintain this status, you – as the end user – are required to abstain from or prevent any action that might have an adverse effect on the lights’ safety characteristics. •
Observe the following safety notices!
•
Be sure to follow the instructions provided!
Should the light or any of its components become damaged or defective: •
Disconnect the light from the power supply!
•
Safeguard the light or its components against dangerous contact with persons! Place warning signs where appropriate.
•
Contact the manufacturer or service technician at once!
Upon completion of any repair or service work, it is mandatory for the service technician to check all functions of the light, the tracking and spring arms and the power supply units, thus ensuring their proper working order and operational safety!
NOTICE It is not permitted to attach to or install on the operating lights any components or systems other than accessories that have been expressly approved by Gebrüder Martin.
3.2
Personal Protection
WARNING Danger of serious injury from defective lights! Damaged lights can pose a life or health hazard to users and patients! Never put damaged lights into operation!
V 1.0
9
Operating / Mounting Instructions marLED® Battery-Operated / Mobile Lights
WARNING Danger of serious injury from excessive heat! When using maximum brightness and very small light-field diameters in a multi-light setup, the light fields should not be allowed to overlap each other. Non-compliance poses a risk of excessive heat development in the light field (> 1000 W/m²).
WARNING Danger of explosion! Be sure to maintain a safe distance between the light and any openings or surfaces from which anesthetic gases, oxygen or other flammable or oxidizing (fire-accelerating) gases are emitted.
3.3
Operation
•
Prior to each use, be sure to check the lights for safe functioning and proper operating condition!
•
Be sure to handle the lights in accordance with the instructions provided in this user manual (including putting them into and out of operation)!
WARNING Danger from light failure! When working with a single operating light, there will be a residual risk of functional failure in spite of the additional safety power supply (ASPS). Therefore, it is the surgeon’s responsibility to decide whether the intended intervention can be carried out under such circumstances or not.
NOTICE Risk of light damage! •
Protect the light from mechanical impact during operation, such as may be caused by arm movements when inserting a hip prosthesis or pulling off components. As such movements are typically performed with edged or sharp instruments, there is a potential danger of damaging the bottom glass pane of the operating light!
•
Avoid collision with other OR equipment (such as ceiling-mounted pendant systems or articulated arm systems)!
•
Adjust the light head’s position with care, approaching the arm stops slowly and applying only moderate force!
10
V 1.0
Operating / Mounting Instructions marLED® Battery-Operated / Mobile Lights
3.4 •
Cleaning and Infection Protection
In addition to the following safety notices, observe the cleaning and disinfection instructions provided in section “9,“Cleaning and Disinfecting the Light” page 34.
WARNING Danger of serious injury from electric shock! Prior to performing any cleaning or disinfecting work, be sure to deenergize the light system: •
Disconnect the light system all-pole from the power supply
•
Secure it against reconnection
•
Protect light system from splash water; do not use wet cleaning / disinfection
•
Never insert any objects into the openings of the units!
WARNING Danger of infection from non-sterile handling! •
To protect yourself against infection, maintenance or service work should only be performed after the lights and associated equipment have been adequately cleaned and disinfected where appropriate!
•
Clean only cold lights! This avoids potential hazards due to disinfectant or cleaning agent evaporation and a consequential ineffectiveness of the disinfection because the disinfectant would not have enough time to take effect.
NOTICE Risk of light damage! When using the “wiping” technique as permitted by Gebrüder Martin for surface disinfection, apply just enough disinfecting liquid to prevent the formation of “pools” and the consequential capillary action through which the liquid could be drawn into the light head.
V 1.0
11
Operating / Mounting Instructions marLED® Battery-Operated / Mobile Lights
4
Description of the Lights
4.1
Description of marLED® V10 M Mobile Light (A) Light head (B) sensoGrip (C) Control panel on cardan joint of light head (D) Spring arm (E) Stand tube (F) Switchbox with internal line fuses (I) Stand base
4.2
Description of marLED® V10 MB Battery-Operated Mobile Light (A) Light head (B) sensoGrip (C) Control panel on cardan joint of light head (D) Spring arm (E) Stand tube (G) Battery box (H) Control panel on battery box, with line fuses (I) Stand base
12
V 1.0
Operating / Mounting Instructions marLED® Battery-Operated / Mobile Lights
4.3
LED Technology
The marLED® V10 Battery-Operated / Mobile lights feature state-of-the art LED light sources – so-called “light engines” – which, compared with conventional halogen lamps, allow various basic lighting parameters to be controlled across a much wider range. Moreover, the light generated contains no infrared content at all and since the lights do not contain any mechanically movable parts, they are completely maintenance-free.
4.4
Starting Performance
The marLED® V10 Battery-Operated / Mobile lights are “smart” lights. They are automatically set to a medium light field diameter and an illuminance of 75% during startup. Other startup parameters can be set as well upon request (such as the initial operating state after turning on the light via the main switch, illumination intensity, color temperature, type and / or size of light field). Immediately upon switching them on, the software status and the accumulated operating hours (ten-hour units) are briefly displayed at the color temperature position (see item (50), page 27, example: “0078” = 780 hours).
4.5
Connecting the Battery-Operated Mobile Lights to the Power Supply With these lights, both the mains power supply and the battery power supply are switched on / off via the control panel (2). Besides, the panel allows you to check the state of charge of the battery. For external power supply, plug the mains cable (1) into a socket-outlet.
4.6
Connecting the Mobile Lights to the Power Supply To connect these lights to the power supply, plug the mains cable (3) into a socket-outlet. The cable has a length of approx. 4 m.
3 Mains cable 4 Dummy plugs
V 1.0
13
Operating / Mounting Instructions marLED® Battery-Operated / Mobile Lights
5
Assembling / Mounting the Light
The light is delivered on a Euro-pallet in disassembled condition, carton-packed.
NOTICE Time loss! •
Prior to mounting the light, please carefully read these mounting instructions and follow them strictly!
Mounting the battery-operated and mobile lights requires the assistance of a second person. The following screws are required: 2 M5x8 cross-recessed raised countersunk oval head screws (DIN EN ISO 7047) for mounting the spring arm on the stand tube 2 M5x12 cross-recessed raised countersunk oval head screws (DIN EN ISO 7047) for mounting the stand tube on the stand base 1 M5x70 cross-recessed raised countersunk oval head screw (DIN EN ISO 7047) for mounting (stabilizing) the stand tube on the battery box
NOTICE Avoid damage caused by improper mounting! If the mounting work appears to be too difficult, do not hesitate to have it done by an authorized service technician of the competent customer service provider. The respective telephone number is available from our hotline (see section 1.5 “Hotline”, page 5). The locking castors provided on the stand base allow arresting the light.
14
V 1.0
Operating / Mounting Instructions marLED® Battery-Operated / Mobile Lights
5.1
V 1.0
Mounting the Stand Tube •
Remove the two M5x12 Phillips screws (5) including the curved tooth lock washers from the neck of the stand base (6).
•
Connect the three cables (8) extending from the neck of the stand base (6) with the wire pull (9) supplied, then pull the three cables (8) through the stand tube (7).
•
Fix the three cables (8) temporarily in place at the upper end of the stand tube (7) to have them readily available for the subsequent spring arm installation.
•
Plug the stand tube (7) in place on the neck of the stand base (6), making sure that the two boreholes (10) and (11) provided in the stand tube are well aligned with the threaded holes provided in the neck of the stand base.
15
Operating / Mounting Instructions marLED® Battery-Operated / Mobile Lights •
Secure the stand tube with the two M5x12 Phillips screws (5) with curved tooth lock washers (12).
NOTICE Stand tube of battery-operated lights! For the battery-operated lights, the M5x70 fixing screw (13) must be inserted in addition to the two M5x12 Phillips screws (5). The fixing screw (13) must be pushed through the stand tube and the wall of the battery box and subsequently tightened. The M5x70 fixing screw (13) is supplied in the plastic bag containing the mounting instructions (user manual). •
16
Push the M5x70 fixing screw (13) through the stand tube and the wall of the battery box, then tighten it.
V 1.0
Operating / Mounting Instructions marLED® Battery-Operated / Mobile Lights
5.2
Mounting the Spring Arm • •
V 1.0
Remove the two M5x8 Phillips screws (15) from the spring arm (14). Connect the three cables (16) extending from the spring arm (14) to the three cables of the stand tube (7).
•
First, connect the two yellow-and-green grounding cables (18, 21) with each other.
•
The current-conducting cables (17, 19, 20, 22) are connector-coded to prevent mix-up.
•
Connect the current-conducting cables as follows: 17 with 22 19 with 20
•
Insert the spring arm connector (23) into the stand tube (7), making sure that the two boreholes (24) of the connector are well aligned with the two boreholes provided in the stand tube (7).
•
Fix the spring arm (14) in place on the stand tube (7) using the two M5x8 Phillips screws (25).
17
Operating / Mounting Instructions marLED® Battery-Operated / Mobile Lights
5.3
Mounting the Light Head on the Spring Arm The spring arm is delivered with no height stop setting. •
Have the spring arm (14) held in horizontal position by your assistant, then insert the neck (26) of the light head bracket (27) into the spring arm.
•
Remove the brake setscrew (28) located on the underside of the sleeve. Rotate the sleeve (29) by 90 degrees, then remove the first locking screw (30). Rotate the sleeve (29) by 180 degrees, then remove the second locking screw (31). Insert the neck of the light head into the spring arm. Screw in the first locking screw (30), making sure that it engages with the groove provided in the neck of the bracket.
• • • •
The locking screw (30) must engage correctly with the groove of the neck of the light head bracket, but take care not to destroy it when screwing it in! •
•
•
Rotate sleeve (29) by 180 degrees, then insert the second locking screw (31) in the same manner, making sure the screw engages correctly with the groove of the neck. Rotate sleeve (29) by 90 Grad degrees, then screw in the braking setscrew (28) and adjust the braking force as desired (see section 5.4.3 “Adjusting the Braking Force”, page 21). The height stop can be adjusted to limit the upward range of movement of the arm in accordance with room height (see section 5.4.2 “Adjusting the Height Stop of the Spring Arm”, page 20).
This completes the light mounting process.
18
V 1.0
Operating / Mounting Instructions marLED® Battery-Operated / Mobile Lights
5.4
Adjusting the Spring Arm
NOTICE The spring arm settings must be made after the light head has been installed! The spring arm has been factory-set for optimal weight balance. If readjustment becomes necessary, please proceed as described below. 5.4.1
Adjusting the Spring Tension
NOTICE Set the spring arm so that the arm (complete with light head) remains securely arrested in any position! •
Insert a 5-mm Allen wrench (32) into borehole (33).
If spring arm swings too easily upwards: •
Rotate the adjusting screw leftwards (counterclockwise).
If spring arm swings too easily downwards: •
Rotate the adjusting screw rightwards (clockwise).
NOTICE Spring arm replacement! Different spring arms have different springs for counterbalancing the weight of different loads (terminal devices). Should the arm not remain in the chosen position after adjusting the spring tension, it must be replaced.
V 1.0
19
Operating / Mounting Instructions marLED® Battery-Operated / Mobile Lights 5.4.2
Adjusting the Height Stop of the Spring Arm
In rooms with low ceilings, you can limit the spring arm’s upward range to horizontal position. The spring arm is delivered ex factory with no height stop set.
20
•
Remove the two Phillips screws (34) and take off the coverings (35).
•
Use the metal pin supplied to set the adjusting nut (37) located in the adjustment opening (36) as appropriate.
•
Put the coverings (35) back in place and screw in the two Phillips screws (34).
•
Check the coverings (35) for secure installation.
•
Perform function test.
•
Store the metal pin in a safe place for future use.
V 1.0