Marquette
Giraffe, Lullaby and Panda Neonatal Systems
CS1 OmniBed and Incubator Carestation Cleaning and Disinfection Guidelines
Cleaning and Disinfection Guidelines
1 Page
Preview
Page 1
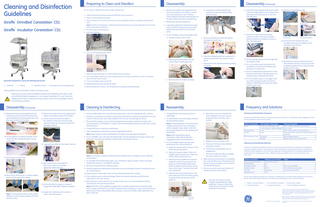
Cleaning and Disinfection Guidelines ™
™
™
Giraffe OmniBed Carestation CS1 ™
™
Giraffe Incubator Carestation CS1
Preparing to Clean and Disinfect Do not clean or disinfect the device while in patient use. 1. Gather Personal Protection Equipment (PPE) per clinical protocol. 2. Obtain recommended solution(s). 3. Move the device to a work area where you have adequate space to completely disassemble parts. Note: All parts to be cleaned or disinfected should be placed in an area separate from the area where clean parts are placed. 4. Put PPE on per clinical protocol. 5. Level the mattress.
Disassembly
Disassembly (Continued)
1. Remove any patient care equipment and linens from drawers and shelves. Consult your clinical protocol or your Infection Control department about returning items to the device after cleaning and disinfecting.
D. Unsnap the notched seal (the seal nearest the Control Panel) by pulling down the ends.
8. Swing the outer side bed panel down so that it lies horizontally relative to the vertical inner side bed panel. Gently pull up on the inner side bed panel.
14. Remove in the following order:
2. Remove any optional equipment. A) Mattress
B) Clear plate
C) X-ray tray
D) Scale (if present)
3. Unplug the patient skin temperature probe, scale connector (if present), and any other probe panel connectors from the probe panel. 4. For an OmniBed, remove the canopy seals: A. Lift and unsnap corner covers.
5. Remove porthole grommets and tubing management grommets.
9. Remove the outer side bed panel by pushing on either of the spring loaded buttons located at the bottom corners of each side bed panel.
15. Ensure that the mattress tray and translation deck are not rotated. Lift the assembly out of the bed.
6. Turn on the standby power switch.
B. Slide long side seals away from the Control Panel and off guide rails.
6. Open the side bed panels by squeezing the latches located at the top corners of each panel. 7. Remove the inner side bed panel by pushing on the tab.
Especially designed for use by the following personnel: • Cleaning
• Clinical
• Infection Control • Biomedical / Clinical Engineering
9. Turn the standby power switch off.
11. For an OmniBed, lower the panel at the humidifier end of the bed by lifting it and allowing it to rotate down.
16. Separate the rotating mattress tray from the translation deck by turning it over and squeezing together the two spring latches located in the center.
12. For an OmniBed, lift the panel at the Control Panel end of the bed. It will raise about 4 cm to allow access underneath the panel.
7. Adjust the elevating base to a comfortable cleaning position. 8. For an OmniBed, raise the canopy midway using the canopy raise/lower arrows. The heater doors should remain closed.
10. Lift the side bed panel out of its hinges with the opposite hand.
13. For an Incubator, press in the trigger at the top of the locking post with one hand to release it while lifting the hood at its center with the other hand.
C. Slide the short front seal to the side.
10. Unplug the device from the power outlet. 11. Allow the device to cool for 30-minutes prior to cleaning and disinfecting.
These guidelines are not intended to replace clinical protocols. Warning: To ensure the safe and effective cleaning and disinfecting of this device, refer to the Giraffe OmniBed Carestation CS1 or Incubator Carestation CS1 User Manual for additional information including warnings, cautions, and a list of acceptable cleaning and disinfecting solutions.
Disassembly (Continued) 17. Release the tilt screw by squeezing the tilt mechanism at the Control Panel end of the bed and sliding the thumb pocket latch near the scale connector to the right.
Cleaning & Disinfecting 21. Remove the water reservoir by grasping the bottom and pulling it away from the bed. 22. Lower it down and allow the water in the cylinder to drain back into the water reservoir. Empty any remaining water from the water reservoir.
1. Remove visible debris from all surfaces by wiping with a soft cloth dampened with a solution. 2. Divide the components according to cleaning and disinfection methods as described in the user manual. Methods other than those detailed in the manual may damage the device. 3. Place parts for soaking, such as tubing management grommets, porthole grommets, and canopy seals (for an OmniBed), in a solution as recommended by solution manufacturer and per clinical protocol. 4. Change PPE prior to cleaning or disinfecting. 5. Clean and disinfect components using the appropriate method. Note: Water reservoir may be disinfected chemically or through steam sterilization.
18. Lift the platform by pulling vertically on the central handle and depressing the spring loaded pin.
6. For an OmniBed, use a soft cloth dampened with a solution between the canopy and the seal guide rails. Pay particular attention to both inside and outside surfaces.
Frequency and Solutions
Reassembly 1. Change PPE per clinical protocol prior to reassembly. 2. For reassembly, reverse the steps outlined in the disassembly section. Note: During reassembly, verify that the fan is tightly pressed down over centerpiece, and the adapter ring is visible. Verify that the fan spins freely prior to proceeding with reassembly. Note: While reassembling the tilt mechanism, verify that the tilt ball is engaged securely in the pocket latch. 3. For an OmniBed, replace canopy seals starting with the Control Panel end.
23. Separate humidifier lid from water reservoir.
A. Insert the notched seal in the slot in front of the red warning spacer Note: Do not clean or disinfect heating element/reflective dish or protective cover inside the canopy doors.
19. Lift the pan out of the bed. 24. Remove the screw that holds the filter cover in place. It is located behind the water reservoir.
8. Remove components from soaking solution. 9. Rinse all cleaned and disinfected components as recommended by solution manufacturer and per clinical protocol. 10. Wipe the touch screen with a soft, lint-free cloth dampened with a solution.
20. Remove fan. With thumb on rubber adapter, gently pull fan upward to release.
11. If the mattress cover is without damage, follow the mattress cleaning and disinfecting instructions in the User Manual. 25. Pull out the filter to inspect or replace it. Inspect the intake filter. Replace as desired.
Note: It is important to press on the rubber adapter to avoid improper release of the fan from the motor.
7. For reusable skin temperature probes, use a soft cloth to apply a solution. Never submerge temperature probes or coil tightly for storage.
26. Inspect the mattress cover for tears or stains. Discard if present.
12. Allow all parts to air-dry for 30 to 45 minutes (minimum) or as recommended by solution manufacturer and per clinical protocol.
E. Select the corner cover that fits the corner. Replace the corner cover by snapping it down over the corner receiver.
B. Slide up to snap into place. There is an audible snap from each end. It does not matter which seal lip faces out. C. Starting at the humidifier end, slide the slotted end of each long seal over the guide rail, with the large seal lip down. Slide the slotted end toward the Control Panel until it stops. The seal is flush with end of guide rail. D. Slide the short seal, large lip down, over short guide rail on the end of the canopy. The seal is flush with the ends of the guide rail.
Note: AAMI TIR30: 2003 guidelines suggest that a reusable medical device should be visibly clean. If visible cleanliness has not been achieved, repeat cleaning or contact authorized service personnel for further disassembly. Return product to service only after visible cleanliness has been confirmed. Larger seal lip
Cleaning and Disinfection Frequency Cleaning and disinfection frequency is impacted by several use factors. The table below offers suggested cycles for the device based on various use scenarios: Device / Component
Use Condition / Description
Minimum Frequency
Device
0-75% non-condensing humidity > 75% humidity, or visible condensation In use In use
Every 2 weeks and between each patient use Every 1 week Every 1 week and when use is discontinued Quarterly and when used with an infectious patient or visibly dirty Discard between patients Between patients or per clinical protocol
Water Reservoir Air Filter Skin Temperature Probe
F. Repeat for the remaining corner. G. Make sure all red warning indicators have been covered. H. Check each canopy seal for secure engagement. I. Close the canopy only after completely dry; never while wet or damp. 4. After ensuring that the device is completely dry, cover the device per clinical protocol to prevent dust accumulation on the cleaned and disinfected device. 5. Prior to use, perform pre-use checkout of the device per the User Manual.
Warning: The device must be properly reassembled per these guidelines. Improper reassembly of the device may result in unsafe operation of the device.
Disposable Reusable
Cleaning and Disinfecting Solutions Cleaning and disinfecting solutions, as well as rinsing and drying procedures for reusable medical equipment, should be consistent with your clinical protocol. Follow manufacturer’s instructions for solution concentration, method of surface application, and contact time required to achieve disinfection. The following table lists some solutions that will not damage the device. Mattress solutions may differ. See your User’s Manual for more information. Generic Formulation
Maximum Concentration
Sodium hypochlorite (bleach) Glutaraldehyde Hydrogen peroxide Iodophur solution Cavicide® Isopropyl Alcohol
0.5% aqueous solution 2% 6% 0.27 % 100% spray 15%
Notes
Do not use in humidifier Parts cleaned may stain yellow See User Manual for notes
Do not use the following substances as cleaners or disinfectants. Do not allow these substances to contact the device. They will damage the parts you are cleaning and disinfecting and are not recommended: • •
Organic Solvents (acetone) • Hand-disinfectants •
Citric Acid (lemon-scented) • Scouring Compounds •
Strong Acids or Bases Citric Acid Adhesive removers
© 2014 - 2018 by General Electric Company. All rights reserved. General Electric Company reserves the right to make changes in specifications and features shown herein, or discontinue the product described at any time without notice or obligation. Contact your GE Representative for the most current information. GE, GE Monogram, Carestation, Giraffe, and OmniBed are trademarks of General Electric Company. All other company and product names mentioned may be trademarks of the companies with which they are associated.
Flush with guide rail 2077951-001 D Language: English
Datex-Ohmeda, Inc., a General Electric company doing business as GE Healthcare.