Quick Reference Instructions
2 Pages
Preview
Page 1
MRidium® MRI Infusion Pump QUICK REFERENCE INSTRUCTIONS
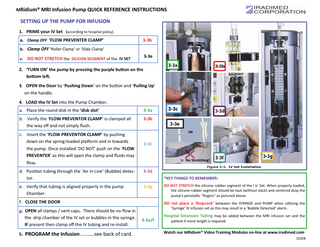
SETTING UP THE PUMP FOR INFUSION 1. PRIME your IV Set (according to hospital policy). a. Clamp OFF ‘FLOW PREVENTER CLAMP’
3-3b
b. Clamp OFF ‘Roller Clamp’ or ‘Slide Clamp’
3-3e
c. DO NOT STRETCH the SILICON SEGMENT of the IV SET
2. ‘TURN ON’ the pump by pressing the purple buƩon on the boƩom leŌ. 3. OPEN the Door by ‘Pushing Down’ on the bu on and ‘Pulling Up’ on the handle. 4. LOAD the IV Set into the Pump Chamber. a. Place the round disk in the ‘disk slot’
3-3a
b. Verify the ‘FLOW PREVENTOR CLAMP’ is clamped all the way off and not simply flush.
3-3b
c. Insert the ‘FLOW PREVENTOR CLAMP’ by pushing down on the spring-loaded pla orm and in towards the pump. Once installed ‘DO NOT’ push on the ‘FLOW PREVENTER’ as this will open the clamp and fluids may flow.
3-3c No Stretching!
3-3d
e. Verify that tubing is aligned properly in the pump Chamber.
3-3g
*KEY THINGS TO REMEMBER:
f. CLOSE THE DOOR
5. PROGRAM the Infusion………..see back of card.
3-3e OR
d. Posi on tubing through the ‘Air in Line’ (Bubble) detector.
g. OPEN all clamps / vent caps. There should be no flow in the drip chamber of the IV set or bubbles in the syringe. IF present then clamp off the IV tubing and re-install.
3-3c
DO NOT STRETCH the silicone rubber segment of the I.V. Set. When properly loaded, the silicone rubber segment should be taut (without slack) and centered atop the pump's peristal c "fingers" as pictured above.
DO not place a ‘Stopcock’ between the SYRINGE and PUMP when u lizing the ‘Syringe’ IV infusion set as this may result in a ‘Bubble Detected’ alarm.
3-3e/f
Hospital Extension Tubing may be added between the MRI infusion set and the pa ent if more length is required.
Watch our MRidium® Video Training Modules on-line at www.iradimed.com OVER
®
MRidium® MRI Infusion Pump QUICK REFERENCE INSTRUCTIONS PROGRAMMING BY RATE AND VOLUME
FIRST-TURN ON THE PUMP!
1.
Turn ‘ON’ the pump Load the IV Set Tubing Select ‘New PaƟent’ (Rate Mode)
2.
RATE is highlighted: using the keypad enter the rate of infusion and press ‘ENTER’.
3.
VTBI is highlighted: using the keypad enter the volume to be infused and press ‘ENTER’.
4.
Open all Roller, Slide or White Vent Caps.
5.
4.
Primary will be highlighted. Press ‘ENTER’ PROGRAM required entries i.e. Dose, Conc, Weight (kg), VTBI and Press ‘ENTER’
‘Ready to Start ’A’ or ’B’ will be flashing in boƩom right corner. PRESS the Purple ‘A’ or ‘B’ soŌkey to start your infusion.
6.
PRESS ‘A’ or ‘B’ to PAUSE / STOP the infusion.
5.
Open all Roller, Slide or White Vent Caps.
7.
6.
Ready to Start ’A’ or ’B’ will be flashing in boƩom right corner.
Infusion Complete: CLOSE the Clamps, OPEN the Door and REMOVE the IV set.
8.
Turn OFF the pump.
1…2…3!
SECOND-LOAD THE IV SET! THIRD-PROGRAM THE INFUSION!
PROGRAMMING the Dose Rate Calculator 1
SELECT ‘New PaƟent’ ‘Drug Library A or Drug Library B’.
2.
Use the ‘UP or DOWN’ arrow keys to scroll thru medicaƟons. Press ‘ENTER’ when you have located the medicaƟon of choice.
3.
PRESS the Purple ‘A’ or ‘B’ soŌkey to start your infusion.
ALARM MESSAGES
7.
PRESS ‘A’ or ‘B’ to PAUSE / STOP the infusion.
8.
Infusion Complete: CLOSE the Clamps, OPEN the Door and REMOVE the IV set.
9.
MESSAGE
RESOLUTION
CHECK DOOR
Possible Free-Flow of IV Fluids
Open door and Check ‘Free Flow Preventer’ to assure it is pulled out to the full stop posiƟon.
CLOSE DOOR
Door Latch is open
Press ‘Alarm Silence
Turn OFF the pump.
PROGRAMMING A BOLUS Press the white soŌkey adjacent to ‘BOLUS’.
2.
DOSE will be highlighted: Enter Dose value and PRESS ENTER
3.
‘Ready to Start ’A’ or ’B’ will be flashing in boƩom right corner. PRESS the Purple ‘A’
Bubble Detected
or ‘B’ soŌkey to start your infusion.
Inlet Occlusion
Once the Bolus has started to infuse you will note: Bolus A or Bolus B on the display screen. Once the Bolus has infused a long ‘Beep’ will sound and the infusion will revert back to the primary seƫngs. IMPORTANT: Refer to the MRidium® 1138 OperaƟon Manual for further instrucƟons.
1025 Willa Springs Drive Winter Springs, FL 32708
Phone: 866.677.8022
Press ‘Alarm Silence Close Door latch fully downward.
1.
4.
Possible CAUSE
Fax: 407.677.5037
Air detector has detected a bubble.
Occlusion between the fluids and pump.
Press ‘Alarm Silence Evaluate air in set. Open Pump Door latch to remove set. Remove air per hospital protocol. Re-install set. Press START to resume infusion.
Press ‘Alarm Silence Check administraƟon set. Check to assure that all clamps/vents have been opened.
PT Occlusion
Occlusion between the pump and paƟent.
www.iradimed.com
Press ‘Alarm Silence Check administraƟon set. Check to assure all clamps have been opened.
LB011 Rev. C