Service Manual
118 Pages
Preview
Page 1
MRidiumTM 3860+ Infusion/Monitor System Service Manual, Part Number 1125A Release 6B, 2015-08 ECN 000702 ©2009-2015 IRadimed Corporation IRadimed Corporation 1025 Willa Springs Drive Winter Springs, Florida 32708 Tel: 407-677-8022 Fax: 407-677-5037 e-mail:[email protected]
European Authorized Representative Medical Device Consultancy 7 Pinewood Drive Ashley Heath, Market Drayton, Shropshire, UK, TF9 4PA www.medicaldeviceconsultancy.co.uk
IRADIMED CORPORATION
TABLE OF CONTENTS Paragraph
Page
1.0 PREPARATION FOR USE ... 1-1 1.1 Introduction... 1-1 1.2 Pre-Operational Mechanical Inspection ... 1-1 1.3 Operational Performance Check ... 1-2 1.3.1 Pre-operational Check Battery Charge ... 1-2 1.3.2 Pre-operational Electrical Inspection... 1-2 1.4 Control and Indicator Operational Performance Test ... 1-3 1.4.1 Power Indicator ... 1-3 1.4.2 Initialization... 1-3 1.4.3 Alarm Sound... 1-4 1.4.4 Prepare IV Set ... 1-4 1.4.5 Install 1056 IV Set ... 1-4 1.4.6 Flow Test (3860+ or 3861 SideCar) ... 1-5 1.4.7 Inlet Occlusion Test ... 1-6 1.4.8 Patient Occlusion Test ... 1-6 1.4.9 Bubble detected (Air In Line) Test... 1-6 1.5 Radio Setup and Verification ... 1-7 1.6 Programming Custom Drug Settings ... 1-8 1.7 MRidium™ 3860+ MR IV Pump ... 1-18 1.7.1 Preparing the Pump and DERS memory for programming... 1-19 1.7.2 Programming / Adding Drug Names and Protocols... 1-19 1.7.3 Create New Drug... 1-20 1.7.4 Programming or Editing a Dose Protocol ... 1-21 1.7.5 Removing Drugs... 1-22 1.7.6 Copy DERS Drug Library card ( cloning cards) ... 1-22 1.7.7 Erasing DERS Memory Cards... 1-23 1.8 Pulse Oximeter Verification (3860+ only)... 1-24 2.0 SERVICE MODE DESCRIPTION... 2-1 2.1 Service Mode Display ... 2-1 2.1.1 Calibrate Pump Screen ... 2-3 2.1.2 Battery Status Screen. ... 2-4 2.1.3 Service Menu Screen ... 2-5 3.0 PREVENTIVE MAINTENANCE ... 3-1 3.1 Introduction... 3-1 3.2 Preventive Maintenance... 3-1 3.2.1 Cleaning Instructions ... 3-2 3.2.2 Mechanical Inspection ... 3-2 3.2.3 Basic Tools ( For basic repairs and PM’s) * ... 3-4 3.2.4 3860+ PM Service Mode Verification ... 3-4 3.2.5 10 Key Pad Verification (3860 only) ... 3-10 3.2.6 Pump Flow Test... 3-11 3.2.7 SpO2 Verification... 3-12 3.2.8 3861 PM Service Mode Verification... 3-12 3.2.9 3861 Pump Flow Test:... 3-14 3.2.10 3865 PM Verification ... 3-15 3.2.11 Battery Pack Maintenance... 3-17 3.2.12 Removing a swelled Battery Pack (Figure 3-2) ... 3-20
i
3.3 Software Update ... 3-22 3.4 Dose Error Reduction System (DERS) Option Installation ... 3-23 3.5 Systems Test ... 3-24 3.5.1 Reference Documents ... 3-24 3.5.2 Test Equipment Needed... 3-24 3.5.3 Basic Tools ... 3-24 3.6 MRidium MR IV Pump, main unit, Verification (3860+) ... 3-25 3.6.1 DC Input Verification... 3-25 3.6.2 Battery Input Verification... 3-25 3.6.3 Battery Charge Verification & Adjustment ... 3-26 3.6.4 Pump Motor Speed Adjustment ... 3-26 3.6.5 Time and Date Verification... 3-27 3.6.6 3860+3860+ Pressure Verification... 3-27 3.6.7 Battery Verification :... 3-28 3.6.8 Bubble Detect Verification : ... 3-28 3.6.9 Verify No Bubble Detect : ... 3-28 3.6.10 3860+ Remote Radio Setup ... 3-29 3.6.11 10 Key Pad Verification (3860+ only) ... 3-31 3.6.12 SpO2 Verification (3860+ Only)... 3-31 3.7 MRidium Side Car Verification (3861) ... 3-32 3.7.1 DC Input Verification (3861) ... 3-33 3.7.2 Pump Motor Speed Adjustment (3861) ... 3-34 3.7.3 Service Mode Display Verification (3861) ... 3-34 3.7.4 Verify Bubble Detect: ... 3-34 3.8 Pump Calibration (3860+ and 3861) ... 3-36 3.8.1 Factory Pump Calibration:... 3-36 3.8.2 Calibration Verification. ... 3-39 3.8.3 Pump Accuracy Verification (3860+ and 3861): ... 3-41 3.8.4 History Verification (3860+)... 3-49 3.8.5 Radio Verification (3860+ and 3865): ... 3-49 3.9 Power Supply verification (3865) ... 3-50 3.9.1 DC Input Verification (3865) ... 3-50 3.9.2 Battery Charger Verification (3865)... 3-51 3.9.3 Line Power Verification Test (3865)... 3-51 3.9.4 Initial Power-Up Verification (3865) ... 3-51 3.9.5 Remote Pump Control Verification (3865) ... 3-53 3.9.6 Remaining Soft Key Verification ... 3-53 3.9.7 BATTERY CHARGE and Burn-In Verification (3865) ... 3-54 4.0 PRINCIPLES OF OPERATION ... 4-1 4.1 Introduction... 4-1 4.2 Mechanical Operation ... 4-1 4.2.1 Physical Description ... 4-1 4.2.2 Pumping Mechanism ... 4-3 4.2.3 Force sensors (Pressure Transducer) ... 4-4 4.2.4 Mechanical Functional Operation... 4-5 4.3 Electronic Operation... 4-6 4.3.1 Electronics Functional Description ... 4-6 4.3.2 Power Supply / Motor Driver Functional Operation... 4-7 4.3.3 Processor Assembly ... 4-9 4.4 Air-In-Line Detector ... 4-11 4.5 Door Sensor ... 4-12
ii
4.6 4.7 4.8 4.9
Flow Switch ... 4-12 Display Subsystem ... 4-12 Communications Interface and Signal Definitions ... 4-13 Critical Error/Service Codes ... 4-13
SECTION 5 ASSEMBLIES AND SCHEMATICS... 5-1
iii
SECTION 1 PREPARATION FOR USE 1.0
PREPARATION FOR USE
1.1
Introduction This section contains information relative to the initial inspection and preoperational checkout of the MRidium 3860+ Infusion Pump/Controller, the 3861 SideCar Secondary Pump and 3865 Remote Display/Charger. These procedures include a mechanical inspection, electrical inspection, pre-operational battery charge and a performance check to ensure that the instruments operate properly and have not been damaged during shipment or storage. The MRidium 3860's operating features are identified in the MRidium 3860+ Operation Manual (IRadimed PN 1138).
1.2
Pre-Operational Mechanical Inspection The MRidium 3860+ and it’s accessories have undergone thorough production control and quality assurance testing prior to shipment from Iradimed. The shipping container has been designed to protect the instruments against damage under normal shipping conditions; nevertheless, internal physical and/or electronic component damage could have occurred without leaving a visible signature. Therefore, it is recommended that the following inspection procedure be performed upon receipt of the instruments at the user's facility. 1. Carefully remove the MRidium 3860+, 3861 or 3865 from their shipping containers. (It is recommended the shipping material be saved in the event an instrument has been damaged and must be returned to the factory for service or repair). 2. Inspect the exterior cases, front and rear, for holes, cracks, scratches, broken or damaged controls, missing components and/or screws. 3. Inspect the display window covering and overlay for scratches or cracks (3860+ or 3865). 4. Ensure the pumping chamber access door fits flush with the case at the top, bottom, and sides (3860+ or 3861). 5. Check the Door Handle/Eazy Latch lock for ease of operation and flush fit with door when latched (3860+ or 3861). 6. Inspect the pumping mechanism seal for damage and to ensure they are properly attached to the front case (3860+ or 3861). 7. Inspect the Bubble detector and Flo-Stop recess for damage or obstructions (3860+ or 3861). 8. Install an approved Iradimed administration set to ensure the Flo-Stop assembly seats correctly and the door closes and latches properly (3860+ or 3861). 9. Actuate each of the keypad controls on the front panel and ensure proper operation (see Section 1 of 1138 Operation Manual for location of controls) (3860+ or 3865). 10. Exercise the pole clamp mechanism to ensure freedom of movement (3860+ only). 11. Inspect the power cord for damage, bent prongs or deformed connector (3860+ or 3865).
1-1
12. Inspect AC Power/Charger Module and Power/Charger cable for physical damage and/or missing parts (3860+ only). NOTE In the event a MRidium 3860+, 3861 or 3865 shows evidence of shipping damage, notify the carrier's agent immediately. Do not return a damaged instrument to the factory before the carrier’s agent has authorized repairs. Contact IRadimed for authorization to return the instrument for repair regardless of liability for repair costs. 1.3
Operational Performance Check Prior to the first operational use and following any routine maintenance or servicing of the MRidium 3860+ and it’s accessories, it is strongly recommended that an operational performance check be performed. The operational performance check consists of two phases; a Pre-operational Electrical Inspection to check the electrical integrity of the instrument for compliance with regulatory agency requirements and an Operational Performance Test to verify proper pump operation. 1.3.1 Pre-operational Check Battery Charge Connect External DC Power/Charger (1120) power cord (1121) to AC Outlet, connect DC Charger cable from External DC Power/Charger (1120) to 3860+ pump DC input insuring connectors at both ends are screwed in tightly and allow the battery to charge for at least 6 hours. 1.3.2 Pre-operational Electrical Inspection The pre-operational electrical inspection includes an electrical leakage test and a ground continuity check.
CAUTION Some of these tests are inherently hazardous. Safeguards for personnel and property should be employed when conducting such tests. Tests should only be performed by qualified personnel. 1.3.2.1 Electrical Leakage Test Connect power cord (1121) to safety analyzer. Connect ground cable from safety analyzer to the front chassis door latch clamp. Perform an electrical leakage current measurement in compliance with Underwriters Laboratories (UL) 2601 for Patient Care Equipment and / or IEC-60601-1. Leakage currents are to be less than 300 microamperes. 1.3.2.2 Electrical Ground Test Connect External DC Power/Charger (1120) power cord (1121) to 25 Amp Ground tester, connect DC Charger cable from External DC Power/Charger (1120) to 3860+ pump DC input insuring connectors at both ends are screwed in tightly. Open pump door and connect alligator clip of chassis Ground wire from Ground tester to front chassis door latch pin and verify less than 0.1 ohms ground resistance and no fail test status.
1-2
1.4
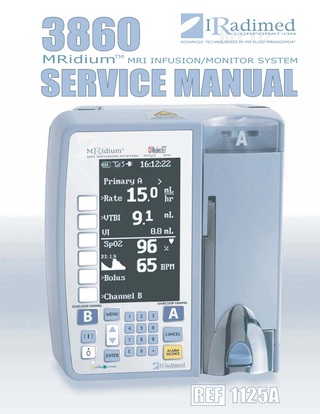
Control and Indicator Operational Performance Test The following operational performance test is designed to ensure each of the MRidium 3860+'s controls and indicators is functioning properly, and to check the operability of all the features available in the normal operating modes. These tests and associated procedures are presented in a sequence that provides an efficient, qualitative check of instrument operability. Test Requirements The following items of laboratory equipment and supplies are required to conduct the operational performance tests: 1. IRadimed 1056 administration set. 2. IV Solution Container. 3. Standard IV Pole. 4. Hemostat. 5. Empty fluid container. 6. Infutest 2000 (or equivalent) 7. Pronk Technologies OxSim, OX-1 SpO2 Finger Simulator (or equivalent). 1.4.1 Power Indicator Mount MRidium 3860+ on IV pole With External DC Power/Charger (1120) power cord (1121) to line power, DC Charger cable connected from External DC Power/Charger (1120) to 3860 pump DC input remove 1133 Battery Pack from Pump and verify LED below power on/ off switches is illuminated Green. Reinstall 1133 Battery Pack and verify LED below power on/off switches is illuminated Yellow or Amber. 1.4.2 Initialization Power on using overlay (IVP-0010) On (I) button. Verify the following initial display with current Software revision: IRI LOADER FLASHER © 201X MS03 ”Day””Month””YR” HR:Min:Sec MS01 ”Day””Month””YR” HR:Min:Sec NO CARD DETECTED followed by: Powering On X.X.XXXX (X.X.XXXX = Current software revision) followed by: Normal pump display (Figure 1-1). Verify display is clear and readable.
1-3
Figure 1-1. 1.4.3 Alarm Sound Momentarily press the Off switch and verify Alarm sound. Pump should not turn off. Verify Power Off requires 2 second depression of the O (off) key. 1.4.4 Prepare IV Set Using IV Set 1056 insert set spike into water container and hang water container approximately 21 inches above MRidium 3860 MRI Infusion Pump. Squeeze drip chamber to fill approximately 2/3 full. With Free Flow Restrictor pinch clamp open prime tubing and clear air by slowly open roller clamp allowing water to fill tubing. 1.4.5 Install 1056 IV Set Install 1056 IV Set in 3860+ Pump or 3861 SideCar as shown and close door (See Figure 1-2).
1-4
Figure 1-2. 1.4.6 Flow Test (3860+ or 3861 SideCar) Connect patient end of IV Set to Infutest 2000 (or other IV Pump Flow test device). Set Pump Rate to 100 ml and VTBI to 25 ml, verify Ready to Start is flashing in lower right of the display. Press the Start/Stop Channel A (Channel B for SideCar) key and verify the pump begins running as indicated by the pulsing “>” in the upper portion of the display and Green flashing LED in the top of the door. Allow Test to run for a minimum of 10 minutes and verify “Ave.:” is 100.00 ml +/- 5%. 1.4.6.1 Alternate Flow Test Connect patient end of IV Set to a graduated 50 ml cylinder with 0.1 ml resolution. Set Pump Rate to 100 ml and VTBI to 25 ml, verify Ready to Start is flashing in lower right of the display. Press the Start/Stop Channel A (Channel B for SideCar) key and verify the pump begins running as indicated by the pulsing “>” in the upper portion of the display and Green flashing LED in the top of the door. Press the Start/Stop Channel A (Channel B for SideCar) key when the pump completes the 25 ml and verify graduated cylinder contains 25 ml +/- 1.25 ml.
1-5
1.4.7 Inlet Occlusion Test Press the Start/Stop Channel A (Channel B for SideCar) key and verify the pump begins running as indicated by the pulsing “>” in the upper portion of the display and Green flashing LED in the top of the door. Use the hemostat to pinch off the tubing above the instrument and verify the following conditions: 1. Pump stops. 2. INLET OCCLUDED” Flashes in the upper portion of the screen. 3. Alarm audio – sounds. 4. Red bar alarm LEDs flashes. 1.4.8 Patient Occlusion Test Clear occlusion (remove hemostat), then press the Start/Stop Channel A (Channel B for SideCar) key and verify the pump begins running as indicated by the pulsing “>” in the upper portion of the display and Green flashing LED in the top of the door. Use the hemostat to close off the distal tubing and verify the following conditions 1. Pump stops. 2. “PATIENT OCCLUDED” Flashes in the upper portion of the screen. 3. Alarm audio – sounds. 4. Red bar alarm LEDs flashes. Clear occlusion (remove hemostat), then press the Start/Stop Channel A (Channel B for SideCar) key and verify the pump begins running as indicated by the pulsing “>” in the upper portion of the display and Green flashing LED in the top of the door 1.4.9 Bubble Detected (Air In Line) Test Set Pump Rate to 500 ml and VTBI to 100 ml, verify Ready to Start is flashing in lower right of the display. Press the Start/Stop Channel A (Channel B for SideCar) key and verify the pump begins running as indicated by the pulsing “>” in the upper portion of the display and Green flashing LED in the top of the door. Tilt Drip Chamber below spike and allow a 0.75 (approximately 100 microliter) to 2 inch air bubble to enter line. Wait for air bubble to pass through pump and verify the following conditions: 1. Pump stops. 2. “Bubble Detected” Flashes in the upper portion of the screen. 3. Alarm audio – sounds. 4. Red bar alarm LEDs flashes.
NOTE The Bubble Detector is located at the bottom of the pump and requires minimum of 100 microliter bubble to be detected. Repeat test if bubble brakes up before reaching Bubble Detector.
1-6
1.5
Radio Setup and Verification
See Section 1.1.3 and 1.1.6. of the 1138 MRidiumTM 3860+ Operation Manual. Connect 2.4 GHz antenna and AC Power Cord to Remote Display Charger. a. b. c. d.
Turn both Pump and 3865 Remote Display/Charger on. Press the Menu key on the Remote Display/Charger Press the NEXT MENU soft key to bring up additional menu options, then press the Set Comm Channel soft key. From the Radio Channel menu, select the desired Channel 1 through 6 by pressing the soft key next to that channel and verify that Channel is now highlighted.
e.
Press the Menu key on the MRidiumTM 3860+ MRI IV Pump.
f.
Press the NEXT MENU soft key to bring up additional menu options, then press the Set Comm Channel soft key. From the Radio Channel menu, select the same Channel that was selected for the Remote by pressing the soft key next to that channel and verify that Channel is now highlighted. Add an ID marker on both the Remote and Pump with the Channel selected. Verify communication between Remote and Pump by pressing the Menu key on one and the Cancel key on the other, and observing both display match and change simultaneously.
g. h. i.
WARNING: Never Set two Pumps or Remotes on the same Comm Channel. Always confirm the remote display is communicating with the selected before use. Note: the COMM channel number can be seen adjacent to the radio antenna icon on the front LCD display. Troubleshooting aids for radio communication in very RF-tight MRI Magnet Rooms: 1) Channel selection - each of the 6 channels actually modify several communications parameters which provide a very wide range of RF link diversity. Please try different channels to find the best link. 2) Location - the 3865 Remote unit must be located close to the wall/window into the MR scanner room. It is recommended to be less than 3 feet away from the window. Do not allow people to get between the remote and pump, humans absorb large amounts of the 2.4 GHz frequency power of the link. 3) Adjust Radio Transmission power - IN the Service Mode, the radio power can be adjusted from medium power (+18 dBm is the standard factory setting) to high power (+24 dBm). 4) External Antenna - You can add an external antenna with longer cable which can be fixed directly on the viewing window. This can increase communication reliability in most all cases. 5) Space between Emitters - Make sure there is at least 0.5meters (20 inches) between the IRadimed equipment Antenna and any other radio emitters (e.g. monitors, injectors, etc.).
1-7
1.6
Programming Custom Drug Settings 1. Enter Service Mode. This is done by pressing the Power On (1) button while simultaneously holding the CANCEL key until the Service Mode MENU is observed on the screen. 2. Select the NEXT MENU Softkey 3 (F3), which will enter the extended MENU 3 choices. 3. On this MENU 3a, select Softkey 6 which will enter the next level of extended MENU 3b choices. 4. On this sub-MENU 3b you should see the following: • Flow Switch On (or Off) • Drug Table On (or Off) • Edit Custom Drugs • Clear Custom Drugs • <none> • Previous Menu 5. Verify that the Drug Table is enabled (ON). If it is not on, press Softkey 2 (F2) to turn on the Drug Table. Now all drug name choices will be available for programming. 6. When starting new, always select "Clear Customs Drugs" before beginning, which will ensure that the Drug Table has been reset to the factory default values. The factory default values can be seen in Table 1. Important: Do not select "Clear Custom Drugs" if any additions have been previously made to the Custom Drug Table, and you wish to retain these earlier settings. Selecting the new drug and/or parameter settings will add these values to your present Custom Settings. If you re-program any previously programmed custom drug and/or parameter setting, the most recent settings will be retained as the Custom Drug Settings. 7. This next choice is very important. The 3860 System allows the user to set the initial default drug that is presented in the Dose Rate Calculator (First Drug). By simply selecting and saving a drug name with its new user preset infusion parameters immediately after "Clear Custom Drugs", this first drug choice will be the initial drug seen when accessing the Dose Rate Calculator. 8. Select the EDIT CUSTOM DRUGS Softkey 3 (F3) on MENU 3b. This will present the standard Dose Rate Calculator Set-up screen. Select the First Drug choice by using the UP or DOWN keys to scroll through the 5 drug options (i.e. Drug?, Adenosine, Dobutamine, Propofol, or Dexmedetomidine). When the appropriate drug is seen, press the ENTER key to set the drug name. 9. Once the drug name has been selected, now select the drug modality to be programmed (i.e. Primary, or Bolus) by pressing the ENTER key. Important: The Secondary modality is provided in these options, but is not able to be programmed independently from the Primary settings. In the Normal Use mode, all Secondary infusions will use the either the factory default or the user-preset values from the Primary infusion parameters for the specific drug type.
1-8
10. Once the drug modality has been selected, now the DOSE, CONC (Concentration), or TIME (if applicable) values can be programmed. This can be accomplished by either using the ENTER key to scroll to the appropriate selection, or by pressing the appropriate Softkeys (either F1, F2, or F5) to select the DOSE, CONC, or TIME settings. The possible range of settings for each of these values can be found in the enclosed Table 3. 11. Set the DOSE numeric value using the UP/DOWN keys, or the numeric keypad keys. The numeric keypad keys include a decimal point, as well as a "Clear the number" function (the "C" key). Press ENTER once the numeric value has been selected. Important: Once these DOSE numeric values are set by the user, they become the initial staring points for a NEW PATIENT infusion in the Dose Rate Calculator. These numeric values can be modified during Normal Use mode. If the SAME PATIENT is selected by the user, the modified values are set in the Dose Rate Calculator. If a NEW PATIENT is selected, or the infusion pump has been turned off for more than 1 hour, the user-preset DOSE numeric values become the initial staring points for a NEW PATIENT infusion in the Dose Rate Calculator. 12. Set the DOSE units value using the UP/DOWN keys. Press ENTER once the numeric value has been selected. The choices for these values are: • mcg/kg/min • mg/kg/min • mcg/kg/hr • mg/kg/hr • mcg/kg • mg/kg • mcg/min • mg/min • mcg/hr • mg/hr Important: Once the DOSE unit values are set by the user, they can't be modified during Normal Use mode, as they will remain fixed to the userpreset values. The only way to modify these DOSE units will be to re-enter the Service Mode and re-program these units. With Software version 3.0.xxxx and higher, the expanded Drug Library choices for the 5 drug types and DERS Drug Library include the additional choices: • mg • mcg • mU/kg/min* • Units/kg/hr* • mU/kg/hr* • Units/min* • Units/hr* • mU/hr* • mU/min*
1-9
• • • •
Units* mU* Units/kg* mU/kg*
*With Software version 3.2.9 and higher, when selecting the units-based Dose Units values, the Concentration Units Value must first to set to either "units", or "mU". With Software version 3.2.9 and higher, the default Bolus Dose units for the Drug Library choices for the 5 drug types, and DERS Drug Library includes the following choice: • mL (NOTE: The "mL" selection is available as a Dose unit choice. Additionally, the Bolus Dose feature now includes the Factory Default to be "0 mL" with a Time of "1 Minute" for the 5 drug types). 13. Now select the CONC (Concentration) numeric numerator values by either using the ENTER key to scroll to the CONC selection, or by pressing the appropriate Softkey (F2) to select the CONC setting. Set the CONC numeric value using the UP/DOWN keys, or the numeric keypad keys. The numeric keypad keys include a decimal point, as well as a "Clear the number" function (the "C" key). Press ENTER once the numeric value has been selected. 14. Set the CONC numerator units value using the UP/DOWN keys. Press ENTER once the numeric value has been selected. The choices for these values are: • mcg
• mg With Software version 3.0.xxxx and higher, the expanded Drug Library choices for the 5 drug types and DERS Drug Library include the additional choices: • units • mU (milli-units) With Software version 3.2.9 and higher, when selecting the units-based Dose Units values, the Concentration Units Value must first to set to either "units", or "mU". 15. Now select the CONC (Concentration) numeric denominator value by either using the ENTER or F2 key to scroll to the CONC selection. Set the CONC numeric value using the UP/DOWN keys, or the numeric keypad keys. The numeric keypad keys include a decimal point, as well as a "Clear the number" function (the "C" key). Press ENTER once the numeric value has been selected. Important: Once these CONC numeric values are set by the user, they become the initial staring points for all infusions for this drug type in the Dose Rate Calculator. These numeric values can be modified during Normal Use mode. If the SAME PATIENT is selected by the user, the modified values are set in the Dose Rate Calculator. If a NEW PATIENT is selected, or the infusion pump has been turned off for more than 1 hour, the user-preset CONC numeric values become the initial staring points for a NEW PATIENT infusion in the Dose Rate Calculator.
1-10
NOTE: The CONC denominator units value is always in milliliters (mL) and can't be modified. 16. If any timeless DOSE units have been set (e.g. mcg/kg or mg/kg), the TIME value can be set using the UP/DOWN keys, or the numeric keypad keys. The numeric keypad keys include a "Clear the number" function (the "C" key). Press ENTER once the numeric value has been selected. 17. Save all the user-preset value by pressing the SAVE DRUG Softkey (F6). The set up screen will now return to MENU 3a. Select. Important: During the drug programming, entries can be made into the WEIGHT, RATE, AND VTBI areas, but these values are not saved as userpresets. They are only made available to allow the user to check the entry values are within the acceptable limits of the various parameters. In Normal Use mode, these values will reset to zero (0) until set by the user prior to the infusion. 18. The set up screen will now return to MENU 3a. Select the NEXT MENU Softkey (F6) to access the Custom Drug set-up choices. 19. On this sub-MENU 3b you should see the following: • • • • • •
Flow Switch On (or Off) Drug Table On (or Off) Edit Custom Drugs Clear Custom Drugs <none> Previous Menu
20. Repeat the programming process, beginning at Step 8 above, and select the next drug type, drug modality, and appropriate DOSE, CONC, and TIME (if applicable), and then again press SAVE DRUG. Important: During the drug programming, always press the SAVE DRUG Softkey (F6) after each group of user-preset values have been entered (e.g. first group - Adenosine/Primary, second group -Adenosine/Bolus, third group -Dobutamine/Primary, fourth group - Dobutamine/Bolus, etc.). If SAVE DRUG is not pressed, the user-preset values will not be retained, and either the prior settings, or factory default settings will be used for this drug type in the Dose Rate Calculator. 21. Complete the programming process cycling through Steps 8 through 17 above until all user-reset values have been saved. For the user's convenience, a table for retaining the user-presets number in enclosed in Table 2, and can be photocopied for multiple uses to record each MRidium's Pumps user settings. Note: If the DRUG? Drug type is programmed by the user for a custom drug not listed in the MRidium Pump's default drug name list (e.g. adrenaline), then these custom settings are saved, the DRUG? Label in the Dose Rate Calculator will be changed to CUSTOM to denote another drug type has been entered. Record this custom drug name in Table 2, and it is recommended to add a label to the MRidium pump identifying this custom drug type for all operator's to see before initiating an infusion using these parameters.
1-11
22. If only 1 or 2 drug types are programmed by the user, the remaining drug types will continue to show the factory default values in the Normal Use mode of the Dose Rate Calculator. These default values can be found in enclosed Table 1. 23. After all the user-presets have been entered and saved, the Pump can be shut off by pressing the Power Off (0) key. 24. Turn on the Pump by pressing the Power On (1) button. Access the Dose Rate Calculator as described in the Operator's Manual, and now confirm the user-preset values have been correctly entered. It is recommended to set-up a test IV set and initiate a brief (1 to 10 second duration) infusion for each user-preset drug type and modality to confirm proper operation before returning the pump to clinical use. 25. If any problems occur during the programming of the user-preset values, or the user-preset values need to be canceled or erased, the CLEAR CUSTOM DRUGS softkey can be pressed at any time to reset all Dose rate Calculator back to the factory default values found in Table 1. 26. Another feature available in the Service Mode Dose Rate Calculator set-up is the additional options available with the use of the DRUG TABLE OFF choice. There are four optional modes of operation: • One, if the DRUG TABLE is turned OFF before any Custom Drug settings have been entered and saved, only the DRUG? Drug type with the factory default settings will be available in the Normal Use mode. All numeric and units values can be modified when used in this manner. • Two, if the DRUG TABLE is turned ON before any Custom Drug settings have been entered and saved, all Drug types with the either the user-preset factory default settings will be available in the Normal Use mode. All numeric values can be modified when used in this manner, but the units values for any user-preset values can't be modified when used in this manner (as described above in Step 12). • Three, if the DRUG TABLE is turned ON, programmed by the user, and then turned off after the Custom Drug settings have been entered and saved, only the First-Drug Drug type with the user-preset values will be available in the Normal Use mode. All numeric values for this single drug type can be modified when used in this manner, but the units values for any user-preset values can't be modified when used in this manner (as described above in Step 12). • Four, if the DRUG TABLE is turned OFF after the CLEAR CUSTOM DRUGS key has been pressed, only the DRUG? Drug type with the factory default settings will be available in the Normal Use mode. All numeric and units values can be modified when used in this manner. 27. If any user-preset values are modified, or new drug types or modalities are added to the original programmed set of parameters, always record the updated user-presets values and added drug types or modalities in a new copy of Table 2 for the MRidium Pump's user settings. Again, it is recommended to set-up a test IV set and initiate a brief (1 to 10 second duration) infusion for each user-preset drug type and modality to confirm proper operation before returning the pump to clinical use. 28. As an added feature, the customized user-preset values can be duplicated and transferred to other pump(s). To do this, perform the following steps:
1-12
1. Complete setting the user-presets as described in Steps 1 through 27 above, and verify user-presets have been saved. 2. Turn off the 3860 Pump. 3. Using another AM05 Software Update card provided by Iradimed Corporation, install this card in the 3860 Pump’s Memory Port in the rear of the pump. 4. Press the Power On (1) button while simultaneously holding the F6 key (bottom key on the left side of the display). Continue holding the F6 key until the messages “BURNING CARD, FLASHING MSTR, FLASHED: 1%, 2%, 3% …” is observed on the screen. The F6 key can now be released. The process will automatically complete and display “FLASHING SUCCESSFUL”. 5. When “FLASHING SUCCESSFUL”, turn off the 3860 Pump. The pump will not re-start automatically after completing this process. 6. When complete, load this AM05 Software Update card into the second pump, and when uploading is completed, power the pump OFF/ ON, and then confirm the customized user-preset values have been duplicated and transferred to the second pump. 7. Repeat Step 6 above for any other pump(s) that require these customized user-preset values.
1-13
Dose Rate Calculator Factory Default Values Table 1
Drug Name
Factory Defaults DRC Default Values
Label Primary
Secondary
Bolus
Drug?
Dose Conc Wt. Rate Time VTBI
0.0 mcg/kg/min 1.00 mg/ 1 ml 0.0 kg UND mL/hr None 0.0 mL
Same as Primary Same as Primary Same as Primary Same as Primary None Same as Primary
0.0 mcg/kg/min 1.00 mg/ 1 ml 0.0 kg UND mL/hr None 0.0 mL
Adenosine
Dose Conc Wt. Rate Time VTBI
0.0 mcg/kg 3.00 mg/ 1 ml 0.0 kg UND mL/hr 6 minutes 0.0 mL
Same as Primary Same as Primary Same as Primary Same as Primary Same as Primary Same as Primary
0.0 mcg/kg 3.00 mg/ 1 ml 0.0 kg UND mL/hr 1 minute 0.0 mL
Dobutamine
Dose Conc Wt. Rate Time VTBI
0.0 mcg/kg/min 1.00 mg/ 1 ml 0.0 kg UND mL/hr None 0.0 mL
Same as Primary Same as Primary Same as Primary Same as Primary None Same as Primary
0.0 mcg/kg/min 1.00 mg/ 1 ml 0.0 kg UND mL/hr None 0.0 mL
Propofol
Dose Conc Wt. Rate Time VTBI
0.0 mcg/kg/min 10.0 mg/ 1 ml 0.0 kg UND mL/hr None 0.0 mL
Same as Primary Same as Primary Same as Primary Same as Primary None Same as Primary
0.0 mg/kg 10.0 mg/ 1 ml 0.0 kg UND mL/hr 1 minute 0.0 mL
Dexmedetomidine
Dose Conc Wt. Rate Time
0.0 mcg/kg/hr 4.00 mcg/ 1 ml 0.0 kg UND mL/hr None
Same as Primary Same as Primary Same as Primary Same as Primary None
0.0 mcg/kg 4.00 mcg/ 1 ml 0.0 kg UND mL/hr 10 minutes
VTBI
0.0 mL
Same as Primary
0.0 mL
Note: The values of “UND” in this table denotes an “UNDer-range” value. Warning: The Factory Default values are provided for initial setup only. Numbers other than zero (0) are used in the table to avoid division by zero (0). Verify all selections prior to beginning the infusion. Note: The secondary infusion feature is not available when starting an infusion with the Dose Rate Calculator with pump software version 3.0.xxxx or higher. Additionally the Bolus dose factory default is “0 mL” with a time of “1 minute”.
1-14
Dose Rate Calculator Custom Protocol Values Worksheet Table 2 Set
Drug Name
Custom Protocol(s) DRC User Selected Custom Values
Label
1st
Primary Custom:
Secondary
Dose Conc Wt. Rate Time VTBI
Same as Primary Same as Primary Same as Primary Same as Primary Same as Primary Same as Primary
Adenosine
Dose Conc Wt. Rate Time VTBI
Same as Primary Same as Primary Same as Primary Same as Primary Same as Primary Same as Primary
Dobutamine
Dose Conc Wt. Rate Time VTBI
Same as Primary Same as Primary Same as Primary Same as Primary Same as Primary Same as Primary
Propofol
Dose Conc Wt. Rate Time VTBI
Same as Primary Same as Primary Same as Primary Same as Primary Same as Primary Same as Primary
Dexmedetomidine
Dose Conc Wt. Rate Time
Same as Primary Same as Primary Same as Primary Same as Primary Same as Primary
VTBI
Same as Primary
Name:
Bolus
MRidium Infusion Pump Serial Number:___________________________________________________ Note: Retain a copy of this Worksheet with Service Records for future use and/or changes. Note: The Custom Drug Protocol values are those programmed by the user in the Service Mode. If no values are programmed by the user, the Factory Default values are used in the Dose Rate Calculator. Important: The First Custom Drug Protocol selected and saved after clearing the Custom Drug Settings will be set as the new default drug when the Dose Rate Calculator is first selected in the Normal Use mode. It will also be the only drug choice, if the drug Table is turned off after the Custom Drug have been set by the user. Warning: The Factory Default values are provided for initial setup only. Numbers other than zero (0) are used in the table to avoid division by zero (0). Verify all selections prior to beginning the infusion.
1-15
Table 3 STANDARD USER SETTING RANGES AND DEFAULTS Characteristic
Specification Range
Initial Start-Up (Factory Default) Value
Primary Flow Rate Range - 0 to 100 mL/hr
0.1 to 99.9 mL/hr in 0.1 mL/hr increments
1 mL/hr
Primary Flow Rate Range - > 100 mL/ hr
100 to 1400 mL/hr in 1 mL/hr increments
1 mL/hr
Secondary Flow Rate Range - 0 to 100 mL/hr
0.1 to 99.9 mL/hr in 0.1 mL/hr increments, 100 to 1400 mL/hr in 1mL increments.
0.1 mL/hr
Primary Volume To Be Infused (VTBI) Range
0.1 to 999 mL
0 mL
Secondary Volume To Be Infused (VTBI) Range
0.1 to 999 mL
0 mL
Total Volume Infused (VI) Range
0.1 to 9999 mL
0 mL
Keep Vein Open (KVO) Rate Range
adjustable, 0 to 5 mL/hr, in 1 mL/hr increments; 0 denotes KVO is off.
1 mL/hr
Bolus Rate Range
0.1 to 99.9, 100 TO 1400 mL/hr in 1 mL/ hr increments
500 mL/hr
Bolus To Be Infused Range
0.1 to 999 mL
0 mL
Occlusion Pressure Limit Range
1 to 10 PSI
None, always retains last setting.
Dose Programming - Patient Weight Range
0.1 to 160 Kg in 0.1 Kg increments
0.0 Kg
Dose Programming - Drug Concentration Range
0.1 to 99.9 mg/mL
Varies, dependent on selected Drug.
Dose Programming CONC - Diluent Range
1 to 999 mL
1 mL
Dose Programming - Dose in mg/Kg/ min Range
0.1 to 9999 mg
0.0 mg
Dose Programming - Volume to Be Infused
0.1 to 999 mL
0 mL
Dose Programming Time Range
1 to 99 min; 0.1 to 99.9 min (Software version 3.0.xxxx and higher)
Varies, dependent on selected Drug.
Alarm Sound Volume
> 65 dBA at 1 meter, Settings = Minimum to Maximum (Graphical Display)
None, always retains last setting.
Drug Library Option
Allows selection of 1 of 5 drugs used in Dose Rate Calculator. When OFF, only one drug (Drug?) is available.
Default value is on. (Drug Library choices are available)
1-16