Operating and Service Manual
60 Pages
Preview
Page 1
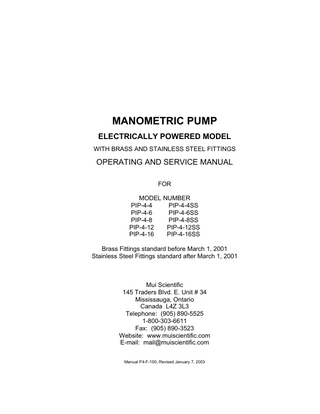
MANOMETRIC PUMP ELECTRICALLY POWERED MODEL WITH BRASS AND STAINLESS STEEL FITTINGS
OPERATING AND SERVICE MANUAL FOR MODEL NUMBER PIP-4-4 PIP-4-4SS PIP-4-6 PIP-4-6SS PIP-4-8 PIP-4-8SS PIP-4-12 PIP-4-12SS PIP-4-16 PIP-4-16SS Brass Fittings standard before March 1, 2001 Stainless Steel Fittings standard after March 1, 2001
Mui Scientific 145 Traders Blvd. E. Unit # 34 Mississauga, Ontario Canada L4Z 3L3 Telephone: (905) 890-5525 1-800-303-6611 Fax: (905) 890-3523 Website: www.muiscientific.com E-mail: [email protected] Manual P4-F-100, Revised January 7, 2003
READ ENTIRE MANUAL BEFORE OPERATING MANOMETRIC PUMP
ii
Table of Contents Section 1
Introduction
1
Section 2
Description of Manometric Pump 2.1 Diagram of features 2.2 Physical description 2.3 General requirements 2.4 Certification, classification and warning statements
2 3 4 5
Initial Installation 3.1 List of components 3.2 Initial assembly 3.3 Connecting electrical system 3.4 Installation of water chamber 3.5 Installation of transducers 3.6 Installation of stopcocks 3.7 Installation of calibration system
7 7 8 9 12 14 15
Preparation Procedure 4.1 Filling water chamber 4.2 Selecting water chamber pressure 4.3 Adjusting water chamber pressure 4.4 Purging air from pump and transducers 4.5 Set-up checklist 4.6 Calibration of recording system 4.7 Functional check - pinch test
17 18 19 20 23 24 26
Operation 5.1 Normal operation before and during the study 5.2 Functional troubleshooting with the pinch test 5.3 Calculation of pressure rise rate 5.4 Post study, shut-down procedure 5.5 Summary of preparation and shut-down procedures
28 30 33 34 34
Service: Maintenance 6.1 Care and cleaning of your manometric pump 6.2 High-Level Disinfection of the system (brass & stainless steel) 6.3 Replacing the capillary tubing 6.4 Inspecting the drying cylinder 6.5 Drying the desiccant
35 35 38 38 39
Service: Troubleshooting 7.1 Poor pressure rise rate or no signal response 7.2 Compressor motor does not run 7.3 Compressor motor does not shut off
40 40 40
Service: Technical Specifications 8.1 Technical drawings 8.2 Parts list
42 52
Section 3
Section 4
Section 5
Section 6
Section 7
Section 8
iii
List of Illustrations Table
Title
1 2
Water Chamber Pressure Selection vs Infusion Rate/Pressure Rise Rate Pressure Conversion Chart
Figure
Title
Section Page 4.2
18
4.2
18
Section Page
1
Features of the Manometric Pump
2.1
2
2
Master On-Off Valve
3.4
9
3
Bottom Quick-Connect and Filter on Water Chamber
3.4
10
4
Air Quick-Connect on Top of Water Chamber
3.4
11
5
Universal Transducer Holder Assembly
3.5
12
6
Medex/pvb Transducer Holder Assembly
3.5
13
7
Installation of Stopcocks on Transducer
3.6
14
8
Poor Connections to Transducer
3.6
14
9
Pneumo-Hydraulic Calibration System (0 – 50/100 mm Hg) 3.7
15
10
Hydrostatic Calibration System (0 – 50/68 cm H2O)
3.7
16
11
Stopcock on Top of Transducer
4.4
20
12
Stopcock Manifold
4.4
21
13
Purging Air from System Using a Syringe
4.4
22
14
Stopcock Position During Calibration, Flush, and Study
4.6
24
15
Hydrostatic Calibration System (0 – 50/68 cm H2O)
4.6
25
16
Pinch Test: Pinch Point and Output Graph
4.7
26
17
Infusion Artifact
5.1
29
18
Slow Pressure Rise Rate
5.2
31
19
Calculation of Pressure Rise Rate
5.3
33 iv
List of Technical Drawings: Section 8 Title
Page
Pump Front View
43
Electric Compartment Removal
44
Air-Water System
45
Electrical Compartment
46
Electrical Schematic
47
Block Diagram
48
Medex/pvb Transducer Holder Assembly
49
Pneumo-Hydraulic Calibration System (0 – 100 mm Hg)
50
Hydrostatic Calibration System (0 – 50/68 cm H2O)
51
v
Section 1
Introduction
This Manometric Pump is part of the motility system used for intraluminal manometric studies of the gastrointestinal tract, such as pressure measurement of muscular contractions or resting tone inside the esophagus, the stomach, the bile duct, the small intestine, the anus, rectum, or colon. Other components of this system include a set of pressure transducers, a motility catheter, and a computerized data processing system or a chart recorder. The Electrically Powered Manometric Pump uses regulated compressed air to deliver distilled water through very small bore capillary tubing to the motility catheter. The pressurized water from each capillary tube is connected to a pressure transducer and then passes through one lumen of the multi-lumen catheter to that lumen's single opening into the esophagus of the patient. The pressure changes in the esophagus are transmitted through this fluid path back to the externally mounted transducer; i.e. the water serves as a pressure - transmission medium. Each lumen of the motility catheter is connected to its own pressure transducer and all the pressure transducers are connected to a computerized recording system or a strip chart recorder. The pressure profile of the multi-channel tracing provides useful diagnostic data for evaluation of the normal or abnormal motor function of the gastrointestinal tract. Similar applications include pressure measurements for oropharygeal, esophageal, stomach, intestinal, colonic, anorectal and biliary motility studies. This Manometric Pump is designed to operate at a constant pressure rather than at a constant flow rate. It maintains a pre-set hydraulic pressure (5-15 psi) at the water chamber regardless of the flow. At 15 psi (776 mm Hg) the pump provides a high static hydraulic pressure background to ensure a high pressure rise rate as well as recording accuracy and repeatability. It can record fast pressure changes such as in the upper esophageal sphincter. The small bore of the capillary tube also ensures a very low infusion rate. During a motility study, the actual flow rate varies due to the varying amount of obstruction caused by muscle contractions. The pressure rise rate of the pump, measured as pressure change per unit of time (i.e. mm Hg/sec or cm H2O/sec), varies directly with the water chamber pressure. A higher water chamber pressure will result in a higher pressure rise rate but also a higher flow rate. To achieve measurement accuracy, the pressure rise rate of the recording system must exceed the actual physiological rise rate of the organ. The upper esophageal sphincter has the highest muscular contraction rate of the gastrointestinal tract. A study of this organ requires the highest pressure rise rate of the recording system, 400 mm Hg/sec. The recommended water chamber pressure of 15 psi (pounds per square inch) will achieve a pressure rise rate of 400 mm Hg/sec. The main purpose of reducing the water chamber pressure from 15 to 5 psi is to reduce the infusion rate from 0.6 to 0.3 ml/min. The lower water chamber pressure and lower pressure rise rate still permit reliable measurement accuracy on those organs that have a lower physiological contraction rate. The pump allows the operator to change the water chamber pressure for different physiological applications in order to optimize the pressure rise rate and flow rate. An infusion rate table (Table 1, page 18) is provided to enable an estimate of the total volume of water infused into the patient in a given period of time (Table 1, page 18).
1
Section 2 2.1
Description of Manometric Pump
Diagram of Features
Figure 1. Diagram of Manometric Pump (8-channel model shown)
2
2.2
Physical Description
The Electrically Powered Manometric Pump consists of an air compressor and a pressure regulator inside a stainless steel case. The air supply pressurizes a water chamber, which delivers pressurized water to a stopcock manifold, which connects in turn to a set of capillary tubes. A set of transducer holders is located on an adjustable support bar. The transducers and motility catheters (which are not supplied with pump) are mounted in the transducer holders and connected to the capillary tubes. (Figure 1, page 2) The drying cylinder inside the stainless steel case removes moisture from the pressurized air and serves as a high pressure air reservoir (17-40 psi). Then the pressurized air is regulated with a manually adjustable regulator. This sets the final pressure in the water chamber (5–15 psi). The compressor gauge (left side) shows the high pressure in the drying cylinder. The water chamber gauge (right side) shows the pressure in the water chamber. The white pilot light indicates the main power status, ON/OFF. The green pilot light indicates the compressor status ON/OFF. The water chamber is removable, simply resting inside the water chamber holder. It is equipped with quick disconnects for the air from the top and for a filtered water connection outlet at the bottom. The lid of the chamber is removable to facilitate filling and cleaning. A toggle valve is provided for quick release of the chamber pressure. The chamber float acts as a barrier to minimize air absorption into the water. A master on-off valve controls the water flow from the water chamber to the stopcock manifold. The 4-way stopcocks on the manifolds provide individual on-off control of the water flow to each capillary tube. The outlet end of each capillary tube is equipped with a standard male Luer connector for easy connection to the transducer. If required, a female-female Luer adaptor is provided for conversion of the Luer connections. The transducer holders (various types are available) to keep the transducers in place and level. The adjustable support permits proper positioning of the height of the transducers with respect to the patient.
3
2.3
General Requirements
The Manometric Pump should be mounted on a cart or shelf at approximately the same height as the patient's bed. The height of the transducers should be level with the height of the patient's stomach. This will reduce the hydrostatic pressure artifact on the transducer and on the recording. The Manometric Pump is normally placed near the bedside close to the patient's head. CAUTION No electrical equipment should be located beneath the Manometric Pump. Some water from the motility catheter is likely to drip down during the procedure. A danger of electric shock could result. CAUTION Use only degassed distilled water in the water chamber. Never use tap water or sterile irrigation water as both contain minerals which can cause blockages in tubing or can support bacterial growth. Electrical requirements: (a) 115 Volt Model:
A grounded, hospital grade, 115 Volt, 50–60 Hz, 15A electrical outlet is required. The pump is rated at 2A. A hospital grade power cord with IEC plug is included.
(b) 220 Volt Model:
A grounded, hospital grade, 220 Volt, 50–60 Hz electrical outlet is required. The pump is rated at 2A. Hospital grade power cord with female IEC plug is required.
(c) 240 Volt Model:
A grounded, hospital grade, 240 Volt, 50–60 Hz electrical outlet is required. The pump is rated at 2A. Hospital grade power cord with female IEC plug is required.
Over-all dimensions: Height (water chamber installed and tubing attached) ---- 50 cm (20 inches) Width (4,6 and 8 channel models) ----------------------------- 56 cm (22 inches) Width (12 channel model) -------------------------------------69 cm (27 inches) Depth (transducer holders attached) -------------------------- 33 cm (13 inches) Length of AC power cord (115v only) -------------------------- 240 cm (94 inches) Weight: Net weight (4,6 and 8 channel models)------------------------ 14 kg (30 pounds) Net weight (12 channel models)-------------------------------- 15 kg (32 pounds)
4
2.4
Certification, Classification, and Warning Statements
Certification Europe 0120
EMC Directive Medical Device Directive EN46002
89/336/EEC 93/42/EEC
Authorized Representative of Mui Scientific in EU: SOLAL 2 rue du Travail 67000 Strasbourg France Tel: 03 88 32 89 85 Fax: 03 88 75 17 13 International IEC 601-1:1988 IEC 601-1:1988 Am 1:1991 IEC 801.2, 801.3, 801.4, 801.5 EN55011 (C.I.S.P.R. 11 (1990) Group1 Class B) Mui Scientific, at 145 Traders Blvd., Mississauga, Ontario, Canada, is registered to ISO 9002 International Standard for Quality Management Systems Canada
CAN/CSA - C22.2 No. 0-M91 CAN/CSA - C22.2 No. 601.1-M90 CAN/CSA - C22.2 No. 601.1S1-94 United States UL Std. No. 544 Equipment Classification Class I with respect to protection from electric shock Type BF with respect to degree of protection from electric shock Ordinary degree of protection against ingress of liquids Equipment not suitable for use in the presence of a flammable anaesthetic mixture with air or with nitrous oxide Mode of operation: continuous 5
Section 2.4: Certification, Classification, and Warning Statements, continued
Warning Statements and Warning Symbols
Type BF Equipment
DANGER: EQUIPMENT NOT SUITABLE FOR USE IN THE PRESENCE OF A FLAMMABLE ANAESTHETIC MIXTURE
GROUND RELIABILITY CAN ONLY BE ACHIEVED WHEN THE EQUIPMENT IS CONNECTED TO A RECEPTACLE MARKED “HOSPITAL ONLY” OR “HOSPITAL GRADE”
Note: All models (115v, 220v, 240v) require 2 fuses: 5 x 20 mm, 250v, T2A.
Environmental Conditions for Storage or Transport When packed for transport from factory, equipment will withstand • ambient temperature range -40°C to +70°C • relative humidity range 10% to 100% • atmospheric pressure range 500 hPa to 1060 hPa
6
Section 3 3.1
Initial Installation
List of Components
Unpack the shipping carton. Locate and check off the following items: Quantity 1 1 1 1
3.2
Description Manometric Pump Main Assembly (including capillary tubes and transducer holders) Water Chamber Assembly Hospital Grade AC Power Cord (for 115 volt model only) Operation Manual
Initial Assembly
Remove any remaining packing material. Place the pump main assembly on a table and make the following adjustments: •
Adjust the height of the hexagonal transducer support bar: Loosen the rear knurled screws on the support bar holder that mounts the hexagonal transducer support bar. Adjust the height of the support bar so that the transducers will be level with the approximate height of the patient's stomach during a study. Retighten the knurled screws.
•
Adjust the orientation of the hexagonal bar: Loosen the front knurled screws on the holder that mounts the hexagonal transducer support bar on the front of the Manometric Pump. Rotate the bar until the universal transducer holders are in a horizontal position as shown in Figure 1, page 2. Medex/pvb transducer holders are positioned vertically (Figure 6, page 13). Retighten the screws.
•
Adjust the spacing of the transducer holders: Loosen the rear knurled screws on the transducer holders and space the transducer holders evenly along the hexagonal bar. Retighten the screws securely.
•
If necessary, the transducer holders can be removed by sliding them off the end of the hexagonal bar.
7
3.3
Connecting Electrical System
•
Ensure that the main power switch (at the bottom of the left side panel of the Manometric Pump) is in the OFF position.
•
Plug the grounded AC power cord (hospital grade) into the IEC power entry that is next to the main power switch. Connect the power cord to a grounded electrical outlet.
•
Turn the main power switch to the ON position. When the main power switch is turned on, both pilot lights (white and green) will illuminate and the compressor will run. The pressure on both gauges will rise. After a few minutes the compressor should stop and the green compressor pilot light should turn off. The compressor pressure gauge (left side) should be at 40 psi or higher. The white power pilot light remains lit, indicating that the main power is still on. The compressor gauge indicates the pressure in the high pressure drying cylinder inside the pump. In normal operation as water empties from the water chamber it is replaced by compressed air. The compressor pressure gauge will drop slowly from approximately 40 psi to 17 psi. When the pressure has fallen to 17 psi, the compressor will turn on for a few minutes. When the pressure has risen to approximately 40 psi, the compressor will turn off. After the compressor shuts off, continuous perfusion can be maintained by the system for several hours, depending on the number of channels and the flow rate. The water chamber gauge (right side) shows the regulated pressure delivered to the water chamber. This is normally set at 15 psi and remains constant. (For other pressure settings see Section 4.2, page 18). During normal operation the compressor will turn on and off automatically to maintain a constant water chamber pressure. CAUTION Do not use pump in the presence of flammable gas. Do not set water chamber pressure higher than 20 psi. Damage to system could result. Excessive water will be delivered to the patient.
8
3.4
Installation of Water Chamber
Figure 2. Master On-Off Valve •
Before installing the water chamber, turn the master on-off valve to the OFF position (Figure 2).
•
Place the water chamber into the plastic holder on top of the Manometric Pump, lining up the water quick-connect pointing to the left on the bottom of the water chamber with the slot in the holder (Figure 3, page 10). The plastic holder enables one person to easily remove or tighten the lid of the water chamber.
•
Unscrew the lid of the water chamber. Discard any packing material, and remove the round float by the black knob.
•
Ensure the inside of the water chamber is clean. Fill three-quarters full with distilled water only. Never use tap water or sterile irrigation water as both contain minerals which can cause blockages in tubing or can support bacterial growth.
•
Replace the float in the water chamber at an angle to avoid any bubbles being trapped under the float. The float reduces the surface area of pressurized air exposed to the water. It minimizes the amount of gases absorbed by the water. Excessive amounts of dissolved gases cause bubbles to form in the transducer and reduce the overall system pressure rise rate and recording accuracy.
• Check that the O-ring is lightly greased (with petroleum jelly). 9
Section 3.4: Installation of Water Chamber, continued
•
Screw the lid back on and tighten securely.
•
Connect the bottom quick-connect on the water chamber by pressing the metal tab on the water chamber connector and pushing the elbow connector in until it snaps (Figure 3a below). This connection delivers pressurized water from the water chamber through the master on-off valve into the stopcock manifold and into the capillary tubes. A stainless steel filter on the quick-connect inside the water chamber filters all water delivered to the capillary tubes.
• To disconnect the quick-connect, push down on the metal tab and pull the elbow connector out. The water flow will automatically shut off at both ends of the quick connect (Figure 3b below).
Figure 3. Bottom Quick-Connect and Filter on Water Chamber TO CONNECT: Make sure that the metal tab is down, Insert the elbow quick connect and push it in until the metal tab snaps up into the lock position.
TO DISCONNECT: Push down on the metal tab and pull the elbow quick connect out.
10
Section 3.4: Installation of Water Chamber, continued
•
Check that the master on-off valve is turned to the OFF position.
•
Connect the top quick-connect on the water chamber; push the two metal fittings together until they snap into the latched position. This connection delivers compressed air from the pressure regulator to the water chamber.
•
To release the quick-connect, push down on the flange (Figure 4). When disconnected, air pressure in the water chamber is released and air flow from the compressor is shut off at the tubing end of the quick connect.
The toggle pressure release valve as shown in Figure 4 below is in the normal CLOSED position. To OPEN the valve squeeze the black handle toward the body of the valve. The valve opens momentarily to release pressure from the system.
Figure 5. Air Quick-Connect on Top of Water Chamber TO CONNECT: Push down on the body until connection snaps together. The gap between the body and the flange will disappear.
TO DISCONNECT: Push down on the flange until the body of the quick connect pops up and disconnects. Lift the connector body off the post. 11
3.5
Installation of Transducers A. Universal Transducer Holder Installation If the pump is supplied with the Universal Transducer Holder Assembly, then use the following steps to install transducers (not supplied) on the Manometric Pump. •
Position the universal transducer holders horizontally (Figure 1, page 2).
•
Loosen the 2 front knurled screws on the universal transducer holder.
•
Slide the transducer between the front bracket and the V-shaped cutout in the holder as shown in Figure 5 (a), 5 (c) below. To hold a smaller diameter transducer, remove the 2 front knurled screws completely and reverse the front bracket of the transducer holder as shown in Figure 5(b).
•
Clamp the transducer in the holder assembly by retightening the two knurled screws against the front bracket. CAUTION Do not over-tighten the knurled screws against the front bracket. Damage to the transducer may result.
Figure 5. Universal Transducer Holder Assembly 12
Section 3.5: Installation of Transducers, continued
B. Medex/pvb Transducer Holder Installation If your pump is supplied with the Medex or pvb Transducer Holder Assembly, as shown in Figure 6, simply slide the transducer into the slot on the transducer holder plate from the top. The transducer holder plate can be repositioned by loosening and tightening the knurled thumbscrews at the back of the assembly.
Figure 6. Medex/pvb Transducer Holder Assembly 13
3.6
Installation of Stopcocks
Install plastic stopcocks (not supplied) to the input and output ports of the transducers and attach capillary tubes as shown in Figure 7 (shown right). NOTES: The most common cause of loss of recording accuracy in a motility system is air bubbles trapped in the transducer or in the motility catheter. The diagram to the right shows the way to connect the transducers to the Manometric Pump and the catheter when using a pneumohydraulic calibration system (Figure 9, page 15). This setup requires additional 2-way and 4-way stopcocks for each transducer. Ample water under pressure can be flushed from the bottom to the transducer in order to push any air bubbles up and out the top of the transducer. This method ensures that the transducer and catheter are free of air bubbles in the shortest time possible.
Figure 7. Installation of Stopcocks on Transducer
Other methods of connection are less satisfactory. For example, the method of connection shown in Figure 8 is not recommended. The small flow from the capillary tube is not able to flush out all the small air bubbles efficiently. NOTES: Extra care must be taken to eliminate air bubbles. A 3-way stopcock can be attached to the bottom of the transducer for flushing with a syringe, as shown in Figure 13, page 22.
Figure 8. Poor Connection to Transducer
14
3.7
Installation of Calibration System A. Installation of Pneumo-Hydraulic Calibration System (0-50/100 mm Hg) with Flushing Bottle, Part # P4-H-102 •
Attach the round calibration support rod for the calibration system to the right rear side of the Manometric Pump using the two 1-inch long screws, washers, and locknuts provided (Figure 9, below).
•
Clamp the calibration bottle to the top of the calibration rod using the bottle clamp provided.
•
Attach the large end of the tubing manifold to the bottom of the bottle and the other ends to the 2-way stopcocks on the bottom of the transducers.
•
Turn all the 2-way stopcocks to the OFF position
•
Fill the calibration bottle three-quarters full with distilled water. Wipe excess water from the inside neck of the bottle.
•
Insert the rubber stopper, with coiled tubing attached, into the top of the bottle.
•
Attach the calibration gauge to the calibration rod using the plastic wire ties provided.
Figure 9. Pneumo-Hydraulic Calibration System (0-50/100 mm Hg) 15