Norav Medical
Norav NBP 24 NG PC Analysis Software Short Guide May 2011
Short Guide
2 Pages
Preview
Page 1
Short Guide ABDM System Norav NBP-24 NG PC Analysis Software NHMS Software (For further instructions please take a look at the user manual)
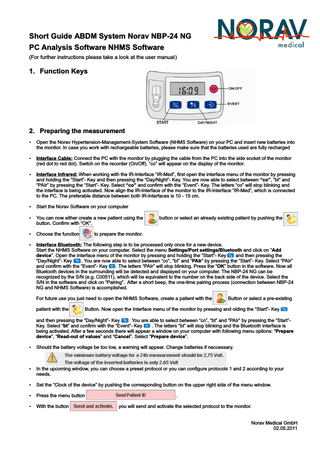
1. Function Keys
2. Preparing the measurement Ÿ Open the Norav Hypertension-Management-System Software (NHMS Software) on your PC and insert new batteries into
the monitor. In case you work with rechargeable batteries, please make sure that the batteries used are fully recharged Ÿ Interface Cable: Connect the PC with the monitor by plugging the cable from the PC into the side socket of the monitor
(red dot to red dot). Switch on the recorder (On/Off). “co” will appear on the display of the monitor. Ÿ Interface Infrared: When working with the IR-Interface “IR-Med”, first open the interface menu of the monitor by pressing
and holding the “Start”- Key and then pressing the “Day/Night”- Key. You are now able to select between “co”, “bt” and “PAIr” by pressing the “Start”- Key. Select “co” and confirm with the “Event”- Key. The letters “co” will stop blinking and the interface is being activated. Now align the IR-Interface of the monitor to the IR-Interface “IR-Med”, which is connected to the PC. The preferable distance between both IR-Interfaces is 10 - 15 cm. Ÿ Start the Norav Software on your computer Ÿ You can now either create a new patient using the
button or select an already existing patient by pushing the
button. Confirm with “OK”. Ÿ Choose the function
to prepare the monitor.
Ÿ Interface Bluetooth: The following step is to be processed only once for a new device.
Start the NHMS Software on your computer. Select the menu Settings/Port settings/Bluetooth and click on “Add device”. Open the interface menu of the monitor by pressing and holding the “Start“- Key and then pressing the “Day/Night”- Key . You are now able to select between “co”, “bt” and “PAIr” by pressing the “Start”- Key. Select “PAIr” and confirm with the “Event”- Key . The letters “PAIr” will stop blinking. Press the “OK” button in the software. Now all Bluetooth devices in the surrounding will be detected and displayed on your computer. The NBP-24 NG can be recognized by the S/N (e.g. C00511), which will be equivalent to the number on the back side of the device. Select the S/N in the software and click on “Pairing”. After a short beep, the one-time pairing process (connection between NBP-24 NG and NHMS Software) is accomplished. For future use you just need to open the NHMS Software, create a patient with the patient with the
Button or select a pre-existing
Button. Now open the Interface menu of the monitor by pressing and olding the “Start”- Key
and then pressing the “Day/Night”- Key . You are able to select between “co”, “bt” and “PAIr” by pressing the “Start”Key. Select “bt” and confirm with the “Event”- Key . The letters “bt” will stop blinking and the Bluetooth interface is being activated. After a few seconds there will appear a window on your computer with following menu options: “Prepare device”, “Read-out of values” and “Cancel”. Select “Prepare device”. Ÿ Should the battery voltage be too low, a warning will appear. Change batteries if neccessary.
Ÿ In the upcoming window, you can choose a preset protocol or you can configure protocols 1 and 2 according to your
needs. Ÿ Set the “Clock of the device” by pushing the corresponding button on the upper right side of the menu window. Ÿ Press the menu button Ÿ With the button
. you will send and activate the selected protocol to the monitor.
Norav Medical GmbH 02.05.2011
Ÿ Click on the button
, to end the NHMS Software.
Ÿ Switch off the monitor (On/Off) and disconnect the cable when using the interface cable. Ÿ Measure the upper arm size of the patient and apply the corresponding cuff. Check the correct sitting:
- The tube connected to the cuff is supposed to be on the top side of the cuff and placed over the neck of the patient. - The cuff is to be placed about two fingers above the bend of the elbow. Ÿ Place the recorder into the equipment pouch and close the pouch. Ÿ Connect the tube of the cuff with the tube connector and then with the monitor. Assure that the connections are fitting
correctly. Ÿ Switch on the monitor. To start the selected protocol for the 24-h measurement, you first have to start a manual
measurement (no error measurement!). For this manual measurement please press the “Start”- Key of the monitor. Ÿ After the manual measurement, ask the patient about possible problems (e.g. the cuff is applied too tight, etc.) If
necessary, take preventive action at respective. Ÿ When the manual measurement was successful and you are convinced about the right settings, the patient can leave the
office. Ÿ In case you expect the patient, to actively participate during the 24-h measurement, explain him the use of the “Event”-
Key and the “Day-/Night”- Key (for further information consult the user manual).
3. After the 24-h measurement: Transfer of data and printout Ÿ When the patient arrives at the office after the 24-h measurement, switch off the monitor (On/Off). Ÿ Take off the cuff from the upper-arm of the patient, disconnect the cable from the monitor (slightly pull the metal ring of the
tube connector; do not twist it!) and take the monitor out of the pouch. Ÿ Start the Norav Hypertension-Management-System Software (NHMS Software) on your computer. Ÿ Connect the recorder to the computer as explained under section 2 of this short guide. After the successful connection: Ÿ When using the Interfaces Cable or Infrared, click on the
Button, to start the data transfer.
Ÿ When using the Interface Bluetooth, open the Interface menu of the monitor (as explained above) and select “bt”. The
menu window with following options will appear: “Prepare device”, “Read-out of values” and “Cancel”. Select “Read-out of values” and follow the instructions on your computer. Ÿ Now confirm “Delete measurements”, in order to clear the memory of the monitor. Ÿ After the successful transfer of the measured data you are able to set the times for the day- and the night interval, in case
they differed from the preset protocol. Ÿ By clicking the buttons you can
display the outcome of the 24-h measurement on your computer. Ÿ For a printout of the data, click on the
button.
Ÿ Choose the pages you want to be printed in the “Print”- menu and confirm with “OK”. Ÿ Click on the button
, to end the NHMS Software.
4. Important Notice When cleaning or washing the cuff, separate the cover of the cuff from the inflatable section on the inside. The inflatable section and the tube are not allowed to get in contact with water. If water enters into the monitor, this can lead to severe damages of the device. In this case contact your local distributor or Norav Medical GmbH immediately.
NORAV Medical GmbH Kreuzberger Ring 23 D-65205 Wiesbaden Tel.: +49 (0) 611 - 77 88 345 Fax: +49 (0) 611 - 77 88 330 E-Mail: [email protected] www.norav.com