Norav Medical
Norav NBP 24 NG Quick User Guide Dec 2009
Quick User Guide
3 Pages
Preview
Page 1
Quick User Guider
Norav NBP 24 NG
Prepare Monitor and enrol Patient
Download Cable 1.
Place new batteries in recorder & make sure recorder is off. Plug the grey cable into the side of the recorder – align red dots. Turn recorder On few seconds.
: CO will appear on recorder display after a
2. Open the HMS-Client Software 3. Click on
to add a new patient or click on
to select existing patient.
4. Click
to prepare recorder
5.
A Warning will appear should the battery voltage be too low. Change batteries if necessary.
6.
Click
.to transfer patient information to monitor Set the “Clock of the device” by pushing the button on the top right side. Click
to activate selected protocol in monitor
7. Click on 8. 9.
Turn off Monitor
11
(press button for more than 2 seconds) and remove cable
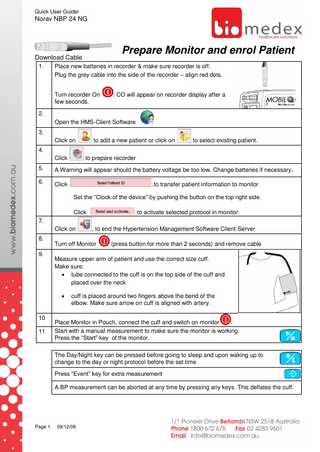
Measure upper arm of patient and use the correct size cuff. Make sure: tube connected to the cuff is on the top side of the cuff and placed over the neck
10
, to end the Hypertension Management Software Client-Server
cuff is placed around two fingers above the bend of the elbow. Make sure arrow on cuff is aligned with artery.
Place Monitor in Pouch, connect the cuff and switch on monitor . Start with a manual measurement to make sure the monitor is working. Press the “Start” key of the monitor. The Day/Night key can be pressed before going to sleep and upon waking up to change to the day or night protocol before the set time Press “Event” key for extra measurement A BP measurement can be aborted at any time by pressing any keys. This deflates the cuff.
Page 1
09/12/09
Quick User Guider
Norav NBP 24 NG
Prepare Monitor & enrol Patient 1.
Place new batteries in recorder
2. Open the HMS-Client Software
and make sure the Bluetooth button is green
3. Click on 4.
to add a new patient or click on
to select existing patient.
Turn monitor On : A Warning will appear should the battery voltage be too low. Change batteries if necessary
5. Press Start
at the same time. Select between “co”, “bt” and
and Day/Night
“PAIr” by pressing Start. Select “bt” and confirm with “Event” Bluetooth is now activated. Wait for the window to appear on your computer and select “Prepare device”. 6.
Set the “Clock of the device” by pushing the button on the top right side.
7.
Click
8.
Click
.to tranfer patient information to monitor to activate selected protocol in monitor
9. Click on 10.
11. 12.
Place Monitor in Pouch, connect the cuff and switch on monitor
14.
.
Measure upper arm of patient and use the correct size cuff. Make sure: tube connected to the cuff is on the top side of the cuff and placed over the neck
13.
, to end the Hypertension Management Software Client-Server
Measure upper arm of patient and use the correct size cuff. Make sure: - tube connected to the cuff is on the top side of the cuff and placed over the neck - cuff is placed around two fingers above the bend of the elbow.
cuff is placed around two fingers above the bend of the elbow. Make sure arrow on cuff is aligned with artery.
Place Monitor in Pouch, connect the cuff and switch on monitor
.
Start with a manual measurement to make sure the monitor is working. Press the “Start” key of the monitor. The Day/Night key can be pressed before going to sleep and upon waking up to change to the day or night protocol before the set time Press “Event” key for extra measurement A BP measurement can be aborted at any time by pressing any keys. This deflates the cuff.
Page 2
09/12/09
Quick User Guider
Norav NBP 24 NG
Transfer data and Print Report 1. Open the HMS-Client Software 2.
If patient was not enrolled: click on
to add a new patient or click on
to
select existing patient. 3.
Connect monitor (See below)
Download Cable Plug the grey cable into the side of the recorder – align red dots. Turn recorder On seconds.
Click on
: CO will appear on recorder display after a few
to start the data transfer
Make sure the Bluetooth button is green Turn monitor On
:
Press “Start”
and “Day/Night”
at the same time. Press “Start” several times
until “bt” appears and confirm with “Event” Bluetooth is now activated. Wait for the window to appear on your computer screen Select “Read-out of values” and follow the instructions on your computer 4. 5.
6. 7. 8. 10
Page 3
Press “Delete measurements”, in order to clear the memory of the monitor After the successful transfer of the data can be analysed.
For a printout of the data, click on the button. Choose the pages for printing in the “Print” – menu and confirm with “OK” Click on
, to end the Hypertension Management Software Client-Server
Press Ctrl D to delete a patient data
09/12/09