NuVasive
Cervical Disc Instrument Set Instructions for Use
14 Pages
Preview
Page 1
Cervical Disc Instructions for Use
Intended Use described in the Simplify Disc Surgical Technique Guide, and Simplify Disc Instructions for Use. IMPORTANT INFORMATION FOR SIMPLIFY DISC INSTRUMENT SET This instruction describes methods of care, cleaning, sterilization and storage of Simplify Disc Instrument Set. Recommended surgical procedure, including use of the instrument set, are 1
Simplify Disc instruments are intended for use in Simplify Disc Implant procedures. Simplify Disc Instrument Set consists of reusable manual surgical instruments contained within a sterilization tray. Simplify Disc Instrument Set use is determined by the user’s experience, training in Simplify Disc Surgical Procedure, and as outlined in the Simplify Surgical Technique Guide. Do not use instruments for any purpose outside the intended use of the device, as improper use may seriously affect the safety and function of the product.
2
Instruments are provided non-sterile and must be cleaned and sterilized using the validated instructions prior to use.
3
Recommendations for Care and Cleaning of Simplify Disc Instrument Set Initial Treatment at Point of Use Promptly after use, rinse instruments under running tap water (≈45°C) to remove gross soil. It is suggested to keep instruments moist after point of use (i.e., soak in treated water or cover with damp towels) until the manual cleaning process is initiated. Preparation before cleaning Perform manual or automated cleaning using the following: • Advanced Sterilization Products Enzol Enzymatic Detergent for Manual Cleaning or neodisher MediClean forte for Automated Cleaning with Manual Pre-Cleaning • Non-abrasive, nylon bristled brush (Sklar #10-1444 Double End Brush Nylon or equivalent) • ISO 15883-1 compliant washer disinfector Manual Cleaning The following Manual Cleaning Instructions have been validated.
1
Prepare detergent solution using Enzol Enzymatic detergent (Advanced Sterilization Products, Division of Ethicon US, LLP), two (2) ounces (60 mL) of detergent per one gallon (3.8 L) of tap water (22°C to 27°C).
2
If applicable, fully extend the jaws of the device.
3
Rinse device under running tap water (22°C to 27°C) for a minimum of 30 seconds.
4
Immerse device in detergent solution and (if applicable) fully actuate the shaft in, then out while submerged.
5
Soak devices in detergent for two (2) minutes.
6 7
Brush the threaded area of the device for one (1) minute and all remaining surfaces of the device for one (1) minute [for a total of two (2) minutes of brushing] using a nonabrasive nylon bristled brush (Sklar #10-1444 Double End Brush Nylon or equivalent). Flush lumen(s) (if applicable) of device six (6) times with 50 mL aliquots of detergent solution (300 mL total).
8
Sonicate devices for five (5) minutes in detergent.
9
Remove devices from sonicator and rinse under running tap water for one (1) minute. If applicable, actuate shaft in and out while rinsing.
10
If applicable, flush lumen six (6) times with 50 mL aliquots of tap water (300 mL total).
11
Submerge device in de-ionized (DI) water for 1 minute.
12
Wipe device with non-linting wipe(s) and allow to dry completely.
13
Visually inspect each instrument for the absence or presence of remaining soil in a well-lit area.
4
Automated Cleaning (with Manual Pre-Cleaning) The following Automated Cleaning procedure (with Manual Pre-Cleaning) has been validated. Manual Pre-Cleaning 1
Prepare a detergent solution using neodisher MediClean forte prepared using 5 mL detergent per liter of water (0.5%).
2
If applicable, fully extend the jaws of the device.
3
Rinse device under running tap water (22°C to 27°C) for a minimum of 30 seconds.
4
Immerse device in detergent solution and (if applicable) fully actuate the shaft in, then out while submerged.
5
Soak devices in detergent for two (2) minutes.
6
Brush the threaded area of the device for one (1) minute and all remaining surfaces of the device for one (1) minute [for a total of two (2) minutes of brushing] using a nonabrasive nylon bristled brush (Sklar #10-1444 Double End Brush Nylon).
7
Flush lumen(s) (if applicable) of device six (6) times with 50 mL aliquots of detergent solution (300 mL total).
8
If applicable, flush lumen six (6) times with 50 mL aliquots of tap water (300 mL total).
9
Wipe device with non-linting wipe(s) and allow to dry completely.
5
Automated Cleaning and Disinfection (with Manual Pre-Cleaning)
1
Before automated cleaning, devices must be cleaned in accordance with the Manual Pre-Cleaning.
2
Place the instruments in a washer-disinfector at an angle to allow for draining and ensure device cavities are facing down. Perform the following automated cycle: Pre-Wash
RECIRCULATION TIME (MINUTES : SECONDS) 02:00
Wash
10:00
Rinse Thermal Rinse
0:15
PHASE
3
Drying
TEMPERATURE Cold Heated 140°F / 60.0°C Hot Heated 194°F / 90.0°C 210°F / 98.8°C (High)
05:00 15:00
DETERGENT / WATER TYPE Tap neodisher MediClean forte (5 mL per L water) Tap High Purity N/A
4
If needed, thoroughly dry the instrument with a clean, lint-free cloth/wipe. Use filtered, medical grade, pressurized air (≤40psi) or a syringe filled with air to facilitate drying the device.
5
Visually inspect each instrument for the absence or presence of remaining soil in a well-lit area.
6
Recommendations for Care and Cleaning of Simplify Disc Tray Initial Treatment at Point of Use It is suggested to keep the tray moist after point of use (i.e., soak in treated water or cover with damp towels) until the manual cleaning process is initiated. Preparation before cleaning Perform automated cleaning using the following: • neodisher MediClean forte Detergent • Non-abrasive, nylon bristled brush (Sklar #10-1444 Double End Brush Nylon or equivalent)
7
Step 1 2
Manual Pre-Cleaning Instructions Prepare a detergent solution using neodisher MediClean forte prepared using 5 mL detergent per liter of water (0.5%). Disassemble the tray into its components.
3
Immerse the tray components in the detergent solution and soak for a minimum of five (5) minutes.
4
While immersed, brush each of the components for a minimum of two (2) minutes (each) and until visibly clean using a non-abrasive, nylon bristled brush (Sklar #10-1444 Double End Brush Nylon).
5
Immerse each tray component in a tap water bath for a minimum of one (1) minute.
Step
Automated Cleaning Instructions
1
Before automated cleaning, devices must be cleaned in accordance with the Manual Pre-Cleaning Steps.
2
Place the disassembled, empty trays in a washer-disinfector to allow for draining. Perform the following automated cycle: Pre-Wash
RECIRCULATION TIME (MINUTES : SECONDS) 02:00
Wash
10:00
Rinse Thermal Rinse
0:15
PHASE
3
Drying
TEMPERATURE Cold Heated 140°F / 60.0°C Hot Heated 194°F / 90.0°C 210°F / 98.8°C (High)
05:00 15:00
DETERGENT / WATER TYPE Tap neodisher MediClean forte (5 mL per L water) Tap High Purity N/A
4
If needed, thoroughly dry the tray components with clean, nonlinting cloth/wipes.
5
Visually inspect each tray component for the absence or presence of remaining soil in a well-lit area.
NOTE: Manual cleaning is NOT a disinfection process.
8
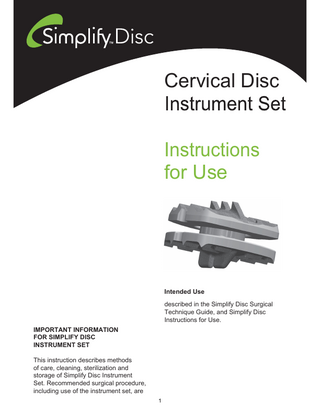
Figure 1: Representative Image of the Simplify Disc Instrument Set
9
Recommendations for Sterilization of Simplify Disc Instruments Loosen or fully open moveable features of instruments, and place in the cervical tray as illustrated on the tray floor. Latch the lid securely in place prior to wrapping.
Method: Temperature: Exposure Time: Dry Cycle:
Wrap the trays using the AAMI CSR double wrap method prior to sterilization to maintain sterility of internal components. Wrap the tray in a medical grade sterilization pouch or wrap which conforms to the recommended specifications for steam sterilization provided below (for example: Cardinal Health Convertor Brand Bio-Shield Regular Sterilization Wrap; Ref Number: 4040, Lot Number: 19EDDNB016, 510(k) reference number: K770933). Ensure that the pouch or wrap is large enough to contain the tray without stressing the seals or tearing the pouch or wrap.
AND: Method: Temperature: Exposure Time: Dry Cycle:
Pre-vacuum Steam 132°C (270°F) 4 minutes 20 minutes
Pre-vacuum Steam 134°C (273°F) 3 minutes 30 minutes
The user/processor should comply with local laws and ordinances in countries where reprocessing requirements are more stringent than those provided above. NOTE: Do not stack trays during sterilization. Use of this cycle is validated to produce a Sterility Assurance Level (SAL) of at least 10-6.
The wrapped Simplify Disc Instrument Set should be sterilized in the tray provided, in a properly functioning and calibrated autoclave.
Caution Handle devices with care to prevent cutting surgical gloves with sharp-edged surgical instruments.
NOTE: It is the responsibility of the hospital to ensure that reprocessing is performed using the appropriate equipment and materials, and that personnel in the reprocessing facility have been adequately trained in order to achieve the desired result. Equipment and processes should be validated and routinely monitored. Any deviation by the processor from these instructions should be properly evaluated for effectiveness to avoid potential adverse consequences.
Limits on Reprocessing Simplify Disc Instruments lifespan is normally determined by wear and damage due to use. Instruments should not be expected to last indefinitely. These items are often subjected to high loads and/or impact forces. Before each use carefully inspect all instruments. Do not use an instrument that is severely corroded, marred or worn or cutting instruments with dull edges. Improperly functioning devices, devices with unrecognizable markings, missing or removed (buffed off) part numbers, damaged and excessively worn devices should not be used. It is the responsibility of the user to ensure each instrument is visually inspected according to the instructions provided.
Recommended minimum sterilization parameters that have been validated to provide a 10-6 sterility assurance level (SAL) are:
NOTE: At some point in time, instruments wear out and should be replaced.
10
Warning
Other Precautions
• Do not use these instruments for any action for which it was not intended such as prying or lifting.
1. Excessive forces when using instruments can be dangerous. 2. Any form of distortion or excessive wear on instruments may cause a malfunction that could lead to serious patient injury.
• To avoid injury, the instruments should be carefully examined prior to use for functionality or damage. A damaged instrument should not be used.
3. Regularly review the operational state of all instruments and, if necessary, make use of repair and replacement services.
NuVasive, Inc. does not and cannot warrant the use of Simplify Disc Instruments nor any of the component parts upon which repairs have been made or attempted except as performed by NuVasive, Inc.
Contraindications The instrument tray is intended only for use with Simplify Disc Instruments. Do not add instruments to the set. Sterilization of contents other than Simplify Disc Instruments has not been validated.
Possible Adverse Effects • Breakage, slippage, misuse, or mishandling of instruments, such as on sharp edges, may cause injury to the patient or operative personnel.
Storage and Transportation
• Improper maintenance, handling, or poor cleaning and sterilization procedures can render an instrument unsuitable for its intended purpose, or even dangerous to the patient or surgical staff.
Simplify Disc Instrument Set trays may be used as a packaging system for transportation of instruments. Limited warranty and disclaimer: NuVasive, Inc. products are provided with a limited written warranty to the original purchaser against defects in workmanship and materials. Any other express or implied warranties, including warranties of merchantability or fitness for a particular purpose, are hereby disclaimed.
• Possibility that an instrument fragment may be left in the body. • Proper patient selection and operative care are critical to the success of the device and avoidance of injury during surgery. Read and follow all other product information supplied by the manufacturer of the implants or the instruments. • Extreme care should be taken to ensure that the instruments remain in good working order. Any surgical techniques applicable for use of this system should be carefully followed.
11
Table 3: Description of Symbols used in packaging
Manufacturer
Authorized representative in the European Community
Batch code
Catalog number
Consult instruction for use www.nuvasive.com/eifu
Non-Sterile
Footprint Size
Height
4, 5, 6 L
Lordosis
12
NuVasive, Inc. 7475 Lusk Blvd. San Diego, CA 92121 USA USA Phone: +01.800.475.9131 USA Fax: +01.800.475.9134 www.nuvasive.com Australian Sponsor: NuVasive Australia & NZ PTY LTD. Building 9 588A Swan Street Richmond VIC 3121 Melbourne, Australia
NuVasive Netherlands B.V Jachthavenweg 109A 1081 KM Amsterdam The Netherlands Phone: +31 20 72 33 000
NuVasive Switzerland GmbH c/o Domenghini & Partners AG Falkengasse 3 6004 Luzern, Switzerland UK Responsible Person: NuVasive UK Limited Suite B, Ground Floor, Caspian House, The Waterfront, Elstree, Herts, WD6 3BS, United Kingdom
Please see www.nuvasive.com/eifu for complete instructions for use for Simplify Disc and Simplify Disc Instruments. 32149-EN_N-2022-06
13