Oxylitre Limited
PSP Operating & Safety Instructions Issue 3.9 July 2014
Operating & Safety Instructions
12 Pages
Preview
Page 1
HEALTHCARE EQUIPMENT
PSP Series “petite elite” Portable Suction Pump Operating & Safety Instructions
1
2. 1.
Cautions Please read these Operating Instructions carefully. This device is to be used by personnel fully trained in the use of medical suction equipment. Ensure that the suction unit is tested for Electrical Safety at least annually. To operate the suction unit correctly, ensure that the Operating Instructions in this document are followed. Ensure the cleaning procedure and safety precautions are followed to avoid the risk of an electrical shock. Contact our service department immediately if an electrical fault has been detected when using the suction unit. Ensure that you check the contents of your package thoroughly before use. Ensure the cable is neatly wrapped prior to moving. Please avoid using the suction unit near other types of electrical equipment that are nonapproved electrical medical devices that may release strong electromagnetic/radiated emissions. Do not use any flammable agents near or on the equipment when in use. Do not submerge the product in water or leave resting in puddles or severe wet environments. Do not clean the suction unit unless the plug has been removed from the mains socket supply. Do not rinse or use excessive amounts of water or fluid over the suction unit. Do not remove the filters, receiver jar or tubing unless the suction unit has been turned off and the mains lead has been disconnected. Do not stretch or pull the mains cable and contact with any sharp implements that may penetrate the cable (e.g. carpet rail, protruding nails etc). Warning: Electrical Safety The PSP Series suction may be operated from a 220 -240 volt mains supply. DO NOT remove or open the main panels of the electrical suction unit for any reason (see section 5.6 for battery removal). If the unit fails to operate you MUST contact the Oxylitre Service Department for service recommendations. The main panels on the product must only be opened by an Oxylitre Service Engineer or by qualified personnel.
Warning: Material Compatibility* The Oxylitre Jar and Lid supplied with PSP001 are manufactured from Polycarbonate. They should not come into contact with compounds such as Alkalis, Ammonia solutions & Amines that may be found in some strong disinfecting and sterilizing agents. Such agents can cause stress cracking. Warning: Presence of Battery Under no circumstances should the PSP be operated on mains without the battery being connected, even if discharged or otherwise not working. This could irrevocably damage the circuitry. 2
Contents 1.
Cautions
Page
2
2 2.1 2.2 2.3
Introductions Scope Warranty Variants
Page Page Page Page
4 4 4 4
3 3.1 3.2
Knowing your Suction Pump Using an Oxylitre Receiver Jar Using an Abbott Jar & Liner
Page Page Page
5 5 5
4 4.1 4.1.1 4.1.2 4.1.3 4.1.4 4.1.5 4.1.6 4.1.7 4.1.8
Operating Instructions Operating Panel On/Off Button Increase/Decrease Button Emergency Switch on Pre-use Test Vacuum Level Selection Indicator Actual Vacuum Level Indicator Mains Connection Indicator Battery Level Indicator
Page Page Page Page Page Page Page Page Page Page
6 6 6 6 6 7 7 7 7 7
5. 5.1 5.2 5.3 5.4 5.5 5.6
Battery & Charging Characteristics Charging Fully Charged In Use In Use & Charging Re-Charging Battery Removal/Replacement
Page Page Page Page Page Page Page
7 7 7 7 8 8 8
6
Preventative Maintenance & Cleaning
Page
8
7
Replacement Parts
Page
9
8 8.1 8.2 8.3 8.4 8.5 8.6 8.7 8.8 8.9 8.10
Specifications 1000mL Receiver Jar Filtration Exhaust Dimensions Electronic/Electrical Specifications Battery Motor Electrical Electronics Electrical/ Electronic Test
Page Page Page Page Page Page Page Page Page Page Page
9 9 9 9 9 9 9 9 9 10 10
9
Symbol Definition
Page
10
10
Fault Diagnosis
Page
11
3
4. 2.
Introduction Oxylitre suction therapy products have been designed and manufactured by our own Research & Development Department. Designed with the latest technologies and the latest requirements of the European Directive RoHS (2002/95/EC) incorporated into the design. “The Petite” has been specifically designed for portable and field use with high performance flexibility. This product incorporates all the most significant aspects of robust design elements taken from our existing range of products which allows “The Petite” to be used in all their environments and more (Note: It has been tested to withstand a accelleration/deceleration of 20 g; twice the Ambulance Standard1 requirement, in its docking station). “The Petite” has the ability to operate in most external environments without having to connect to any power source for up to a combined period of up to 1½ hours.
2.1
Scope The Portable Suction unit incorporates a 12V NiMH, RoHS compatible replacable battery pack, which allows the unit to operate for a period up to 1½ hours. As the unit has been designed for use in either internal or external environments, this enables the unit to be taken to almost any point of use in emergency case scenarios. The unit is light in weight, easy to carry and is available with a carry bag. The unit is designed for intermittent use for the aspiration of bodily fluids, secretions, blood and vomitus e.g. from a patient’s airway. It should not be used for continuous suction or drainage as defined by BS EN ISO 10079-1 i.e. not to be used for specific endoscopic use, closed system wound drainage, suction for permanent tracheostomy etc. A wall mounting docking station is also available for easy storage. It can incorporate the required recharging power cord so that the unit connects to the recharging power source automatically when the unit is mounted for storage. The product is a fully rechargeable device and can be recharged from the following areas: 110V - 240V AC Mains power source. 12V - 28V DC power supply from an Ambulance/Road Vehicle or an Air Ambulance (the operating/charging of the unit from a supply voltage of 17V - 28V DC requires a white cable. This diverts the charging current to isolated circuitry). Any of the above is available with a wall storage docking station power cable.
2.2
Warranty The Company Warranty; in respect of durable goods (but not in respect of disposable goods) that such goods will correspond with their specification at the time of delivery and will be free from defects in material and workmanship for a period of 7 years from delivery (N.B. Warranty is 1 year for the battery and 3 years for the Oxylitre Jar). Full warranty statement available on request or online at: www.oxylitre.co.uk
2.3
Variants (for 1000mL Jars only)
i. ii. iii. iv. v. vi.
Oxylitre Receiver Jar Hospira Receptal Jar Serres Jar VacSax Jar Low Vacuum Versions Tubing Holder
PSP001 PSP002 PSP003 PSP004 (PSP004-BR without Jar) “L” Suffix on code “B” Suffix on Code 4
3.
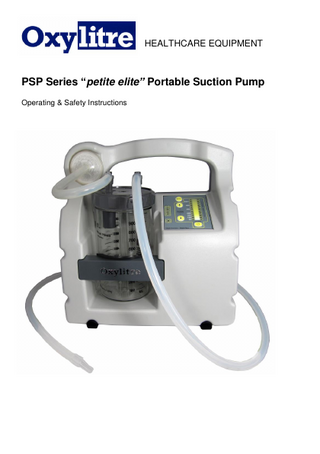
Knowing your Portable Suction Pump
3.1
Using an Oxylitre Receiver 1000mL Jar (PSP001)
Vacuum Connector Tube
Carrying Handle
Filter Cartridge Vacuum Port Operating Panel 1000ml Receiver Jar
Patient Suction Tubing
Jar Retainer
Anti Slip Rubber Feet Catheter Connector 3.2
Using an VacSax Receiver 1000mL Jar (PSP004) Carrying Handle
Filter Cartridge Vacuum Connector Tube
Operating Panel
Vacuum Port VaxSax Liner & 1000ml Jar
Patient Suction Tubing
Jar Retainer
Anti Slip Rubber Feet
Catheter Connector
5
4. 4.
Operating Instructions The Petite Elite Portable Suction Pump is intended to be used by and/or its use clearly directed by suitably trained personnel for medical suction purposes. Before use please read the cautions and check for any damage/breakage of equipment. The tubing is to be routed as shown in section 3.1 on the standard Oxylitre Receiver Jar, and section 3.2 if using the VacSax disposable liner type. 4.1 Operating Panel Vacuum Level Selection Indicator
Full Suction and/or Emergency Switch “ON”
Actual Vacuum Level Indicator
Vacuum Increase Button Battery Level Indicator
Vacuum Decrease Button
Mains Connected Indicator
Low Version Panel
On/Off Button 4.1.1
“On/Off” Button Press the “ON” button and the unit will start and operate at the lowest suction level (80mmHg). Note: When on MAINS after switching “OFF” wait 5 seconds before switching “ON” again (unit needs to re-set in this operating mode).
4.1.2
Increase/Decrease Vacuum Button To increase or decrease the level of vacuum, simply press either the increase (▲) or decrease (▼) button and the level will be displayed.
4.1.3
Emergency Switch On When in an emergency scenario or where it is known that the highest vacuum level is required at an instant, the “500+” or “Max Vac” button can be pressed to give this instant requirement. Pressing the “500+” or “Max Vac” button will override the “On/Off” button or any pre-set level settings.
4.1.4
Pre-use Test As a Pre-use Test, press the 500+ or Max Vac button and allow the unit to run for a few seconds then occlude the patient tubing/catheter. The right hand vacuum indicator lights will advance to the top setting in approximately 10 seconds. 6
This indicates that the pump is operating correctly. Note that if then kept occluded the vacuum top LED can ‘pulse’ down to the lower LED and then back again. This is normal and is due to the unit detecting the internal relief valve operating under this constricted volume condition. In ordinary use; connected to a container, this valve function is not detected by the unit. WARNING: Ensure you release (‘drain down’) the vacuum after testing. Conduct testing on mains AND battery to check for battery function. If there is a leak in a jar seal (or disposable liner) for any reason and air can get into the system the test will become invalid. Do not for any reason keep the tubing / catheter occluded (keeping the system under vacuum) and switch off then on. The unit cannot reset and damage to the circuitry could occur. If the unit ever stalls on mains, switch off and disconnect from mains, reconnect and switch on again. 4.1.5
Vacuum Level Selection Indicator
4.1.6
When a vacuum level is selected the LEDs on the left will highlight the selected vacuum level. Actual Vacuum Level Indicator
4.1.7
4.1.8
During aspiration the actual level of vacuum gained will be indicated on the vacuum level indicator. This column may increase and decrease rapidly as the level of suction may vary depending on the density of the fluid and/or if air is being aspirated. Vacuum indicator accuracy is ±10%. Mains Connected Indicator When connected to an external power source; whether for charging or direct use, this LED will light up green (red for models circa pre 3rd quarter 2011). Battery Level Indicator The battery level indicators LEDs display the remaining battery capacity, from the internal battery. Note: When receiving the unit for the first time there is no requirement to condition the battery, the battery is conditioned by the normal charging processing.
5.
Battery & Charging Characteristics The suction unit incorporates a 12V/4300mAh NiMH battery pack, which can operate the suction unit for a period up to 1½ hours. The battery pack is made of 10 x 4300mAh cells, which are RoHS compatible and can be recycled. The battery pack automatically starts recharging itself when connected to an external power source such as 110V – 240V AC mains or a vehicle 12V – 28V supply. There are 4 x battery level LED lights on the control panel that nominally indicate the battery charge level. These should only be used as indicators during operation from the internal battery, as they can be influenced by a number of factors including unit settings, temperature, battery condition etc. Caution: During aspiration the battery LEDs CAN flicker between the 4 levels but will return to a steady level when aspiration has stopped. This is a normal operating characteristic of the device under load.
5.1
Charging When charging from an external power source the top green light will flash on the battery indicator and the bottom light will stay illuminated. As the battery charges, the LEDs will sequentially light up on the battery indicator. This process will take approximately 2½ hours to fully charge the battery pack. N.B. If the top LED still flashes well beyond this time, this is indicative of the battery being faulty and will need replacing.
5.2
Fully Charged When then battery is fully charged the top green light will stop flashing and stay on.
5.3
In Use When the suction unit is being operated, the indicator lights will illuminate giving the level of charge remaining in the battery (on battery power only) – during free flow (see 5 above). When the unit is in use (and when not connected to an external power source), 7
6.
the lights will gradually decrease to bottom of the battery indicator, which will remain illuminated until re-charging commences. At this point the suction unit will continue to operate until there is not sufficient power remaining to operate the unit. Note: As a guide, under battery supply only, when the second from bottom light extinguishes there is approximately 20 minutes of operation remaining. 5.4
In Use & Charging With the suction unit being operated whilst connected to an input supply, the top battery indicator light only will illuminate (N.B. this will flash if battery is not fully charged).
5.5
5.6
6. i.
ii.
iii. iv. v.
Re-Charging When the Battery Level Indicator has only the bottom light illuminated, the unit requires recharging. Note: If this bottom light starts flashing, the unit must be turned off immediately or the battery could totally discharge. If not in regular use, it is recommended to fully charge at least monthly to maintain battery condition. Caution: It is recommended that battery condition is checked on a daily basis for correct function prior to use and/or distribution; even if left on charge, as all batteries can fail over time – see 5.1 above (noting battery packs carry a one year warranty only). Battery Removal/Replacement Warning: Only use batteries or accessories supplied by Oxylitre or its authorised distributers. This should only be conducted by trained technically competent personnel. Remove the two screws that attach the battery cover to the rear of the unit. Remove and disconnect the battery (by pressing down on the white connector tab) and dispose of safely according to local regulations. Replace the battery by first pushing in the white connector into the terminal in the battery compartment (note: can only be attached in one orientation) and then the battery unit itself, taking care with positioning the cable. Replace the battery cover and replace the screws. Note: For PSPs manufactured from 2014 onwards, when a new battery is connected, on first power up (battery only, no mains) the unit will perform an auto calibration (synchronisation) sequence and then the unit will automatically turn off. The sequence is as follows (information included on label in battery compartment): Turn on, all four battery LEDs will illuminate Unit automatically selects top vacuum After up to 10 seconds all four battery LEDs will go out. The battery display indicator will display correct battery level (showing one LED illuminated). The unit will then turn itself off. Unit is now ready for use. This is done prior to connecting to the mains to ensure correct battery management. Servicing, Preventative Maintenance & Cleaning The Hydrophobic/Bacterial Filter should be immediately replaced when found discoloured or if wetted/contaminated. Such contamination can reduce pump performance. Discolouration can be simply checked by comparing it with a new replacement filter. Decontaminate (or replace as necessary) the “Suction Connecting Tube” after each use. Use mild cleaning agents/detergents (e.g. diluted Dettol or similar) when cleaning the unit and Receiver Jar components (* see ‘Warning’ on page 2). The Oxylitre Receiver Jar and Lid Components are Autoclaveable up to 134°C (for 3 minutes); see Guidelines for Autoclaving Doc-OP-4403. The battery should be fully charged after use. Do not allow the battery to discharge or consistently fast charge as this will reduce the life of the battery pack. There are no user serviceable components inside the unit’s enclosure. Do not open the enclosure. Unauthorised repairs will invalidate the warranty. Refer servicing to Oxylitre qualified engineers ([email protected]). 8
7.
Replacement Parts
a. b. c. d. e. f. g. h. i.
Suction Connecting Tubing: Catheter Connector: Hydrophobic/Bacterial Filter: Hydrophobic/Bacterial Filter: Receiver Jar Lid: Lid Sealing Ring: Float Assembly: Oxylitre1000mL Receiver Jar: 12V Battery Pack:
Ref: Ref: Ref: Ref: Ref: Ref: Ref: Ref: Ref:
PSP500-4-1 PSP500-5 (10 Pack) PSP600-12 (12 Pack) PSP600-50 (50 Pack) PSP500-2-1 BS9335 PSP500-3 PSP500-1 PSP300-5
Please Note: Always use Oxylitre replacements parts.
8.
Specifications
8.1
1000mL Receiver Jar Capacity: Overflow protection: Cleaning agent: Sterilisation: Material specification: Filtration Input Filtration:
8.2
8.3
8.4
8.5
8.6
8.7
8.8
Exhaust Exhaust output:
1000mL (100mL marking divisions) Float valve shut off Dettol (diluted to Dettol instructions) or similar Autoclaveable to 134ºC Mainly Polycarbonate Disposable Hydrophobic/Bacterial Filter, effective against 0.6 micron particles.
99.9%
Exhaust output on rear panel. No rear panel exhaust filtration required.
Unit Dimensions Height: 315mm Width: 305mm Depth: 175mm (225mm with docking station) Weight: 4.59kg (without docking station) Electrical/Electronics Specifications Input supply & Cables. Connection Options: High Voltage: 110 - 240V AC (Via Mains lead) Low Voltage: 12 - 17V DC (Low voltage black lead) Low Voltage: 17 - 28V DC (Low voltage white lead) Battery Battery type: NiMH (RoHS compatible) Battery power: 10 x 1.2V cell pack Battery capacity: 4300mAh complete Temp protection: Thermal switch protection Load protection: Charge management system Load & overheat protected. Battery life: 12 months (ideal conditions) Motor Motor: Standard Supply Voltage: Max Amp: Fuse type: Electrical Mains Input Voltage:
Enclosed 12 Volts DC 5A 12V AC (F) 5A 110-240V AC 9
8.9
8.10
Watts: Frequency: Phase: Amperes: Fuse Type: Classification: Level of protection: Plug Fuse: Electronics Components: Charging voltage: Control voltage: Management: Electrical/Electronic Test Electrical/Electronic Safety: EMC emissions:
9.
40-50W (charging) 50/60 Hz Single 5A T2A Class II Type BF 5A RoHS compatible 12V 12V ICU/Software managed BS EN 60601-1 BS EN 60601-1-2
Symbol Definition Class II: type of protection incorporated into the design of the product to prevent the risk of an Electrical Shock.
Type BF: type of protection incorporated into the design of the product to prevent the risk of an Electrical Shock to the user.
IP24D
Rating of the degree of protection against intrusive implements and the protection of the environment. The product has been designed to comply with the safety and design requirements of the European Directives for Medical Devices including Council Directive 92/43/EEC. The product complies with the requirements of the relevant Safety European Automotive Directives for use in Ambulances and other Medical Vehicles. Indicates: “Caution, consult accompanying documents”.
Waste Electrical & Electronic Equipment (WEEE) compliance (Environmental Agency Producer Registration Number: WEE/AJ0509VR). Please contact Oxylitre for details of obligated waste collection. The Oxylitre PSP Series Portable Petite Elite Suction unit complies and/or has been approved to the requirements of: a. c. e. g.
BS EN ISO 10079-1 BS EN 17891 Council Directive 2006/28/EC VCA Approved (Automotive)
b. d. f. h.
BS EN 60601-1 BS EN 60601-1-2 Council Directive 92/43/EEC GMDN 47366
10
10.
Fault Diagnosis Fault Found
Possible Cause
Corrective Action
Faulty switch on Display Board
Contact Supplier. Possible emergency override by pressing the 500+/Max Vac button. Then control vacuum in the usual way. *Be advised it may not be possible to switch off the unit. In which case it will continue to run until the battery is fully discharged.
Internal Battery fully discharged and/or faulty Internal Cable fault.
Connect Mains Lead to recharge Battery. If Battery does not recharge, operate off mains supply in emergency situation and Contact Supplier Contact Supplier
Faulty Switch on Display Board
Contact Supplier
Internal Circuit or Cable fault
Contact Supplier
Fuse Blown on Mains Lead Plug or Mains Lead faulty
Replace fuse or mains Lead
Suction Unit does not operate when the on/off button is pressed and LED’s do not illuminate (with or without mains lead connected).
Internal Battery Disconnected.
Contact Supplier
Internal Pump and Motor Assembly disconnected or faulty
Contact Supplier
LED’s do all operate when on/off button is pressed (with or without mains lead connected) but no suction
Internal Pump and Motor Assembly disconnected or faulty
Contact Supplier
Suction Unit operates on battery but does not work off mains (mains lead and fuse OK).
Faulty Power Board
Contact Supplier
Vacuum level will select and run but motor stops running when aspirating
Possible blockage
Suction Unit PULSATES when the on/off button is pressed (With Mains Lead connected)
Internal Battery Disconnected
The unit is designed to stop running when the tubing is blocked, the jar is full, if fluid aspirated is highly dense or if solids are found. Empty or replace jar, clean tubing and replace filter as necessary. Check shut-off valve in jar assembly is not in shut-off position and moves freely. Contact Supplier
When 500+ mmHg or “Max Vac” is selected (Highest Level of vacuum) and patient tubing occluded the actual achieved vacuum and flow is poor. Note: This will cause the pretest (section 4.1.4) to be invalid i.e. the pump will not stop as indicated.
Leakage in the vacuum system caused faulty components
Suction Unit does not operate when the on/off button is pressed and LED’s do not illuminate (without mains lead connected)
Suction Unit does not operate when the on/off button is pressed and LED’s do not illuminate (with mains lead connected)
Filter blocked
Liner System faulty
Damaged Tubing or disconnected
Unusual noise coming from inside the unit when running When pressing the Vacuum Control Buttons the unit does not respond/or the Vacuum Indicator LED’s behaves erratically The unit is not performing well on Battery.
Ensure that all components have been correctly fitted. Inspect the Jar Lid, Filter and Tubing and change where applicable and or readjust tubing connections Filters are to be replaced if wetted or discoloured and/or contaminated. Compare to new unused filter to confirm status. If fitted with a disposable Liner check the Liner System & Filter (if used). Use new Liner. Check any kinks or damaged to tubing and change where necessary
Pump Assembly worn and/or damaged
Contact Supplier
Possible mechanical or electrical fault
Contact Supplier
Faulty PC Board
Contact Supplier
Battery in poor condition or faulty
Ensure that unit has been fully recharged (i.e. for 2¼ hours). If still poor performance - Contact Supplier.
11
PSP002 Hospira Receptal Jar2
PSP003 Serres Jar
2.
PSP004 VacSax Jar
N.B. only 1500ml Hospira Jar may be available.
Manufactured in the UK by: Morton House Skerton Road Old Trafford Manchester. M16 OWJ England www.oxylitre.co.uk
Tel: (0161 872 6322 Fax: (0)161 848 7914 Email:[email protected]
0473 Ref: DOC-OP-4601 Issue 3.9 Date: 29.7.14
MK3
12