Pro-Med Patient Lifting
INVACARE Patient Lifting & Transfer
Floor Lift Owner’s Operator and Maintenance Manual Product Code 17201
Operator and Maintenance Manual
8 Pages
Preview
Page 1
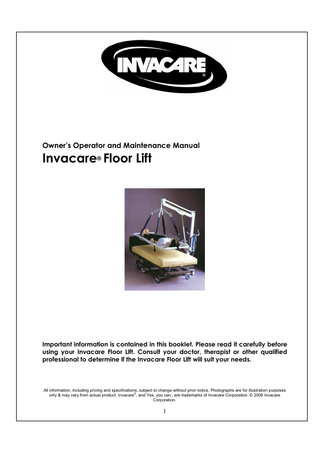
Owner’s Operator and Maintenance Manual
Invacare® Floor Lift
Important information is contained in this booklet. Please read it carefully before using your Invacare Floor Lift. Consult your doctor, therapist or other qualified professional to determine if the Invacare Floor Lift will suit your needs.
All information, including pricing and specifications, subject to change without prior notice. Photographs are for illustration purposes ® only & may vary from actual product. Invacare , and Yes, you can., are trademarks of Invacare Corporation. © 2008 Invacare Corporation.
1
1 Year Warranty Your Invacare Floor Lift is warranted to be free of defects in material and workmanship for a period of 1 year, for the original consumer. This device was built to precise standards and carefully inspected prior to shipment. This 1 year warranty is an expression of our confidence in the material and workmanship of our products and assures years of convenient, dependable service. In the event of a defect covered by this warranty, we will, at our discretion, repair or replace the device. This warranty does not cover device failure due to owner misuse, negligence, or normal wear and tear. The warranty does not extend to nondurable components such as tapes, handles/grips, straps and rubber boots, which are subject to normal wear and tear. Non-durable components are warranted for a period of 6 months. If you have a question about your Invacare product or this warranty, please call us on 1800 460 460 (Australia) or 0508 468 222 (New Zealand).
All information, including pricing and specifications, subject to change without prior notice. Photographs are for illustration purposes ® only & may vary from actual product. Invacare , and Yes, you can., are trademarks of Invacare Corporation. © 2008 Invacare Corporation.
2
USING THE FLOOR LIFT STRAP KIT* IN COMBINATION WITH THE 4 POINT YOKE ATTACHMENT *Invacare Product Code: 17201
Invacare recommends that two carers assist with a floor lift using a Floor Lift Strap Kit and 4 point Yoke Combination.
#Invacare Lifting Frame Safe Working Load: 230kg.
Assemble the Pro-Med Lifting Frame: LIFTING FRAME 1. Assemble lifting frame by locking the two halves together (see diagram) and place over the patient. If the patient is attached to apparatus such as drips, monitors etc., the unassembled frame needs to be placed around the patient first before assembly.
All information, including pricing and specifications, subject to change without prior notice. Photographs are for illustration purposes ® only & may vary from actual product. Invacare , and Yes, you can., are trademarks of Invacare Corporation. © 2008 Invacare Corporation.
3
GLIDERS Caution: Do not use a glider that is damaged. Pass the single hole end of a glider under the patient. If skin is exposed, apply talcum powder to the glider first. Attach to a support peg on the frame at a strategic point. Tension the glider by selecting the appropriate hole at the glider's other end. Employ a sufficient number of gliders to provide a cradle support. It is recommended that a minimum of 9 standard gliders and 1 head glider be used for patients exceeding 70kg. Gliders can be fitted diagonally to avoid injured areas. Similarly, a glider can be left out for toileting or wound dressing etc. Assembling a lifting frame is easier with two people, one either side of the patient
2. Widen the leg base of the lifter and position the lifter around the head of the frame.
3. Lower the boom of the lifter towards the patient stopping about a metre above the patient, allowing enough space to attach the straps.
All information, including pricing and specifications, subject to change without prior notice. Photographs are for illustration purposes ® only & may vary from actual product. Invacare , and Yes, you can., are trademarks of Invacare Corporation. © 2008 Invacare Corporation.
4
4. Connect the Floor Lift Straps to the 4 Point Yoke:
Place the RED loops over the yoke hooks at the head end of the lifting frame, and place the RED loops over the yoke hooks at the foot end of the lifting frame. Make sure loops are the same colour at both ends
5. Attach the Floor Lift Straps to the Frame Use the longest straps. Attach front keyhole buckles to the inner most studs and rear keyhole buckles to outer most studs.
Make sure all gliders, attachments, and straps are fitted correctly before lifting the patient.
All information, including pricing and specifications, subject to change without prior notice. Photographs are for illustration purposes ® only & may vary from actual product. Invacare , and Yes, you can., are trademarks of Invacare Corporation. © 2008 Invacare Corporation.
5
6. Lift the frame with the brakes on the lifter ON. One person is required at the foot end of the lifting frame to pull, and guide the frame clear of the lifter legs and electrics during the lift.
NB: The frame will lift on an incline so that the lifter does not over-balance (i.e. the head end of the frame will be higher than the foot end). This is unavoidable.
7. Raise the lifting frame about one metre off the ground or until clear of hospital bed. With the assistance of two carers, rotate frame to 90 degrees.
All information, including pricing and specifications, subject to change without prior notice. Photographs are for illustration purposes ® only & may vary from actual product. Invacare , and Yes, you can., are trademarks of Invacare Corporation. © 2008 Invacare Corporation.
6
8. Adjust the base width of the lifter appropriately and position the frame slowly over the bed.
9. Lower the lifting frame until there is no tension on the straps. • • •
Remove the straps Remove the patient lifter Remove the lifting frame from the patient.
REMOVAL OF GLIDERS To release a glider from a stud, pull the glider gently so that the stud clears the keyhole and lift. If the glider is difficult to remove, employ a twisting motion.
HIGH LIFT MANOEUVRE A lift from bed-to-bed can be achieved by using the BLUE loops attached to all hooks on the 4 Point Yoke and the shorter keyhole buckles straps attached to the frame. When undertaking a high lift manoeuvre, make sure the head end keyhole buckles are connected to the outer most studs. The keyhole buckles at the foot end should be connected to the inner most stud.
All information, including pricing and specifications, subject to change without prior notice. Photographs are for illustration purposes ® only & may vary from actual product. Invacare , and Yes, you can., are trademarks of Invacare Corporation. © 2008 Invacare Corporation.
7
Invacare Australia 1 Lenton Place North Rocks NSW 2151 Australia www.invacare.com.au Email: [email protected] Phone 1800 460 460 Fax: (02) 8839 5311
Invacare New Zealand PO Box 62-124 4 Westfield Place Mt Wellington, Auckland, New Zealand Freephone 0508 468 222 Freefax 0508 807 788 www.invacare.co.nz All information, including pricing and specifications, subject to change without prior notice. Photographs are for illustration purposes ® only & may vary from actual product. Invacare , and Yes, you can., are trademarks of Invacare Corporation. © 2008 Invacare Corporation.
8