Pyng Medical Corp
FASTx Training Device Instructions
Training Device Instructions
6 Pages
Preview
Page 1
FASTx™ TRAINING DEVICE INSTRUCTIONS (also refer to the FASTx Trainer’s Manual PM-079)
DEPLOYMENT
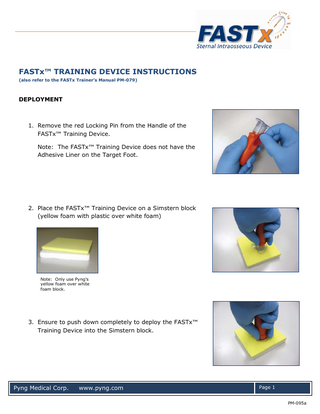
1. Remove the red Locking Pin from the Handle of the FASTx™ Training Device. Note: The FASTx™ Training Device does not have the Adhesive Liner on the Target Foot.
2. Place the FASTx™ Training Device on a Simstern block (yellow foam with plastic over white foam)
Note: Only use Pyng‟s yellow foam over white foam block.
3. Ensure to push down completely to deploy the FASTx™ Training Device into the Simstern block.
Pyng Medical Corp.
www.pyng.com
Page 1 PM-095a
4. Pull the FASTx™ Training Device straight up while holding down the Target Foot to separate the Handle from the Infusion Tube which is now inserted into the Simstern “bone”. Completely pull up all the way until the Handle with Needle Cover is pulled completely away from the Target Foot. You will feel resistance in the upward motion. Do not stop.
5. Connect the luer to the IV line or source of fluid or medication. Connect the Infusion Tube Strain Relief Hook to the Target Foot.
6. Place the Dome over the Target Foot. Note: Use of the FASTx™ Dome is optional as the Target Foot also provides protection.
Pyng Medical Corp.
www.pyng.com
Page 2 PM-095a
REMOVAL
7. To remove, grip as close to the lower end of the Infusion Tube as possible. Pull the Infusion Tube out from the Simstern “bone”. Note: Pull in one continuous motion (do not start/stop) until removed. Use the tube to pull, not the luer connection. It is normal for the tubing to stretch.
RESETTING THE FASTx™ TRAINING DEVICE
1. Reset the FASTx™ Training Device using the Reset Tool. Push the Reset Tool into the hole in the back of the FASTx™ Handle. Push gently until you hear and feel a „click‟. You do not need to push hard to reset the FASTx™ Training Device.
Use the short FASTx™ reset tool with orange on handle. Note: Ensure you are not using the FAST1® reset tool which is longer and will damage the FASTx™ trainer.
Pyng Medical Corp.
www.pyng.com
Page 3 PM-095a
2. Carefully push down on the Needle Cover, and hold it down with your thumb and/or fingers to prepare for the next step.
3. While holding down the Needle Cover, load the Infusion Tube over the Stylet. Note: Load the Infusion Tube with the Strain Relief Hook towards the side of the handle (90 degrees from the FASTx™ logo)
4. Load the blue Anti-Buckle into the slot next to the Stylet with the Infusion Tube. The Blue Anti-buckle can only fit in one direction properly. Ensure that it is fitting like a puzzle piece with the rounded end & clip facing the handle thumb grip. Sliding the anti-buckle down the infusion tube can aid in proper alignment. Snap the Anti-Buckle into place.
Pyng Medical Corp.
www.pyng.com
Page 4 PM-095a
5. Snap the Target Foot back on the Needle Cover Ensure that the Target Foot notch is aligned with handle notch.
Line up the arrows on the target foot and the device to ensure a proper reset.
6. Check the alignment of the Target Foot on the needle Cover. Ensure each needle is in its respective separate hole (if not, repeat step 5). Pull the Needle Cover back out in place.
Pyng Medical Corp.
www.pyng.com
Page 5 PM-095a
7. Snap the red Locking Pin back in the Handle.
8. The FASTx™ Training Device is now ready for re-use Note: The FASTx™ Training Device needles will get worn with repeated re-use and the device may need to be replaced. The Infusion Tube with stretch after multiple uses and may need to be replaced.
Pyng Medical Corp.
www.pyng.com
Page 6 PM-095a