Smiths Medical
Blood and Fluid Warmers
Level 1 Model H-1200 DI-Series IV Admin Set Step-by-Step Guide Jan 2016
Step-by-Step Guide
2 Pages
Preview
Page 1
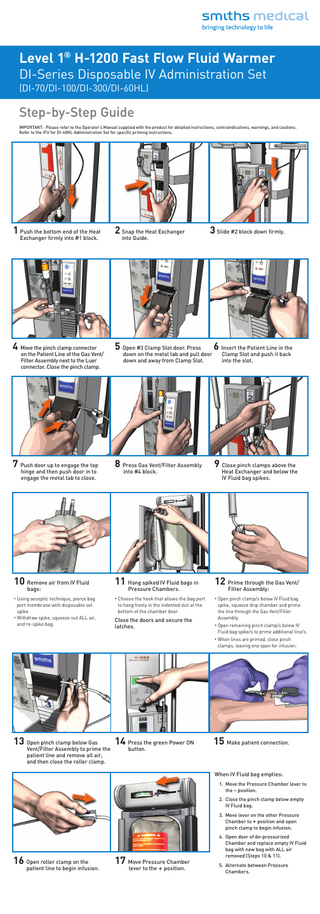
Level 1® H-1200 Fast Flow Fluid Warmer DI-Series Disposable IV Administration Set (DI-70/DI-100/DI-300/DI-60HL)
Step-by-Step Guide IMPORTANT: Please refer to the Operator’s Manual supplied with the product for detailed instructions, contraindications, warnings, and cautions. Refer to the IFU for DI-60HL Administration Set for specific priming instructions.
1 Push the bottom end of the Heat
2 Snap the Heat Exchanger
3 Slide #2 block down firmly.
4 Move the pinch clamp connector
5 Open #3 Clamp Slot door. Press
6 Insert the Patient Line in the
7 Push door up to engage the top
8 Press Gas Vent/Filter Assembly
9 Close pinch clamps above the
10 Remove air from IV Fluid
11 Hang spiked IV Fluid bags in
12 Prime through the Gas Vent/
• Using aeseptic technique, pierce bag
• Choose the hook that allows the bag port
• Open pinch clamp/s below IV Fluid bag
port membrane with disposable set spike. • Withdraw spike, squeeze out ALL air, and re-spike bag.
to hang freely in the indented slot at the bottom of the chamber door.
spike, squeeze drip chamber and prime the line through the Gas Vent/Filter Assembly.
Exchanger firmly into #1 block.
on the Patient Line of the Gas Vent/ Filter Assembly next to the Luer connector. Close the pinch clamp.
hinge and then push door in to engage the metal tab to close.
bags:
into Guide.
down on the metal tab and pull door down and away from Clamp Slot.
into #4 block.
Pressure Chambers.
Close the doors and secure the latches.
Clamp Slot and push it back into the slot.
Heat Exchanger and below the IV Fluid bag spikes.
Filter Assembly:
• Open remaining pinch clamp/s below IV
Fluid bag spike/s to prime additional line/s. • When lines are primed, close pinch
clamps, leaving one open for infusion.
13 Open pinch clamp below Gas
Vent/Filter Assembly to prime the patient line and remove all air, and then close the roller clamp.
14 Press the green Power ON button.
15 Make patient connection. When IV Fluid bag empties: 1. Move the Pressure Chamber lever to the – position. 2. Close the pinch clamp below empty IV Fluid bag. 3. Move lever on the other Pressure Chamber to + position and open pinch clamp to begin infusion.
16 Open roller clamp on the
patient line to begin infusion.
17 Move Pressure Chamber lever to the + position.
4. Open door of de-pressurized Chamber and replace empty IV Fluid bag with new bag with ALL air removed (Steps 10 & 11). 5. Alternate between Pressure Chambers.
Level 1® H-1200 Fast Flow Fluid Warmer D-Series Disposable IV Administration Set (DI-70/DI-100/DI-300/DI-60HL) WARNING: Do not turn OFF the Fluid Warmer when the Air Detector alarm is active. If the Fluid Warmer is powered OFF in an active alarm state, the Air Detector/Clamp will open and the Air Detector will become disabled. This could allow any air within the patient line to be delivered to the patient resulting in serious injury or death.
No power or LEDs do not light up: • Check that the power cord is plugged into a working electrical receptacle. • Check that the unit is turned ON by pressing the green Power ON button.
Heat Exchanger is difficult to install: • Lubricate O-Rings in #1 and #2 blocks with silicone lubricant. Silicone lubricant part #80-04-002.
Kinked administration set tubing: • Do not leave clamps closed for extended periods as it will cause the tubing to become kinked.
Pressure Chamber not activated: • Check that the unit is turned ON. • Check that the Pressure Chamber lever is in the + position. • Check that the pneumatic tubing is fully seated into fittings on the rear of the Pressure Chambers and Fluid Warmer.
Slow flow rate: • Use large bore needles or catheters to maximise flow rate. • Check that the IV Fluid bag port is fully spiked. • Choose the hook that allows the bag port to hang freely in the indented slot at the bottom of the chamber door. • Check that all clamps are fully open. • Check that the Pressure Chamber is activated. Move the Pressure Chamber lever to the + position. • Check that the Gas Vent/Filter Assembly is not clogged. Replace the Gas Vent/Filter Assembly every 3 hours or when clogged. • Spike blood bags with the Level 1® PF-1 Pre-Filters to extend the life of the Gas Vent/Filter Assembly. • Use the PF-1 Pre-Filters rather than 40-80 micron filters which may restrict flow. • Use only Level 1® accessories: Y-INJ, Y-30 or X-36 Extension Sets and SC-3 3-Way Stopcock.
Fluid Warmer Alarms: Check Disposable Indicator: • Check the position of the Heat Exchanger in the #1 block (Step 1). • Check the position of the Heat Exchanger in the Guide (Step 2). • Check that the #2 block is pressed down firmly (Step 3). • Check the position of the Gas Vent/Filter Assembly in the #4 block (Step 8).
Add Recirculating Solution Indicator: • Add recirculating solution to the Fluid Warmer’s reservoir (Refer to the Operator’s Manual for solution preparation and filling instructions).
Over Temperature Indicator: • Immediately close all clamps on the Administration Set. • Press the orange Power OFF button. • Press the green Power ON button.
Air Detector / Clamp Alarms:
Check Tubing Indicator:
• The patient line is not properly inserted into the Air Detector/Clamp Slot or the Clamp Slot door is not closed properly. • Open #3 Clamp Slot door. Press down on the metal tab and pull door down and away from Clamp Slot (Step 5). • Insert the Patient Line into the Clamp Slot (Step 6). • Push door up to engage the top hinge and then push door in to engage the metal tab to close. (Step 7).
Air Detected / Clamped Indicator:
• Immediately close all clamps on the Administration Set. • Move the Pressure Chamber lever to the – position. • Remove any air from the Administration Set. Hang new air-free IV Fluid bag and prime Administration Set (Steps 9 - 12). • Move the Pressure Chamber lever to the + position. • Open clamps and resume infusion. * If the suggested solutions do not correct the problem, discontinue use of the H-1200 Fast Flow Fluid Warmer, remove from service, and contact Smiths Medical.
Smiths Medical Australasia Pty Ltd Suite 201, Level 2 10 Norbrik Drive Bella Vista NSW 2153, Australia Tollfree: Australia 1800 654 949 Tollfree: New Zealand 0800 444 200 www.smiths-medical.com Smiths Medical is part of the global technology business Smiths Group plc. Please see the Instructions for Use/Operator’s Manual for a complete listing of the indications, contraindications, warnings and precautions. The Smiths Medical and Level 1 design marks are trademarks of Smiths Medical. The symbol ® indicates the trademark is registered in the U.S. Patent and Trademark Office and certain other countries. All other names and marks mentioned are the trademarks or service marks of their respective owners. ©2016 Smiths Medical Australasia Pty Ltd. All rights reserved. TM194848GL-112015 MSydCAVC011 012016