Vitalograph
Model 2120 Quick Start Guide Part 1 Issue 1
Quick Start Guide
2 Pages

Preview
Page 1
Vitalograph 2120 Quick Start Guide Part 1
Vitalograph 2120 Quick Start Guide Part 1
Customer Service
How To Set Up Your Vitalograph 2120
For the names and addresses of approved Vitalograph Service Agents, please contact any of the following offices or your local Vitalograph distributor.
The Vitalograph 2120 is ready for use as soon as you take it out of its transit packaging. It is strongly recommended, however, that you familiarise yourself with this product first. The intention of this Quick Start Guide is to help you do this.
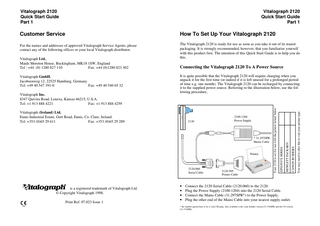
2100.1204 Power Supply
* 31.297SPR Mains Cable
Printer
2120.060 Serial Cable
Vitalograph! is a registered trademark of Vitalograph Ltd. © Copyright Vitalograph 1998. Print Ref. 07.023 Issue 1
• • • •
2120.505 Printer Cable
Connect the 2120 Serial Cable (2120.060) to the 2120. Plug the Power Supply (2100.1204) into the 2120 Serial Cable. Connect the Mains Cable (31.297SPR*) to the Power Supply. Plug the other end of the Mains Cable into your nearest supply outlet.
* the number quoted here is for a 3 pin UK plug. Also available is the 2 pin Schuko version (31.376SPR) and the US version (31.375SPR).
You may need to alter this to suit your printer type.
2120
CANON BJ SERIES
Vitalograph (Ireland) Ltd. Ennis Industrial Estate, Gort Road, Ennis, Co. Clare, Ireland Tel: +353 (0)65 29 611 Fax: +353 (0)65 29 289
HEWLETT PACKARD
Vitalograph Inc. 8347 Quivira Road, Lenexa, Kansas 66215, U.S.A. Tel: +1 913 888 4221 Fax: +1 913 888 4259
It is quite possible that the Vitalograph 2120 will require charging when you unpack it for the first time (or indeed if it is left unused for a prolonged period of time e.g. one month). The Vitalograph 2120 can be recharged by connecting it to the supplied power source. Referring to the illustration below, use the following procedure,
EPSON FX SERIES
Vitalograph GmbH, Jacobsenweg 12, 22525 Hamburg, Germany Tel: +49 40 547 391-0 Fax: +49 40 540 65 32
Connecting the Vitalograph 2120 To A Power Source
Your 2120 is set for use with the printer ticked below:
Vitalograph Ltd., Maids Moreton House, Buckingham, MK18 1SW, England Tel : +44 (0) 1280 827 110 Fax: +44 (0)1280 823 302
Vitalograph 2120 Quick Start Guide Part 1
It is not necessary to switch on the unit as charging is automatic.
Connecting the Vitalograph 2120 To A Printer The Vitalograph 2120 can be easily connected to a desktop printer for output of informative, well presented reports. First, the correct printer must be selected on the 2120 by using the following procedure, • From the main menu, select Setup. • From the Setup menu, select Printer. • Using the • and ‚ buttons, select the printer type that you will be printing to (if you do not have the Vitalograph 2130 Base Station, press ESC when asked if you would like to print via this device). Referring to the previous illustration, use the following procedure, • • • • •
Ensure everything is powered off and unplugged before setting up. Connect Printer Cable (2120.505) to the 2120 Serial Cable (2120.060). Connect the other end of the Printer Cable to the printer. Switch the printer on. Switch the Vitalograph 2120 on.
Once you have set up as above, you can perform the following test. A quick test:After you have connected your Vitalograph 2120 to the printer, using the above procedure, do the following to ensure every thing is in working order, • • • •
Switch the Vitalograph 2120 on. From the main menu, select Patient. Select Manual patient ID. Do not enter a patient ID i.e. press ↵. This will ensure that nothing from this test is saved to the database. • Press ↵ on the Sex, Age, Height and Race fields - values entered are not important here. • From the main menu, select Test.
Vitalograph 2120 Quick Start Guide Part 1 • Press ↵ to enter temperature. • Select VC - the results of this test are quicker to print out. • Blow into the flowhead for a couple of seconds - performance is not important here. • Press ESC twice. • From the main menu, select Print. • Select Current. A one page report with a VC result should now print out. If a printout is not obtained. Power off everything and reconnect as above.