W & H Dentalwerk
Surgical Handpiece Instructions for Use
56 Pages

Preview
Page 1
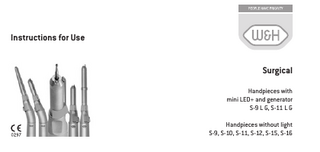
Instructions for Use
Surgical Handpieces with mini LED+ and generator S-9 L G, S-11 L G Handpieces without light S-9, S-10, S-11, S-12, S-15, S-16
Contents Symbols..................................................................................................................................................................................... 4 in the Instructions for Use....................................................................................................................................................................4 on the medical device/packaging........................................................................................................................................................5 1. Introduction.......................................................................................................................................................................... 6 2. Safety notes......................................................................................................................................................................... 9 3. Product description............................................................................................................................................................ 14 4. Start-up............................................................................................................................................................................... 16 Assembly/Removal ............................................................................................................................................................................16 Rotary instruments............................................................................................................................................................................ 18 To change the rotary instrument .......................................................................................................................................................19 Test run............................................................................................................................................................................................... 20 5. Hygiene and maintenance.................................................................................................................................................21 General notes......................................................................................................................................................................................21 Limitations on processing..................................................................................................................................................................23 2
Initial treatment at the point of use.................................................................................................................................................. 24 Manual cleaning................................................................................................................................................................................. 25 Manual disinfection........................................................................................................................................................................... 33 Automated cleaning and disinfection............................................................................................................................................... 34 Drying................................................................................................................................................................................................. 36 Inspection, Maintenance and Testing............................................................................................................................................... 37 Packaging........................................................................................................................................................................................... 44 Sterilization........................................................................................................................................................................................ 45 Storage................................................................................................................................................................................................ 47 6. Servicing............................................................................................................................................................................. 48 7. W&H Accessories and spare parts.................................................................................................................................... 49 8. Technical data..................................................................................................................................................................... 50 9. Disposal.............................................................................................................................................................................. 53 Explanation of warranty terms.............................................................................................................................................. 54 Authorized W&H service partners......................................................................................................................................... 55 3
Symbols
in the Instructions for Use
WARNING! (risk of injury)
ATTENTION! (to prevent damage occurring)
General explanations, without risk to persons or objects
Do not dispose of with domestic waste
Caution! According to Federal law, this medical device may only be sold by or on the order of a dentist, physician or any other medical practitioner licensed by the law of the State in which he or she practices and intends to use or order the use of this medical device. 4
Symbols CE marking XXXX with identification number of the Notified Body Catalogue number Serial number Date of manufacture
DataMatrix Code for product information including UDI (Unique Device Identification)
on the medical device/packaging Data structure in accordance with Health Industry Bar Code
Thermo washer disinfectable UL Component Recognition Mark indicates compliance with Canadian and U.S. requirements
Sterilizable up to the stated temperatures Medical Device
5
1. Introduction Customer satisfaction has absolute priority in the W&H quality policy. This medical device has been developed, manufactured and subjected to final inspection according to legal regulations, quality and industry standards. For your safety and the safety of your patients Prior to initial use please read the Instructions for Use. These explain how to use your medical device and guarantee a smooth and efficient operation. Observe the safety notes. Intended use Surgical treatment of organic hard tissue. Misuse may damage the medical device and hence cause risks and hazards for patient, user and third parties. 6
Qualifications of the user We have based our development and design of the medical device on the physician target group. Production according to EU Directive The medical device meets the requirements of Directive 93/42/EEC. Responsibility of the manufacturer The manufacturer can only accept responsibility for the safety, reliability and performance of the medical device when it is used in compliance with the following directions: >> The medical device must be used in accordance with these Instructions for Use. >> The medical device has no components that can be repaired by the user. >> Modifications or repairs must only be undertaken by an authorized W&H service partner (see page 55). 7
Skilled application The medical device is intended only for skilled application according to the intended use as well as in compliance with the valid health and safety at work regulations, the valid accident prevention regulations and in compliance with these Instructions for use. The medical device should be prepared for use and maintained by staff who have been trained in procedures for infection control, personal safety and patient safety. Improper use, (e.g., through poor hygiene and maintenance), non-compliance with our instructions or the use of accessories and spare parts which are not approved by W&H, invalidates all claims under warranty and any other claims. Any serious incident that has occurred in relation to the medical device should be reported to the manufacturer and the competent authority! 8
2. Safety notes >> Before using the medical device for the first time, store it at room temperature for 24 hours. >> The operation of the medical device is permitted only on supply units which correspond to the standards IEC 60601-1 (EN 60601-1) and IEC 60601-1-2 (EN 60601-1-2). >> Always ensure the correct operating conditions and cooling function. >> Always ensure that sufficient and adequate cooling is delivered and ensure adequate suction. >> In case of coolant supply failure, the medical device must be stopped immediately. >> Check the medical device for damage and loose parts each time before using. >> Do not operate the medical device if it is damaged. >> Only attach the medical device onto the motor when the motor is at a complete standstill. >> Perform a test run each time before using. >> Avoid overheating at the treatment site. 9
>> Do not touch the soft tissue with the handpiece head (risk of burning)! >> Avoid contact between LED and soft tissue (risk of burning due to the LED heating up). >> Do not use the medical device as a light probe. >> Do not look directly into the light source. The medical device is not approved for operation in potentially explosive atmospheres. 10
The medical device has a considerably higher level of efficiency than normal contra-angle handpieces and has been designed to fit the W&H drive units Implantmed SI-9xx, SI-10xx, Elcomed SA-2xx and SA-3xx. If using a drive unit other than one for which the medical device has been designed, the setting for the required torque must be reduced by roughly one half. E.g., to achieve 50 Ncm on the rotating instrument with an W&H Elcomed 100 / 200, the torque must be set to 30 Ncm. The use of the medical device on surgical units other than the Implantmed SI-9xx, SI-10xx, Elcomed SA-2xx and SA-3xx, in particular those without a calibration function, represents a risk which must be considered by the user (risk of injury). W&H explicitly advises against doing this. The user is solely responsible. The manufacturer accepts no liability. 11
Risks due to electromagnetic fields The functionality of implantable systems, such as cardiac pacemakers and implantable cardioverter defibrillator (ICD) can be affected by electric, magnetic and electromagnetic fields. >> Find out if patient and user have implanted systems before using the medical device and consider the application. >> Weigh the risks and benefits. >> Keep the medical device away from implanted systems. >> Make appropriate emergency precautions and take immediate action on any signs of ill-health.. >> Symptoms such as raised heartbeat, irregular pulse and dizziness can be signs of a problem with a cardiac pacemaker or ICD. 12
Hygiene and maintenance prior to initial use >> The medical device is sealed in PE film and not sterilized when delivered. >> The PE film and the packaging are non-sterilizable. >> Clean, disinfect and lubricate the medical device. >> Sterilize the medical device, the nozzle cleaner and the coolant tube. 13
3. Product description 14
S-11 L G, S-11, S-15 LED (only S-11 L G) Handpiece head* Coolant tube (movable) Chuck lever Area of chuck lever Shaft Sheath* Long nozzle cleaner * Symbols on parts and Sheath open Direction of rotation Sheath locked
Product description S-16, S-9 LG alle zutreffenden
S-9 L G, S-9, S-10, S-12, S-16
LED (only S-9 L G)
Handpiece head*
S-12
Coolant tube (movable) Chuck lever
Area of chuck lever
Shaft
Knee*
Lower shaft
Sheath*
Long nozzle cleaner
* Symbols on parts , and Sheath open Direction of rotation Sheath locked 15
4. Start-up 16
Coolant tube Fit the coolant tube. or Pull off the coolant tube.
Assembly/Removal
Medical device Do not assemble or remove the medical device during operation! Push the medical device onto the motor. When using a locking pin between motor and medical device: See Instructions for use of the control unit. Verify full engagement. Remove the medical device 17
Rotary instruments >> Use only rotary instruments which are in perfect condition and pay attention to the direction of rotation of the rotary instrument. Follow the operating instructions of the manufacturer. >> Insert the rotary instrument only when the medical device is stationary. >> Never touch the rotary instrument while it is still rotating. >> Do not activate the chuck lever of the medical device during operation. This leads to detachment of the rotary instrument, damage to the chucking system and/or heating up of the medical device. Risk of burning! >> When having a torque higher than 30 Ncm on the rotary instrument you have to use hardened shafts (>50 HRC, >520 HV) (risk of deformation). 18
To change the rotary instrument Unlock and swivel the chuck lever. Insert the rotary instrument until limit stop. Return the chuck lever to the initial position. Verify full engagement. or Unlock and swivel the chuck lever. Remove the rotary instrument. 19
Test run Do not hold the medical device at eye level! >> Insert the rotary instrument. >> Operate the medical device. In the event of operating malfunctions (e.g., vibrations, unusual noise, overheating, coolant failure or leakage) stop the medical device immediately and contact an authorized W&H service partner. 20
5. Hygiene and maintenance
General notes
>> Follow your local and national laws, directives, standards and guidelines for cleaning, disinfection and sterilization.
>> Wear protective clothing, safety glasses, face mask and gloves.
>> Use only oil-free, filtered compressed air with a maximum operating pressure of 3 bar for manual drying.
21
Cleaning agents and disinfectants >> Read the notes, follow the instructions and heed the warnings provided by the manufacturers of cleaning agents and/or disinfectants. >> Use only detergents which are intended for cleaning and/or disinfecting medical devices made of metal and plastic. >> It is imperative to comply with the concentrations and exposure times specified by the manufacturer of the disinfectant. >> Use disinfectants which have been tested and found effective by, for example: the Verbund für Angewandte Hygiene e.V. (VAH = Association for Applied Hygiene), the Österreichischen Gesellschaft für Hygiene, Mikrobiologie und Präventivmedizin (ÖGHMP = Austrian Society for Hygiene, Microbiology and Preventive Medicine), the Food and Drug Administration (FDA) or the U.S. Environmental Protection Agency (EPA). The user is responsible for validating its process if the specified cleaning agents and disinfectants are not available. 22
Hygiene and maintenance
Limitations on processing
The product lifetime and the medical device’s ability to operate correctly are mainly determined by mechanical stress during use and chemical influences due to processing. >> Send worn or damaged medical devices and/or medical devices with material changes to an authorized W&H service partner.
Processing cycles >> We recommend a regular service for the W&H medical device after 500 processing cycles or one year. >> W&H recommends that the coolant tube is replaced after 100 processing cycles.
23
Hygiene and maintenance
Initial treatment at the point of use
Clean the medical device immediately after every treatment, to flush out liquid (e.g., blood, saliva etc.) and to prevent settling on the internal parts. >> Operate the medical device for at least 10 seconds at idle speed. >> Ensure that all coolant outlets are rinsed out.
>> Wipe the entire surface of the medical device with disinfectant. >> Remove the rotary instrument. >> Remove the medical device.
Note that the disinfectant used during pre-treatment is only for personal protection and cannot replace the disinfectant step after cleaning.
24
Hygiene and maintenance
Manual cleaning Disassemble straight handpiece S-11 L G, S-11, S-15 Pull off the coolant tube. Unlock and swivel the chuck lever. Turn off the sheath from the handpiece head by turning once. 25
Remove the chuck lever. Remove the shaft from the handpiece head. 26
Disassemble angled handpiece S-9 L G, S-9, S-10, S-12, S-16 Pull off the coolant tube. Press sheath firmly against knee. Turn off the sheath from the handpiece head by turning once. 27
Remove the lower shaft from the knee. Turn off the knee from the handpiece head. Unlock and swivel the chuck lever. Pull off the shaft until back stop and remove the chuck lever. Remove the shaft from the handpiece head. 28
Do not place the medical device in liquid disinfectant or in an ultrasonic bath. >> Clean the medical device under running tap water (< 35°C/< 95°F). >> Rinse and brush off all internal and external surfaces. >> Move moving parts back and forth several times. >> Remove liquid residues using compressed air. 29
Cleaning of the external coolant tubes The coolant tube can be cleaned in an ultrasonic bath and/or in the washerdisinfector. The nozzle cleaner can be prepared in an ultrasonic bath and / or in a washerdisinfector. Clean coolant outlets carefully with the nozzle cleaner to remove dirt and deposits. 30
Blow through the coolant tube and coolant outlets using compressed air. In case of blocked coolant outlets or coolant tubes contact an authorized W&H service partner. 31
Cleaning of the light source S-9 L G, S-11 L G Avoid scratching the light source! Wash the LED with cleaning fluid and a soft cloth. Blow the LED dry using compressed air or dry it carefully with a soft cloth. >> Carry out a visual inspection after each cleaning process. >> Do not use the medical device if the light source is damaged and contact an authorized W&H service partner. 32
Hygiene and maintenance >> W&H recommends wiping down with disinfectant.
Manual disinfection
Evidence of the medical device’s basic suitability for effective manual disinfection was provided by an independent test laboratory using the disinfectants “mikrozid® AF wipes” (Schülke & Mayr GmbH, Norderstedt) and “CaviWipes™” (Metrex).
33
Hygiene and maintenance
Automated cleaning and disinfection
W&H recommends automated cleaning and disinfection using a washer-disinfector (WD). >> Read the notes, follow the instructions and heed the warnings provided by the manufacturers of washer disinfectors, cleaning agents and/or disinfectants.
Evidence of the medical device’s basic suitability for effective automated disinfection was provided by an independent test laboratory using the »Miele PG 8582 CD« washer disinfector (Miele & Cie. KG, Gütersloh) and the »Dr. Weigert neodisher® MediClean forte« cleaning agent (Dr. Weigert GmbH & Co. KG, Hamburg) according to ISO 15883. >> Cleaning at 55°C (131°F) – 5 minutes >> Disinfection at 93°C (200°F) – 5 minutes
34
Automated cleaning and disinfection of the external coolant tubes Use the W&H adaptor kit REF 07233500. Screw the W&H adaptor into the adaptor on the injector rail. Screw the W&H intermediate adaptor onto the W&H adaptor. Put the W&H silicone hose over the W&H intermediate adaptor. Insert the external coolant tube into the W&H silicon hose. 35
Hygiene and maintenance
Drying
>> Ensure that the medical device is completely dry internally and externally after cleaning and disinfection. >> Remove liquid residues using compressed air.
36
Hygiene and maintenance
Inspection, Maintenance and Testing
Inspection >> Check the medical device after cleaning and disinfection for damage, visible residual soiling and surface changes. >> Reprocess any medical devices that are still soiled. >> Sterilize the reassembled medical device following cleaning, disinfection and lubrication.
37
Reassembling the straight medical device S-11 L G, S-11, S-15 Reassemble the medical device following manual cleaning and disinfection. >> Without coolant tube >> Types and serial numbers must be identical Note the positioning of the area of chuck lever Insert the shaft into the handpiece head. Insert chuck lever (a) and turn it to initial position (b). Only S-11 L G: Position the golden contacts on the shaft and handpiece head so that they are facing each other. 38
Push the shaft into the handpiece head. Check free running of the shaft. Insert the sheath onto the handpiece head. Turn the sheath until it engages audibly. Note the symbols and turn until locked. 39
Reassembling the angled medical device S-9 L G, S-9, S-10, S-12 , S-16 >> Reassemble the medical device following manual cleaning and disinfection. >> Without coolant tube >> Types and serial numbers must be identical Note the positioning of the area of chuck lever Insert the shaft into the handpiece head. Insert chuck lever (a) and turn it to initial position (b). Only S-9 L G: Position the golden contacts on the shaft and handpiece head so that they are facing each other. 40
Push the shaft into the handpiece head. Insert the knee onto the handpiece head. Note the symbols and turn until locked. Insert lower shaft into the knee. Check free running of the lower shaft. Insert sheath onto the knee. Turn the sheath until it engages audibly. Note the symbols and turn until locked. 41
Lubrication >> Lubricate the dry medical device immediately after cleaning and/or disinfection. Recommended lubrication cycles >> Essential after every internal cleaning >> Before each sterilization With W&H Service Oil F1, MD-400 >> Follow the instructions on the oil spray can and on the packaging. or With W&H Assistina >> Follow the instructions in the Assistina Instructions for Use. 42
Test after lubrication >> Direct the medical device downwards. >> Operate the medical device so that excess oil can escape. >> Remove any oil that has escaped. >> Excess oil may result in the medical device overheating. 43
Hygiene and maintenance
Packaging
Pack the medical device and the accessories in sterilization packages that meet the following requirements:
>> The sterilization package must meet the applicable standards in respect of quality and use and must be suitable for the sterilization method. >> The sterilization package must be large enough for the sterilization goods. >> The filled sterilization package must not be under tension.
44
Hygiene and maintenance W&H recommends sterilization according to EN 13060, EN 285 or ANSI/AAMI ST79.
Sterilization
>> Read the notes, follow the instructions and heed the warnings provided by the manufacturers of steam sterilizers. >> The program selected must be suitable for the medical device. >> Pull oft the coolant tube from the medical device before sterilization.
>> Sterilize the coolant tube and the medical device.
45
Recommended sterilization cycles >> Steam sterilization (type B, N) >> Sterilization time at least 3 minutes at 134°C (273°F), 4 minutes at 132°C (270°F), 30 minutes at 121°C (250°F) >> Maximum sterilization temperature 135°C (275°F) Evidence of the medical device’s basic suitability for effective sterilization was provided by an independent test laboratory using the LISA 517 B17L steam sterilizer (W&H Sterilization S.r.l., Brusaporto (BG)) and the CertoClav MultiControl MC2-S09S273 steam sterilizer (CertoClav GmbH, Traun). »Dynamic-air-removal prevacuum cycle« (type B): temperature 134°C (273°F) – 3 minutes* temperature 132°C (270°F) – 4 minutes*/** »Gravity-displacement cycle« (type N): temperature 121°C (250°F) – 30 minutes** * EN 13060, EN 285, ISO 17665 ** ANSI/AAMI ST55 , ANSI/AAMI ST79 46
Hygiene and maintenance >> Store sterile goods dust-free and dry. >> The shelf life of the sterile goods depends on the storage conditions and type of packaging.
Storage
47
6. Servicing Repairs and returns In the event of operating malfunctions immediately contact an authorized W&H service partner. Repairs and maintenance work must only be undertaken by an authorized W&H service partner. >> Ensure that the medical device has been completely processed before returning it. 48
7. W&H Accessories and spare parts Use only original W&H accessories and spare parts or accessories approved by W&H! Supplier: W&H partners 000301xx Assistina 301 plus 30310000 Assistina TWIN (MB-302) 07233500 Adaptor kit for the washer-disinfector 10940021 Service Oil F1, MD-400 (6 pcs) 02038200 Spray adaptor 00636901 Long nozzle cleaner 07978680 Coolant tube for S-9, S-11, S-16 08026210 Coolant tube for S-10, S-12 08026950 Coolant tube for S-15 49
8. Technical data
Transmission ratio
Colour coding
Motor connection according to standard
Rotary instruments Permitted bur length Minimum chucking length
ISO 1797 (Ø mm) (mm)
Maximum drive speed(min-1)
Coolant volume
ISO 14457 (ml/min)
S-11 L G 1:1 blue ISO 3964 2,35* 45** until limit stop 40.000 > 50
S-11 1:1 blue ISO 3964 2,35* 45** until limit stop 50.000 > 50
S-15 1:1 blue ISO 3964 2,35* 45** until limit stop 30.000 > 50
min-1 (Revolutions per minute) * System Stryker usable ** When using longer or shorter rotary instruments the user must ensure by correct selection of the operating conditions, that there is no danger to the user, patient or third parties. 50