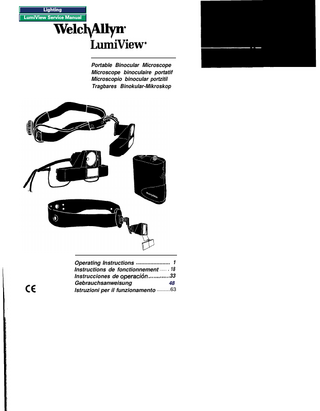
WelchAllyn
LumiView Portable Binocular Microscope Rev B
Manual
81 Pages
Preview
Page 1
Symbols
a I.
CAUTION: Indicates a potentially hazardous situation which, if not avoided, may result in minor injury or property damage. It also alerts against unsafe practices.
NOTE: Provides supplemental information to the text and indicates a potentially hazardous situation, which, if not avoided, may result in property damage. Additionally, it highlights important information on the use of this equipment.
Standards Compliance
0 0
Double Insulation
Internally Powered
Listed Product Underwriters Laboratories, Standard UL544
Listed Product Canadian Standards Association, Standard CAN/CSA C22.2 No. 125
Listed Product ETL Laboratories
Listed Standards UL544, CAN/CSA C22.2 No. 125, IEC 601-1, IEC 601-1-2
3
Contents CE Approval ... 2 Symbols ... 3 Standards Compliance ... 3 Instrument Function ... 5 Portable Binocular Microscope ... 5 Flat Surface Magnifier ... 5 Description of Controls.. ... 6 Adjustments ... 7 Headband Model ... 7 Band Adjustments ... 7 Optical Section Horizontal Adjustment ... 7 Optical Section Vertical Adjustment.. ... 7 Spectacle Model ... 8 Optical Section Vertical Adjustment ... 8 Adjusting for User Refractive Error ... 8 Lens Template - Spectacle Model ... 8 Setting the Interpupillary y Distance ... 9 Flat Surface Magnifier ... 9 Connecting to the Power Source ... 10 Portable Power Source ... 10 Direct Plug-In Power Source ... 10 Accessories ... 11 Pneumatic Speculum Holder.. ... 11 Lamp Replacement ... 11 Cleaning ... 12 Maintenance ... 12 Specifications.. ... 12 Approvals ... 12 Product and Accessory Ordering Information ... 13 Instruments ... 13 Power Sources ... 13 Accessories ... 13 Power Sources (Portable and Direct Plug-In). ... 14 Portable ... 14 Features ... 14 Specifications.. ... 14 Connecting Instrument to Portable Power Source ... 15 Recharging the Portable Power Source ... 15 Accessing Spare Lamp ... 15 Battery Replacement.. ... 16 Direct Plug-In Transformer.. ... 16 Service and Warranty Information ... 17 Service ... 17 Technical Service Department ... 17 Warranty ... 17 Troubleshooting Guide ... 18 4
Instrument Function This device offers binocular (both eyes) viewing, providing a threedimensional stereoscopic view. This stereoscopic view is then magnified and illuminated to provide excellent tissue rendition.
Portable Binocular Microscope When the binoculars are engaged, the visual pathways are displaced medially to allow for binocular vision in narrow cavities. Two diopters (1.5x) magnification improves vision. When the binoculars are rotated upwards, the scope becomes a convenient basic headlight.
Flat Surface Magnifier l
The three diopter (2.5x) flat surface magnifier is available in either the headband model or the spectacle model. The magnifier can be flipped up for convenient headlight use.
a I
.
CAUTION: DO NOT look directly into the light. This device contains a High Intensity Lamp. It is not to be used for illumination or examination of any portion of the eye, Posterior or Anterior.
5
Description of Controls Front View
Back View
3
1
1. lnterpupillary distance (IPD) controls 2. Lamp 3. Instrument vertical height adjustment I
1
55
/*
4. Binocular flip-up axis 8. Comfort pads 9. Cable clips 5. Pivot mechanism 6. Height adjustment screw 10. Optical assembly 7. Headband circumference adjustment knob Fiat Surface Magnifier 12
11 -
11. Magnifier lens 12. Lens holder 13. Vertical adjustment screw
6
Adjustments Ratchet Style Headband Instructions l
Position the main body of the headband on the head so that the band fits comfortably on the forehead and low on the back of the head. Use the circumference adjustment knob to adjust the size. Circumference adjustment knob
1
Optics Assembly l
l
The optics assembly can be adjusted to the desired position by manipulating the links in the pivot mechanism. The Optics Assembly should be positioned as close to the eyes as possible so that the eyes can gaze directly through the Optics Assembly. (Set optics per instructions provided with your LumiView.)
Optical Section
With the lamp illuminated, check the adjustment by confirming that the light beam is centered in the visual field. If the light is high or low, refer to the detailed adjustment instructions provided with your LumiView@.
7
Spectacle Model Screw
Optical Section Vertical Adjustment l
l
l
Loosen screw that attaches optical section spectacles. Reposition optical section to insure proper alignment with user’s eyes. Tighten screw to maintain optical section location.
Adjusting for User Refractive Error (Spectacle Models Only) The optimal working distance from the object is 15” (38.1 cm) 17” (43.2 cm). If this model is used without corrective lenses and user is myopic or hyperopic, then the user will need to work closer or farther from object, depending on refractive error. To compensate for this, the spectacle models can be fitted with corrective lenses by an eyecare practitioner of your choice. Please bring the following information to assist your eyecare practitioner in fitting your prescription lenses. Lens Template - Spectacle Model Front Sizes
Eye
A
B
ED
D.B.L
51
51
43
57.4
18
1
8
A ,
I
Setting the lnterpupillaty Distance The lnterpupillary Distance (IPD) Controls move the oculars and are located on the bottom of the optical section. These oculars move independently of one another. l
l
l
l
To set IPD properly, observe an object at approximately 15 inches (38 cm). Close the left eye and adjust the IPD control under the right eye until the viewed image is centered. Now close the right eye, keeping the left eye open, and adjust the IPD control for the left eye until that image is centered. Open both eyes and the object should be clear and centered.
lnterpupillary Distance Controls
Flat Surface Magnifier Model l l
l
Loosen screw that attaches the lamp section to the adjustment arm. Reposition the lamp section up or down to desired location and tighten screw. Place instrument on head. Adjust the flat surface magnifier by moving the lens holder up or down and the magnifier in or out.
Lens holder
Magnifier Adjustment screw
99
Connecting to the Power Source NOTE: The instrument power cord must be plugged into either a Welch Allyn Portable Power Source No. 75250 or a Welch Allyn Direct Plug-In Power Source No. 75210.
a I.
CAUTION: To minimize lamp housing temperatures, on-time should not exceed 5 minutes and off-time should not be less than 10 minutes.
Portable Power Source l
l l
l
l
Plug instrument power cord into the power cord connector port on top of the power source. Push in until firmly in place. Gently screw the external connector sleeve clockwise to secure (optional). Attach the Portable Power Source by using the belt clip. The instrument is now ready for use.
Direct Plug-In Power Source l
l l
Plug Power cord from the Binocular microscope into the Direct Plug-In Power cord. Push in until firmly in place. Gently screw the external connector sleeve clock-wise to secure (optional).
l
Plug direct power source into a nearby receptacle.
l
The instrument is now ready for use.
To instrument
10
Accessories Pneumatic Speculum Holder l
A pneumatic speculum holder with a 4x’s magnification lens can be used to aid in examination of the ear.
Lamp Replacement A
I
I CAUTION: Lamps may become very HOT. Be sure to allow lamps to cool before changing.
l
To change the lamp, flip the binocular assembly into its up position. Remove the reflector assembly by placing the thumb on the notch located on the bottom of the reflector housing and pushing the reflector assembly. (Step 1) Remove lamp and insert a new Welch Allyn lamp No. 08500 into the back of the reflector. (Step 2) Replace reflector housing into instrument and push until it snaps into place.
NOTE: Reflector assembly air vents should be positioned top and bottom.
Binocular assembly Reflector assembly
Step 1
Step 2
11
Cleaning All glass surfaces, portable binocular microscope lenses, ocular or eyepiece covers and lamp reflective covers can be cleaned with a soft cloth moistened with alcohol. The exterior surfaces of the portable binocular microscope and power sources can be wiped clean with a soft cloth moistened with alcohol. NOTE: Avoid using harsh cleansing fluids or excessively moistened cloths on any portion of the instrument.
Maintenance Lamp replacement and cleaning may be performed by the user on an as needed basis. Additional servicing should be performed by returning the instrument to an authorized Welch Allyn Technical Service Department or distributor. See “Service and Warranty Information” section.
Specifications Interpupillary Distance
49 mm to 74 mm
Light Source
3.60v, Halogen
Headband Adjustment Range
Small, Medium and Large
Weight (No. 20500S)
80g -20°C to 40 o C 95% RH maximum
Transport and Storage
Approvals UL 544, CAN/CSA C22.2 No.125 IEC 601-1, IEC 601-l -2, CE
Product and Accessory Ordering Information Product No. No. 20500S No. 20510S No. 20500H No. 20510H No. 205308 No. 20530H No. 20520S No. 20520H No. 205408 No. 20540H No. 75260 No. 75265 No. 74180 No. 74185 No. 75210 No. 75215
Description Instruments Spectacle LumiView with Portable Power Source Spectacle LumiView with Direct Plug-In Headband LumiView with Portable Power Source Headband LumiView with Direct Plug Power Spectacle LumiView w/o Power source Headband LumiView w/o Power source Spectacle Flat Surface Magnifier w/ Portable Power Headband 1 Flat Surface Magnifier w/Portable Power Spectacle 1 Flat Surface Magnifier w/o Power Source 1 Headband Flat Surface Magnifier w/o Power Source I Power Sources Portable Power Source w/ charger International Portable Power Source w/Charger (specify country and voltage) Charger only for No. 75260 International Charger only for No. 75265 (specify country and voltage) Direct Plug-In Power Source International Direct Plug-In Power Source (specify country and voltage)
Note: The power source options listed above operate with all instrument configurations.
I No. 08500 No. 205007-501 No. 72250 No. 21502 No. 21505 No. 22002 No. 22003 No. 22004 No. 22005 No. 22009 1 No. 05374
I
1 Accessories Replacement lamp for device (all models) Replacement Reflector Assembly Replacement battery for portable battery pack lnsufflation bulb system for LumiView models Pneumatic Speculum Holder with specula for LumiView models Poly Speculum 2mm Poly Speculum 3mm Poly Speculum 4mm Poly Speculum 5mm Polv Speculum 9mm I Hard case
Note: Only accessories and power sources indicated in this manual are to be used with the Portable Binocular Microscope and Flat Surface Magnifier. 13
Power Sources (Portable and Direct Plug-In) Portable Power Source (Welch Allyn Model No. 75260) This power source is designed for use in both the office and the hospital and is ideal for carrying to satellite offices. Power On time is 90 minutes after a full charge of 10 hours.
Features: 2
1
1. On/Off Switch 2. Instrument Connector 3. Charging Transformer Port
4. Charging Indicator 5. Belt Clip 6. Spare Lamp Receptacle
Specifications: Battery Type
Welch Allyn #72250 (nickel-cadmium)
Voltage/Capacity
3.6 VDC/1.8 Ahr
Charger
Welch Allyn #74180 (for international orders, specify country)
14
Connecting Instrument to Portable Power Source: Portable Power Source l Plug instrument power cord into the power cord connector port on top of the power source. l l
Push in until firmly in place. Gently screw the external connector sleeve clockwise to secure (optional).
Recharging the Portable Power Source: l l
l
l
l
Turn portable power source off. Disconnect instrument from power source.
On/Off
Plug charging transformer into portable power source. Plug charging transformer into wall socket. LED light indicates unit is charging. Disconnect charging transformer from power source when fully charged, after 10-12 hours.
Accessing Spare Lamp l
Lift the spare lamp out of its receptacle and use.
15
Battery Replacement l l
l
Be sure power is off. Remove both screws from back of power source with Phillips head screwdriver. Grasp the belt clip, gently pull back and down on the housing. (Steps 2 and 3)
l
Lift battery out and unplug from unit.
l
Replace with new battery and reverse above steps.
Step 1
Step 2
Step 3
Step 4
NOTE: Power source housing screws must be securely tightened in order to properly ho/d electrical components in place.
Direct Plug-In Transformer Plug Power cord from the binocular otoscope into the Direct Plug-In Power cord. l Push in until firmly in place. l
Gently screw the external connector sleeve clockwise to secure (optional). l The instrument is now ready for use. l Plug direct power source into a nearby receptacle.
l
e To instrument 16
Service and Warranty Information Service For customers in North America, please return instruments requiring service to a Welch Allyn Technical Service Department listed below or to an authorized Welch Allyn distributor.
Technical Service Department Welch Allyn, Inc. 4341 State Street Road Skaneateles Falls, NY 13153-0200 U.S.A. Telephone: 800-535-6663 (in U.S.A. only) or (315) 685-4560 Fax: 315-685-4653 For customers outside of North America, return your unit to a local, authorized Welch Allyn distributor or to your nearest Welch Allyn service center.
Warranty Welch Allyn, Inc. warrants the Portable Binocular Microscope and Flat Surface Magnifier to be free of original defects in material and workmanship and to perform in accordance with manufacturer’s specifications for a period of one year from the date of purchase. If this instrument or any component thereof is found to be defective or at variance with the manufacturer’s specifications during the warranty period, Welch Allyn will repair or replace the instrument or component(s) at no cost to the purchaser. This warranty only applies to instruments purchased new from Welch Allyn or its authorized distributors or representatives. The purchaser must return the instrument directly to Welch Allyn or an authorized distributor or representative and bear the costs of shipping. This warranty does not cover breakage or failure due to tampering, misuse, neglect, accidents, modification or shipping, and is void if the instrument is not used in accordance with manufacturer’s recommendations or if repaired or serviced by other than Welch Allyn or a Welch Allyn authorized representative. No other express or implied warranty is given.
17
Troubleshooting Guide Problem
Solution
Illumination spot is too high and is out of field of view.
Make sure you are 14” to 16” from patient or object under inspection. If you are too close, the illumination spot will be too high. Make sure optical section is aligned with user’s eyes. Suggest looking into the instrument when on user. The user’s eyes should be centered vertically on the center mirrors. & A. optical section too high on user -/B. optical section too low on user
( d;i% ,T, d C. optical section centered cor‘-I rectly on user To correct A and B, simply loosen screw on back of optical section and adjust optical section up or down until image is centered. User encounters glare off of the pneumatic insufflation system.
Clean the glass section with alcohol swab or clean cotton cloth. Rotate pneumatic assembly until glare dissipates.
18
Problem
Solution
Instrument does not illuminate.
Replace 08500 lamp. See page 11 for instructions. Battery is expired or discharged. See page 15 and 16.
Image is distorted or double image is seen.
Instrument must be set correctly for interpupillary distance adjustment. See page 9 for instructions. Depth perception is slightly altered with 3D optical design. Continued usage will improve comfort level.
How do I utilize bifocals?
Install bifocal lenses so that only the upper third is for distance and lower two-thirds is for reading. Adjust the nose bridge so that frame sits higher on nose. Then lower the height adjustment. This will ensure that the binocular viewing system will be positioned in fron of the reading part of the lenses,
19
Welch Allyn, Inc. 4341 State Street Road Skaneateles Falls, NY 13153-0220 (800) 535-6663 (in U.S.A. only) or (315) 685-4560 Fax (315) 685-3361
Printed in the U.S.A.
Part No. 205070-l Rev. B