Instructions for Use
24 Pages
Preview
Page 1
Ultrasonic Unit SonicWeld Rx II
Instructions for Use / Technical Description
91-600-00-86 REV 04
Instructions for Use / Technical Description Ultrasonic Unit SonicWeld Rx II Caution: The SonicPins Rx are designed to be used for the fixation of Resorb x Plating System implants and the SonicWeld Rx Endobrow Fixation pins are designed to be used for suture fixation. Caution: Surgeons with cardiac pacemakers must not operate the ultrasonic unit. Patients with cardiac pacemakers must not be treated with the ultrasonic unit. Caution: The ultrasonic unit is factory pre-set to power level 2. Power level 2 is the ONLY power setting appropriate to implant SonicPins Rx. For illustrations, see below.
Labeled Component Pictures
A
B
C
D
E
G
K
2
H
M
I
N
B
F
J
K
1
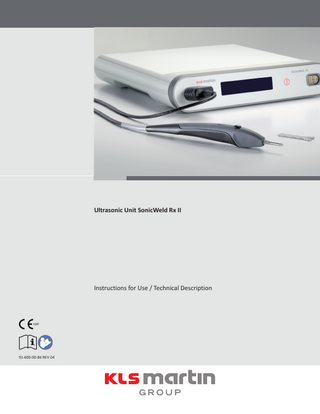
Ultrasonic Unit SonicWeld Rx II
2
Connection socket for handpiece
3
Display
4
On/Standby switch
5
Main connection
6
Fuse holder
7
Connecting cable (handpiece)
8
Handpiece
9
Activation LED (lit blue)
10
Hand activation pushbutton
11
Standard sonotrode, straight*
12
Open-end wrench for sonotrode tips
13
Standard sonotrode, angled
14
Smoothing sonotrode, straight
15
Smoothing sonotrode, angled
I
O
91-600-00-86 · REV 04 · 2022-11-28
Instructions for Use / Technical Description Ultrasonic Unit SonicWeld Rx II Contents Terms & Acronyms...04 1 1.1 1.2 1.3 1.3.1 1.4 1.5
Product Liability and Warranty... 04 General Information... 04 Scope of Delivery... 04 Intended Use... 04 Safe Usage... 05 Warranty... 05 Hotline... 06
2
Notices Concerning this Document... 06
3
Users... 06
4 4.1 4.2 4.3 4.3.1 4.3.2 4.3.3 4.3.4 4.3.5 4.4 4.4.1 4.4.2 4.4.3 4.5
Operation... 06 Function... 06 Safety Functions... 06 Preparation and Installation... 07 General Information... 07 Setting up SonicWeld Rx II... 07 Changing the Display Language... 08 Visual Check... 08 Automatic Functional Test... 08 Intraoperative Use... 08 Sterile Delivery... 08 Preparatory Measures... 09 Application... 09 Turning off the Ultrasonic Unit... 11
5 5.1 5.1.1 5.1.2 5.1.3 5.2 5.3
Processing, Cleaning, Disinfection and Sterilization... 11 Reprocessing... 11 Handpiece, by Machine... 11 Handpiece, by Hand... 11 Device, by Hand... 11 Inspection for Damage... 12 Sterilization... 12
6 6.1 6.1.1 6.1.2 6.1.3 6.2 6.2.1 6.2.2 6.2.3 6.2.4 6.2.5
Maintenance... 13 Troubleshooting... 13 Displays... 13 Handpiece Statuses... 13 Potential Malfunctions... 14 Replacements... 15 Replacing the Sonotrode tip... 15 Replacing the Fuse... 15 Replacing the Activation LED... 15 Replacing the Power Cable... 15 Replacing the Handpiece with Connecting Cable... 15
7
Accessories & Spare Parts... 16
8
Technical Data... 17
9
Guidelines and Manufacturer’s Declaration Regarding Electromagnetic Compatibility (EMC)... 18
10
Disposal of the Device... 20
11
Safety Checks (SC)... 20
3
91-600-00-86 · REV 04 · 2022-11-28
Instructions for Use / Technical Description Ultrasonic Unit SonicWeld Rx II The Symbol Glossary is located on the last page of this IFU. Terms & Acronyms Designation
Description
EMC
Electromagnetic compatibility
LED
Light-emitting diode
REF
Reference number for ordering KLS-Martin L.P. products (item number)
SC
Safety Check
SonicPin
Designates a resorbable SonicPin Rx or SonicPin xG
1
Product Liability and Warranty
1.1 General Information This product is manufactured for KLS-Martin L.P. KLS-Martin L.P. 11201 Saint Johns Industrial Pwky S Jacksonville, Florida 32246 [email protected] · www.klsmartinnorthamerica.com 1.2
Scope of Delivery
Designation
REF
SonicWeld Rx II system, comprising: Case with foam plastic insert for SonicWeld Rx II Ultrasonic Unit SonicWeld Rx II
52-502-21-04
1 handpiece with connecting cable (3 m)
52-500-23-04
Standard sonotrode, straight
52-501-21-04
Open-end wrench for sonotrodes
52-502-01-04
1.3
Intended Use
WARNING The Ultrasonic Unit SonicWeld Rx II can be used for the implantation of SonicPins Rx for the fixation of Resorb x/xG implants and for the implantation of SonicWeld Rx Endobrow Fixation pins. Each application has separate and distinctive Indications for Use in the United States and Canada. Intended Use for SonicWeld Rx SonicPins: The SonicPins Rx are designed only to be inserted with the Ultrasonic Unit SonicWeld Rx Sonotrode device. SonicWeld Rx Sonotrode is NOT intended for any other use and is only intended for use for insertion of the SonicPins Rx and SonicWeld Rx Endobrow Fixation pins. U.S.: The SonicWeld Rx is intended for use in fracture repair and reconstructive procedures of the craniofacial skeleton in pediatric and adult populations. In addition, resorbable meshes, plates, screws and pins may be used in non-load bearing applications for maintaining the relative position of, and/or containing, bony fragments, bone grafts (autograft or allograft), or bone graft substitutes in reconstruction of the craniofacial or mandibular areas. 4
91-600-00-86 · REV 04 · 2022-11-28
Instructions for Use / Technical Description Ultrasonic Unit SonicWeld Rx II Canada: The SonicWeld Rx is intended for fractures of the craniofacial skeleton including, but not limited to, comminuted fractures of the naso-ethmoidal and infraorbital areas, comminuted fractures of the frontal sinus wall, midface fractures, and reconstructive procedures of the midface or craniofacial skeleton. The SonicWeld Rx is NOT intended for use in the mandible or full load-bearing situations, nor in areas of active infection or for patients with conditions including blood supply limitations, insufficient quantity or quality of bone, or latent infections. Intended Use for SonicWeld Rx Endobrow Fixation pins: The SonicWeld Rx Endobrow Fixation pins are intended to anchor suture-holding non-load-bearing tissues of the craniofacial skeleton including, but not limited to, endobrow fixation. The SonicWeld Rx Endobrow Fixation pins are designed only to be inserted with the SonicWeld Rx Sonotrode device.
CAUTION The following sutures are not recommended for use with SonicWeld Rx Endobrow Fixation pins: PDS II 2-0 (sterile, synthetic absorbable suture) SonicPins Rx for fixation of Resorb XG Implants are indicated for use: Intended Use for SonicPins Rx in fixation of Resorb xG implants: The Resorb xG is intended for use in non-load bearing fracture repair and reconstructive procedures in adolescent and adult populations. In addition, resorbable meshes, plates and pins may be used in non-load bearing applications for maintaining the relative position of, and/or containing, bony fragments, bone grafts (autograft or allograft), or bone graft substitutes in oral and maxillofacial reconstruction. For cranial use: Resorb xG is intended for use in non-load bearing fracture repair and reconstructive procedures in pediatric and adult populations. In addition, resorbable meshes, plates and pins may be used in non-load bearing applications for maintaining the relative position of, and/or containing, bony fragments, bone grafts (autograft or allograft), or bone graft substitutes in cranial reconstruction. NOTE: RxG pins not available in Canada. The Symbol Glossary is located on the last page of this IFU. Sonotrode tips • The standard sonotrode tips are used for the application of SonicPins Rx. They are available in two different designs, straight and angled (pos. 11, 13). The angled sonotrodes facilitate working in regions that are hard to access, e.g. the posterior teeth region. • The smoothing sonotrode tips are used for smoothing out Resorb x, Resorb xG implants. They are available in a straight version and an angled one (pos. 14, 15). • The angled standard sonotrode (pos. 13) has an axial working end for inserting the SonicPins Rx and an angled working end for smoothing out Resorb x, Resorb xG and implants. Sonotrode materials coming into body contact with the patient or user during application all have good biological compatibility in accordance with ISO 10993-1. 1.3.1 Safe Usage • Before use, check the device for functionality and proper condition. • In order to avoid damage due to improper installation or use, compromising the warranty or guarantee, the following points must be observed: – Use device only as described in these instructions – Observe safety precautions – Observe user instructions in accordance to all applicable standards – Device and equipment must only be operated by persons that have the required training, expertise and experience Keep this document accessible to users at all times. 1.4 Warranty Our Standard Terms and Conditions of Sale effective at the time shall apply. Agreements diverging from these Standard Terms and Conditions do not restrict the legal rights of the buyer. Any warranty exceeding the above provisions shall require a contractual form and shall exclude component-related vandalism, software updates and consumables. Important Notices The product may only be repaired by KLS-Martin L.P. Please contact your local KLS-Martin L.P. sales consultant or call KLS-Martin L.P. customer service at 1-800-625-1557. Repairs performed outside KLS-Martin L.P. shall void any and all warranty claims. Unauthorized actions performed on the product shall invalidate any liability claims against KLS-Martin L.P.
5
91-600-00-86 · REV 04 · 2022-11-28
Instructions for Use / Technical Description Ultrasonic Unit SonicWeld Rx II 1.5 •
Hotline Should you have any questions regarding the use or handling of this product, please call KLS-Martin L.P. customer service. Tel: 1-800-625-1557 or 1-904-641-7746 Fax: 1-904-641-7378 You may also email the technical support team at [email protected].
NOTICE To answer your technical questions as efficiently as possible, our service technicians require the serial number of the product. Therefore, please have this number on hand when contacting our hotline. It is part of the information provided on the rating plate. 2
Notices Concerning this Document
Non-observance of this document can lead to serious injury or death. Improper handling and care or use in a manner other than described in these instructions can lead to premature wear/pose risk to patients and users! It is the operator’s responsibility to ensure that all personnel handling the product have understood and do observe the notes and instructions in this document. • • • •
Every user is required to read this document completely and follow it carefully. Heed all cautions, warnings and danger notices. Keep this document accessible to users at all times. It is the user’s responsibility to inform the patient on all the application, cautionary, warning and danger notices ontained in this document and to ensure that he/she has understood them.
3 Users The SonicWeld Rx II system may only be used by competent medical staff who, due to their specialized training, experience and knowledge of the relevant regulations, have the necessary qualification for using the system correctly. Users must have adequate knowledge of the rules of medical practice, as well as the state of the art and the contents of pertinent scientific articles published by medical authors. The user must be thoroughly familiar with the surgical technique as well as with the set of implants and the instruments and accessories used. The user bears the responsibility for • The proper performance of the surgical procedure • Selecting the right implant components and implanting them properly • Avoiding or minimizing the general risks posed by surgical interventions 4
Operation
4.1 Function The Ultrasonic Unit of the SonicWeld Rx II system converts electric energy into mechanical vibrations (ultrasound). When using a standard sonotrode, the ultrasonic energy heats up the resorbable material through friction at the interfaces between the bone and the SonicPins, thus causing the SonicPins Rx to glide into the predrilled hole. When using a smoothing sonotrode, the ultrasonic energy heats up the Resorb x or Resorb xG mesh, plate, foil or membrane implants, thus allowing to smooth them out or welding them to other KLS-Martin L.P. polymer implants. 4.2 Safety Functions Energy transmission is possible only if the resonance frequency of the sonotrode (pos. 11) is not altered by excessive mechanical load (e.g. when applying too much pressure to the SonicPin Rx with the handpiece). In such case of overload, the system is switched off automatically. Built-in fuses protect the unit from overload. The device automatically performs a self-test during start-up, see section 4.3.5 “Automatic Functional Test”. During the self-test, the system checks that: • All components required are connected • The handpiece functions properly • The basic insulation is intact • The internal operating software has been loaded correctly • The fuses are intact 6
91-600-00-86 · REV 04 · 2022-11-28
Instructions for Use / Technical Description Ultrasonic Unit SonicWeld Rx II
WARNING Ensure proper power connection. • The device must not be combined with other devices. Do not place or store any objects or devices on top of the ultrasonic unit. • The device must not be connected to a power outlet that also powers life-supporting systems. 4.3
Preparation and Installation
4.3.1 General Information KLS-Martin L.P. guarantees the proper functioning of the device only if the following rules are observed: National requirements for installation and operation • National requirements for fire and explosion prevention • Applicable rules when connecting sterilized device components to nonsterile equipment • The device may only be connected to a grounded outlet with alternating current between 100 – 240 V. Adjustment of the device to different voltages is not required.
WARNING Danger of injury from electric shock To prevent any risk of electric shock, this device may only be connected to a power supply system having a protective conductor.
NOTICE The SonicWeld Rx II system requires special precautions regarding electromagnetic compatibility (EMC), so when setting it up and putting it into operation, be sure to follow the EMC instructions provided in this user manual, see section 9 “Guidelines and Manufacturer’s Declaration Regarding Electromagnetic Compatibility (EMC)”.
NOTICE Portable and mobile RF communication equipment can adversely affect the SonicWeld Rx II system. 4.3.2 Setting up SonicWeld Rx II The following are guidelines for setting up the Ultrasonic Unit SonicWeld Rx II: • Place unit on a level, dry and solid surface. • Place unit in a non-sterile area of the operating environment. • Connect the handpiece (pos. 8) to the connecting socket (pos. 2) after inserting the plug of the connecting cable fully into the socket. • Screw the sonotrode manually in place on the handpiece and use the open-end wrench (pos. 12) to check it for secure attachment (torque: max. 0.3 Nm). Note that the wrench is shipped non-sterile, so it needs to be sterilized prior to use.
NOTICE Disconnection from the supply system The SonicWeld Rx II must be set up so that it can be easily and reliably disconnected from the power supply. • •
The ultrasonic unit features two connecting sockets for handpieces (pos. 2). This enables you to connect two handpieces in order to work alternatingly with two types of Sonotrode tips (e.g. a standard sonotrode and a smoothing sonotrode). Plug the power cable into the ultrasonic unit (pos. 5) and then into a power socket-outlet with ground contact. As soon as the unit has been connected to the power supply, it is automatically set to standby mode. Therefore, full disconnection is possible only by pulling the plug of the main cable out of the socket-outlet.
WARNING Explosion hazard • The SonicWeld Rx II is not suitable for use in atmospheres enriched with flammable mixtures of anesthetics and air, oxygen or nitrous oxide.
WARNING Danger of injury due to malfunction! SonicWeld Rx II must not be placed close to or stacked with other devices (always maintain separation distance!). See section 9 “Guidelines and Manufacturer’s Declaration Regarding Electromagnetic Compatibility (E MC)”, page 18. If operation in close pro ximity to or in a stack with other devices is unavoidable, the SonicWeld Rx II must be monitored to verify its proper performance in such a setup. 7
91-600-00-86 · REV 04 · 2022-11-28
Instructions for Use / Technical Description Ultrasonic Unit SonicWeld Rx II 4.3.3 Changing the Display Language The display language defaults to English. Users can select a different language by proceeding as follows: 1. Place the ultrasonic unit (pos. 1) on a level, dry and solid surface. 2. Connect a handpiece (pos. 8) to a connecting socket (pos. 2), inserting the plug of the connecting cable fully into the socket 3. Connect the power cable first to the unit (pos. 5) and then to a grounding socket-outlet. Once connected to a power socket-outlet, the unit automatically goes into standby mode. 4. With the unit in standby mode, simultaneously operate the hand activation pushbutton (pos. 10) and the On/Standby switch (pos. 4) and hold them down until the display lights up. 5. Using the hand activation push button, you can now select among the following languages: German, English, French, Spanish, and Portuguese. 6. Confirm your preferred language by operating the On/Standy switch. This turns off the unit automatically. 7. Upon turning on the unit again with the On/Standby switch, the display language will have been changed as desired for future use. 4.3.4 Visual Check • Check all components for visible defects. – Damaged components must not be used. Replace if necessary. – The sonotrode tip must not show any signs of mechanical damage. It must not be bent or rammed (typical damage after the handpiece has fallen down). 4.3.5
Automatic Functional Test
CAUTION Danger of burns If the sonotrode is allowed to make skin contact during the functional test, this can cause burns. Avoid contact with skin, eyes, etc. The sonotrode can reach temperatures above 60 °C. Self-test: Upon turning on the unit with the On/Standby switch (pos. 4), the handpieces (if connected) are ready for a self-test. This is a indicated for each handpiece by the flashing activation LED (pos. 9) and the following symbol flashing on the corresponding side of the display: The self-test for this handpiece will be started upon operating the hand activation push button(pos. 10) for the first time. Hold down the button until the display message changes from “Testing” to “Cooling”, the activation LED stops flashing and the acoustic signal changes. Be sure to keep the tip of the sonotrode out of contact with objects during this process. If the test is successful, the unit is automatically set to working mode. • •
Checkmark √ displayed (checkmark right or left, depending on which handpiece has been tested): Means “no malfunction detected”. Generator-related error messages are displayed in text form, while handpiece states are indicated by pictogram on the respective side (depending on handpiece), see section 6.1 “Troubleshooting”.
4.4 Intraoperative Use Non-sterile delivery of the SonicWeld Rx II system: With the exception of sterile packaged sonotrode tips, all components of the SonicWeld Rx II system are delivered non-sterile. NOTE: All resorbable implants are packaged sterile. 4.4.1
Sterile Delivery:
Non-sterile sonotrode tips, open-end wrench and handpieces with connecting cables have to be sterilized prior to the operation, and shall be kept in the sterile field. • Make sure that the handpieces are dry. • Ensure that the open-end wrench and the handpieces with connecting cables have been properly sterilized, see section 5 “Processing, Cleaning, Disinfection and Sterilization”, page 11. Handpieces with connection cables, non-sterile sonotrodes and the open-end wrench are steam sterilizable. See section 5 “Processing, Cleaning, Disinfection and Sterilization”. Sterile products require proper handling. Sterile devices must be stored in their original packaging in a place suitable for storing sterile supplies and may be removed from their packaging only immediately prior to use. Prior to use, check the packaging for use by date and damage. If the expiration date is exceeded or the packaging is found to be defective, do not use the product. The end user shall assume financial responsibility for opened sterile product.
8
91-600-00-86 · REV 04 · 2022-11-28
Instructions for Use / Technical Description Ultrasonic Unit SonicWeld Rx II NOTE: Sterile implants and sonotrode tips are for single use and may not be reprocessed and reused. 4.4.2
Preparatory Measures
NOTICE Glove damage by sonotrode tip The display language defaults to English. Users can select a different language by proceeding as follows: 1. Switch on the device at the power switch. 2. Wait for the self-test to be successfully completed. 3. Upon determining the depth and diameter of the pilot hole to be drilled in accordance with the indication, select the appropriate SonicPin Rx and drill bit. It must be possible to insert the bit up to the STOP mark. The geometry of the drill bit and the design of the SonicPin Rx have been perfectly matched to each other. The working end of the bit is designed so that it allows you to drill through the Resorb x, Resorb xG mesh, plate, foil or membrane implants. The bit geometries also reflect the diameter of these implants. We recommend selecting a drill bit that is at least 1 mm longer than the pin to be inserted. 4. Hold and guide the handpiece like a pencil. 5. Press the sonotrode tip onto the SonicPin Rx. 6. The sonotrode tip will engage the SonicPin Rx, allowing the pin to be removed from its holder. 7. Position the pin attached to the sonotrode tip into the drilled hole. 8. Apply light pressure on the pin orthogonally to the pilot hole. 9. Press and hold down the hand activation pushbutton (pos. 10) until the pin is inserted, under light pressure, into the pilot hole down to the intended depth. 10. Hold the Sonotrode pin in place until SonicPin Rx is solidified. 11. Once the pin has solidified, the sonotrode tip can be detached from the pin by turning the sonotrode clockwise and counterclockwise in an oscillating movement. 12. Continue the procedure by repeating steps 4 to 11. 4.4.3 Application 1. To take out the SonicPins Rx from the clip magazine: Insert the sonotrode tip fully into the hole in the top of the SonicPin Rx and then pull straight away. The SonicPins Rx friction fit onto the tip of the sonotrode so they can easily be taken out of the clip magazine.
2.
While still attached to the sonotrode tip, seat the SonicPin Rx tip into the pilot hole of the plate or mesh.
3. 4.
Exert slight pressure on the SonicPin Rx orthogonally to the pilot hole so the SonicPin Rx becomes seated into the bone. Keeping this slight pressure, operate the activation pushbutton (pos. 9) until the SonicPin Rx has been inserted into the hole to the intended depth, and then stop pressing the activation button but keep your hand in place. During activation, the blue indicator on the handpiece (pos. 8) will light up and an audible alert can be heard. Avoid any sonotrode tip movement for at least three seconds after inserting the SonicPin Rx and stopping activation of the ultrasonic energy.
9
91-600-00-86 · REV 04 · 2022-11-28
Instructions for Use / Technical Description Ultrasonic Unit SonicWeld Rx II 5.
Once the SonicPin Rx has solidified, remove the sonotrode tip with a twist as shown in the next picture and then pull straight away. While twisting, the sonotrode tip should remain perpendicular to the bone.
Resorb x or Resorb xG mesh or foils can be fixated as follows: 1.
Implant a sufficient number of SonicPins Rx in the bone as described above, using the standard sonotrode (pos. 10, 11) for pin insertion.
2. 3.
Cut the Resorb x or Resorb xG membrane or foil and place over the inserted pins. Use the smoothing sonotrode (pos. 14, 15) or the angled working end of the standard sonotrode (pos. 13) to weld the Resorb x or Resorb xG membrane or foil in place on the inserted pins. • Place the tip of the smoothing sonotrode onto the membrane/foil at the point of contact between the membrane/foiland the SonicPin Rx underneath. • Exert slight pressure on the membrane/foil. • Operate the activation pushbutton until the membrane liquefies visibly. As long as the pushbutton is pressed down, the blue indicator (pos. 9) lights up on the handpiece and an alert is sounded. • Do not move the tip of the sonotrode for at least 3 seconds after operating the pushbutton. • Once the membrane/foil has solidified again, withdraw the tip of the sonotrode. Repeat this procedure to fix the Resorb x or Resorb xG membrane or foil to all the remaining SonicPins Rx.
4.
5.
The welding or smoothing sonotrodes can be used for smoothing out sharp or projecting edges of the membrane or foil. • Place the tip of the smoothing sonotrode at the edge of the membrane or foil. • Exert slight pressure on the edge of the membrane or foil. • Operate the activation pushbutton until the membrane visibly liquifies. As long as the pushbutton is pressed down, the blue indicator (pos. 9) will be lit and an audible sound will be heard. • Run the tip of the sonotrode very slowly along the edge of the membrane/foil during activation of the system.
10
91-600-00-86 · REV 04 · 2022-11-28
Instructions for Use / Technical Description Ultrasonic Unit SonicWeld Rx II 4.5
Turning off the Ultrasonic Unit
NOTICE If activation is continued for 60 seconds, then the handpiece will automatically switch off and the activation LED (pos. 9) will go out. To completely turn off the SonicWelder Rx II, proceed as follows. • •
Operate the On / Standby switch (pos. 4). This sets the unit to standby mode and the display (pos. 2) will become dark. Disconnect all system components (sonotrode from handpiece, handpiece with connecting cable from ultrasonic unit and power cable from ultrasonic unit). For all-pole disconnection of the unit from the power supply, pull the power plug. 5 Processing, Cleaning, Disinfection and Sterilization The warranty regarding handpiece cleaning and sterilization is limited to 250 reprocessing and sterilization cycles. Once the maximum number of cycles has been reached, a corresponding message will be displayed. The responsibility for proper cleaning, disinfection and sterilization of the handpiece rests with the operator/user. Be sure to observe your national/local regulations, including potential restrictions. Use appropriate and approved sterile packaging (e.g. in accordance with ISO 11607) for sterilization, subsequent transportation and storage. 5.1 Reprocessing Non-sterile sonotrode tips must be processed following 91-600-00-07 “Processing KLS Martin Reusable Surgical Instruments and Trays.” 5.1.1 Handpiece, by Machine The handpiece and connecting cable can be reprocessed by machine. It can be processed with the program sequences that are authorized for surgical instruments and implants. For cleaning, follow the manufacturers’ instructions of the corresponding cleaning machines and cleaning agents. The process (including loading) must guarantee sufficient removal of residue. Only mildly alkaline cleaning agents are authorized for use. 1. 2. 3. 4.
Remove the sonotrode tip from the handpiece. Disconnect the connecting cable with handpiece from the ultrasonic unit. Coil the connecting cable with handpiece in a circle having a diameter of at least 20 cm (pos. 17). Use recommended storage container for storing and reprocessing handpiece. See section 7 “Accessories & Spare Parts”, page 16. – Arrange the handpiece inside the cleaning machine (W/D) that the sonotrode side of the handpiece points downward. This prevents any accumulation of rinsing liquid in the handpiece.
5.1.2 Handpiece, by Hand 1. Remove the sonotrode tip from the handpiece. 2. Disconnect the connecting cable with handpiece from the ultrasonic unit. 3. Clean the handpiece with a clean, lint-free cloth moistened with a commercially available disinfectant approved for use with instruments and based on alcohol of type ethanol (50/50) or isopropanol (70/30).
NOTICE Risk of damage due to improper handling. The handpiece must not be immersed in a disinfecting or ultrasonic bath. Do not use any acetone-containing disinfectants for cleaning and disinfecting the handpiece. 5.1.3 Device, by Hand Clean the SonicWeld Rx II ultrasonic unit with a clean, lint-free cloth moistened with a commercially available disinfectant approved for surface disinfection and based on ethanol or methanol.
WARNING Danger of death by electric shock • Ingress of liquids into the device must be avoided under any circumstances. • Before cleaning or disinfecting the SonicWeld Rx II, the device must be fully disconnected from the power supply. • Should moisture penetrate the device, dry it after disconnecting it from the supply.
11
91-600-00-86 · REV 04 · 2022-11-28
Instructions for Use / Technical Description Ultrasonic Unit SonicWeld Rx II 5.2 Inspection for Damage Perform a visual check of all components before using the system again and before sterilizing the handpiece. In particular, check the cable connections and verify that the unit and the sonotrode is not damaged. 5.3
Sterilization
WARNING Danger of infection due to non-sterile handling Improper sterilization and non-sterile handling of the SonicWeld Rx II system can pose serious health hazards to patients. • •
•
Open-end wrench The wrench (pos. 12) can be reprocessed in the same way as surgical instruments. A wrench in sterile packaging is required for each use. Sonotrode Non-sterile sonotrode tips must be reprocessed in the same way as surgical instruments. Each reuse requires the sonotrode tips to be available in new sterile packaging. NOTE: Sonotrodes provided sterile are for one time use and cannot be reprocessed or reused. Handpieces with connecting cables The handpiece with connecting cable (pos.7 and 8) and the handpiece with a 6m connecting cable are steam-sterilizable. The warranty for the cleaning and sterilization of the handpiece is limited to 250 reprocessing and sterilization cycles. Once the maximum number of cycles has been reached, a corresponding message will be displayed. The maintenance measures required for the SonicWeld Rx II system are described in section 11 “Safety Checks (SC)”.
The following sterilization parameters are recommended: For pre-vacuum steam sterilization cycles, a 4 minute exposure time at 270°F. Minimum Drying Time: 20 minutes Caution: Time required for sterilizer to reach the necessary temperature is not included in the times given. This is based on instructions in Steam Sterilization and Sterility Assurance in Health Care Facilities (ANSI/AAMI ST79).
12
91-600-00-86 · REV 04 · 2022-11-28
Instructions for Use / Technical Description Ultrasonic Unit SonicWeld Rx II 6 Maintenance The SonicWeld Rx II requires no annual or preventative maintenance. 6.1
Troubleshooting
6.1.1
Displays
Message displayed
Cause
Remedy
Power Supply Error Temperature Gauge defective Generator Over Temperature Device Error
Generator error or fault.
Disconnect the unit from the power supply, and then reconnect it. If the problem persists, return unit to manufacturer, see section 1.1.
Ultrasound Error
Generator problem (during welding process).
Acknowledge by pressing the On/Standby switch. If the problem persists, disconnect the unit from the supply.
1. Release handpiece! 2. Press On/Standby!
System overload (sonotrode tip stuck/jammed, excessive pressure).
Acknowledge by pressing the On/Standby switch, then clear the handpiece problem and operate the activation push button again.
Welding time > 60 s
Maximum welding time of 60 s exceeded.
After a cooling-down time of 5 s, the unit is ready for use again.
1. Release handpiece! 2. Press On/Standby!
Sonotrode tip seated too loosely.
Tighten sonotrode tip with wrench (pos. 12), and acknowledge error.
System Error
Monitoring of all important program modules.
Disconnect the unit from the power supply, and then reconnect it. If the problem persists, return unit to manufacturer, see section 1.1.
6.1.2 Handpiece Statuses Message displayed X
13
Cause
Remedy
No handpiece connected.
Connect handpiece.
Temperature values measured on handpiece not plausible.
Replace handpiece.
Max. temperature reached on handpiece.
Message disappears automatically as soon as the temperature drops below 70°C (158°F). Alternative: Replace handpiece.
The handpiece cycle counter pictogram appears during self-test. (240 ≤ cycle counter< 250)
Message disappears automatically once the self-test has been completed.
The flashing handpiece cycle counter pictogram appears during self-test. (cycle counter≥ 250)
Following completion of the self-test, the message must be acknowledged with the On/Standby switch.
Handpiece pushbutton defective.
Replace handpiece.
91-600-00-86 · REV 04 · 2022-11-28
Instructions for Use / Technical Description Ultrasonic Unit SonicWeld Rx II 6.1.3
Potential Malfunctions
Trouble
“Screeching” noises heard during the self-test or during use of the SonicWeld Rx II system.
Sonotrode tip will not detach from SonicPin. SonicPin fails to attach to sonotrode tip.
Sonotrode tip sticks to SonicPin.
Handpiece indicator does not light up during activation.
Display dark.
14
Cause
Identification
Remedy
Residual moisture or condensate on the contact points.
Clearly audible.
This does not compromise the proper functioning of the SonicWeld Rx II system. Noise will subside automatically during normal use of the device. It may be helpful to use longer drying times after sterilization.
Bent or rammed sonotrode tip.
Visual check.
Replace sonotrode tip.
Ultrasound applied too long.
Pin is generally deformed, sonotrode cannot be removed residue-free.
Observe required cooling down time. Rotate the sonotrode axially (twist) to break the connection, see section 4.4, page 13.
Bent sonotrode tip.
Visual check.
Replace sonotrode tip.
LED life exceeded.
Visual check.
Replace the handpiece. A defective indicator on the handpiece has no adverse effect on ultrasound application.
No power supply.
Visual check.
Connect the system to the power supply and operate the On/Standby switch.
Fuse defective.
Electrical test.
Replace fuse.
Unit not switched on.
Visual check.
Press On/Standby switch until display lights up.
91-600-00-86 · REV 04 · 2022-11-28
Instructions for Use / Technical Description Ultrasonic Unit SonicWeld Rx II 6.2
Replacements
6.2.1 Replacing the Sonotrode tip Use the wrench (pos. 12) to remove the sonotrode tip (pos. 11) from the handpiece by counterclockwise rotation; subsequently tighten the new sonotrode tip with the wrench (clockwise rotation). 6.2.2 Replacing the Fuse 1. Set SonicWeld Rx II to standby mode by pressing the On/Standby switch. –The unit can now no longer be activated and the display turns dark upon entering standby mode. 2. Remove power cable from power socket-outlet. 3. Pull out the fuse holder (pos. 6). 4. Remove the defective fuse from the fuse holder. 5. Insert new fuse into the fuse holder, see section 7 “Accessories & Spare Parts”, into the fuse holder. 6. Push fuse holder back into the unit, making sure that it locks in place. 7. Check the unit for proper functioning. 6.2.3 Replacing the Activation LED The activation LED (pos. 9) cannot be replaced by the user. However, a defective LED has no adverse effect on the proper functioning of the SonicWeld Rx II system. 6.2.4 Replacing the Power Cable 1. Set SonicWeld Rx II to standby mode by pressing the On/Standby switch. The unit can now no longer be activated. –The display turns dark upon entering standby mode. 2. Unplug the power cable first from the power socket-outlet and then from the IEC inlet connector (pos. 5). 3. Use new country-specific power cable (see section 7 “Accessories & Spare Parts”,) and connect it first to the unit (pos. 5) and then to a grounding outlet. 4. Check the unit for proper functioning. 6.2.5 Replacing the Handpiece with Connecting Cable 1. Set SonicWeld Rx II to standby mode by pressing the On/Standby switch. The unit can now no longer be activated. –The display turns dark upon entering standby mode. 2. Remove the plug of the handpiece connecting cable from the handpiece connecting socket (pos. 2). 3. Connect a new handpiece with connecting cable (pos. 7, 8; see section 7 “Accessories & Spare Parts”, page 16) to the SonicWeld Rx II system: insert the plug of the connecting cable fully into the handpiece connecting socket (pos. 2) and rotate to lock it in place. 4. Operate the On/Standby switch to set the SonicWeld Rx II to working mode. 5. Check the unit for proper functioning.
WARNING Danger of injury in the event of using non-approved accessories The use of accessories, sonotrodes, and connecting cables other than those offered by the manufacturer of the SonicWeld Rx II as spare parts in Section 7 can lead to increased emission of the SonicWeld Rx II system or deterioration of its interference immunity.
15
91-600-00-86 · REV 04 · 2022-11-28
Instructions for Use / Technical Description Ultrasonic Unit SonicWeld Rx II 7
Accessories & Spare Parts Designation
REF
Ultrasonic Unit SonicWeld Rx II
52-502-21-04
Handpiece with connecting cable (3 m)
52-500-23-04
Handpiece with connecting cable (6 m)
52-500-24-04
Standard sonotrode, straight
52-501-21-04
Standard sonotrode, straight, sterile
52-501-21-71
Standard sonotrode, angled
52-501-22-04
Smoothing sonotrode, straight
52-501-23-04
Smoothing sonotrode, angled
52-501-24-04
Open-end wrench for sonotrodes
52-502-01-04
Fuse (T 2 AH, 250 V)
52-503-24-04
Tray basket for MiniSet Container System 277 x 171 x 54 mm (L x W x H) with cover
55-015-30-01
Tray basket
55-969-44-04
Tray basket cover
55-963-51-04
16
91-600-00-86 · REV 04 · 2022-11-28
Instructions for Use / Technical Description Ultrasonic Unit SonicWeld Rx II 8
Technical Data
Designation
REF
Fuse rating
T 2 AH, 250 V
Power supply frequency
50–60 Hz
Power supply voltage
100–240 V alternating voltage with protective ground contact
Power input
70 VA
Maximum power
17 W
Operating frequency
30 kHz
Electric shock protection
Protection class I
Protection against harmful ingress of water
IP42
Suitability for use in atmospheres enriched with oxygen
The SonicWeld Rx II is not suitable for use in atmospheres enriched with flammable mixtures of anesthetics and air, oxygen or nitrous oxide.
Operating mode
Continuous duty with intermittent loading 2 s operation 15 s break 5 repetitions 4 min. break
Applied part
Handpiece with type BF sonotrode
Dimensions
Width Height Depth
Length of handpiece with cable
3m
Length of handpiece with long cable
6m
Number of reprocessing cycles for the handpiece
250
Environmental conditions for transport and storage
Ambient temperature Relative humidity Atmospheric pressure
-20°C to +45°C (-4°F to +113°F) 10–100% 500–1,060 hPa
Environmental conditions for operation
Ambient temperature Relative humidity Atmospheric pressure Altitude
+10°C to +40°C (+50°F to +104°F) 20–75% 700–1,060 hPa max. 4,000 m
17
260 mm 255 mm 46 mm
91-600-00-86 · REV 04 · 2022-11-28
Instructions for Use / Technical Description Ultrasonic Unit SonicWeld Rx II 9
Guidelines and Manufacturer’s Declaration Regarding Electromagnetic Compatibility (EMC) Guidance and manufacturer’s declaration – Electromagnetic interference emission The SonicWeld Rx II is intended for use in an electromagnetic environment as specified below. The user should assure that it is used in such an environment. Emission test
Compliance level
Electromagnetic environment – Guidance
RF emissions according to EN 55011
Group 2
The SonicWeld Rx II uses electromagnetic energy exclusively for the performance of its internal functions. This may cause interference in nearby electronic equipment.
RF emissions according to EN 55011
Class B
Harmonic emissions according to IEC 61000-3-2
Complies
Voltage fluctuations/flicker emissions according to IEC 61000-3-3
Complies
The SonicWeld Rx II is suitable for use in all establishments, including domestic establishments and those directly connected to the public low-voltage power supply network that supplies buildings used for domestic purposes.
Guidance and manufacturer’s declaration – Electromagnetic interference emission The SonicWeld Rx II is intended for use in an electromagnetic environment as specified below. The user should assure that it is used in such an environment. Immunity test
Electrostatic discharge (ESD) according to IEC 61000-4-2
Fast electrical transients/bursts according to IEC 61000-4-4
IEC 60601 test level
Compliance level
±8 kV contact discharge
±8 kV contact discharge
±15 kV air discharge
±15 kV air discharge
±2 kV for power lines
±2 kV for power lines
±1 kV for input and output lines
±1 kV for input and output lines
Surge according to IEC 61000-4-5
Complies 0% UT for ½ period at 0-315 degrees
Voltage dips, short power interruptions and supply voltage fluctuations according to IEC 61000-4-11
0% UT for 1 period at 0 degrees 70% UT for 25 periods at 0 degrees
0% UT for ½ period at 0-315 degrees 0% UT for 1 period at 0 degrees 70% UT for 25 periods at 0 degrees 0% UT for 250 periods
Electromagnetic environment – Guidance Floors should be wood, concrete or ceramic tile. If floors are covered with synthetic material, the relative humidity should be at least 30%. Power quality should be that of a typical commercial or hospital environment. Power quality should be that of a typical commercial or hospital environment.
Power quality should be that of a typical commercial or hospital environment. If the user requires continued operation during power interruptions, it is recommended to power the device from an uninterruptible power supply.
0% UT for 250 periods Power frequency (50/60 Hz) magnetic field according to IEC 61000-4-8
3 A/m
Note
UT is the a. c. voltage prior to application of the test level.
18
3 A/m
Power-frequency magnetic fields should be at levels characteristic of a typical location in a typical commercial or hospital environment.
91-600-00-86 · REV 04 · 2022-11-28
Instructions for Use / Technical Description Ultrasonic Unit SonicWeld Rx II
Guidance and manufacturer’s declaration – Electromagnetic interference emission The SonicWeld Rx II is intended for use in an electromagnetic environment as specified below. The user should assure that it is used in such an environment. Immunity test
IEC 60601 test level
Compliance level
Electromagnetic environment – Guidance Portable and mobile RF communications equipment should be used no closer to any part of the device (including cables) than the recommended separation distance calculated from the equation applicable to the frequency of the transmitter. Recommended separation distance: =1.17 √P
Conducted RF according to IEC 61000-4-6
Radiated RF according to IEC 61000-4-3
3 Veff 150 kHz to 80 MHz
3 V/m 80 MHz to 2.5 GHz
3 Veff 150 kHz to 80 MHz
3 V/m 80 MHz to 2.5 GHz
=1.17 √P for 80 MHdz to 800 MHz = 2.33 √P for 800 MdHz to 2.5 GHz where P is the maximum output power rating of the transmitter in watts (W) according to the transmitter manufacturer and d is the recommended separation distance in meters (m). Field strengths from fixed RF transmitters, as determined by an electromagnetic site surveya, should be less than the compliance level in each frequency range.b Interference may occur in the vicinity of equipment marked with the following symbol.
Note 1
At 80 MHz and 800 MHz, the higher frequency range applies.
Note 2
These guidelines may not apply in all situations. Electromagnetic propagation is affected by absorption and reflection from structures, objects and people.
Field strengths from fixed transmitters, such as base stations for radio (cellular/cordless) telephones and land mobile radios, amateur radio stations and AM and FM radio and TV stations, cannot be predicted theoretically with accuracy. To assess the electromagnetic environment due to fixed RF transmitters, an electromagnetic site survey should be considered. If the measured field strength in the location in which the device is used exceeds the applicable RF compliance level specified above, the device should be observed to verify normal operation. If abnormal performance is observed, additional measures may be necessary, such as reorienting or relocating the device.
a
b
Over the frequency range of 150 kHz to 80 MHz, field strengths should be less than 3 V/m.
19
91-600-00-86 · REV 04 · 2022-11-28
Instructions for Use / Technical Description Ultrasonic Unit SonicWeld Rx II
Recommended separation distances between portable and mobile RF telecommunications equipment and the SonicWeld Rx II The SonicWeld Rx II is intended for use in an electromagnetic environment in which radiated RF disturbances are controlled. The user can help prevent electromagnetic interference by maintaining a minimum distance between portable and mobile RF telecommunications equipment (transmitters) and the device as recommended below, depending on the maximum output power of the communications equipment. Separation distance according to frequency of transmitter (in m) Rated maximum output P of transmitter in watts
150 kHz to 80 MHz =1.17 √P
80 MHz to 800 MHz =1.17 √P
800 MHz to 2.5 GHz = 2.33 √P
0.01
0.12
0.12
0.23
0.1
0.38
0.38
0.73
1
1.2
1.2
2.3
10
3.8
3.8
7.3
100
12
12
23
For transmitters rated at a maximum output power not listed above, the recommended separation distance d in meters (m) can be estimated using the equation applicable to the frequency of the transmitter, where P is the maximum output power rating of the transmitter in watts (W) according to the transmitter manufacturer. Note 1
At 80 MHz and 800 MHz, the separation distance for the higher frequency range applies.
Note 2
These guidelines may not apply in all situations. Electromagnetic propagation is affected by absorption and reflection from structures, objects and people.
10 Disposal of the Device Observe all national/local regulations and guidelines when disposing of the packaging material and potentially infectious items (e.g. removed metal components). In designing the device, we tried to avoid using composite materials wherever possible. This allows a high degree of recycling. We therefore offer to take the device back for proper disposal and recycling. Be sure to observe your national/local rules and regulations governing disposal. 11
Safety Checks (SC)
NOTICE It is recommended that users perform an annual technical safety check on the SonicWeld Rx II. The proper working condition of the unit should be confirmed by the inspector after completion of the check. For frequency and scope of the safety check, see IEC 62353. The points listed here are additional check points. Frequency:
annually
Device:
Inv. number:
Serial Number:
Operator:
Operating hours:
SonicWeld Rx II
Location:
20
91-600-00-86 · REV 04 · 2022-11-28