2 Pages
Preview
Page 1
ENDOEYE FLEX video laparoscope
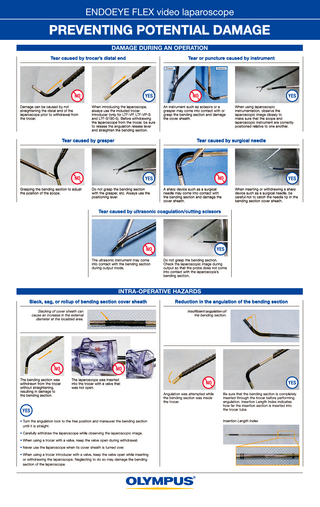
PREVENTING POTENTIAL DAMAGE DAMAGE DURING AN OPERATION Tear caused by trocar’s distal end
Tear or puncture caused by instrument Grasper
NO
YES
Damage can be caused by not straightening the distal end of the laparoscope prior to withdrawal from the trocar.
When introducing the laparoscope, always use the included trocar introducer (only for LTF-VP, LTF-VP-S and LTF-S190-5). Before withdrawing the laparoscope from the trocar, be sure to release the angulation release lever and straighten the bending section.
Tear caused by grasper
NO
YES
An instrument such as scissors or a grasper may come into contact with or grasp the bending section and damage the cover sheath.
When using laparoscopic instrumentation, observe the laparoscopic image closely to make sure that the scope and laparoscopic instrument are correctly positioned relative to one another.
Tear caused by surgical needle
NO Grasping the bending section to adjust the position of the scope.
Scissors
NO
YES
A sharp device such as a surgical needle may come into contact with the bending section and damage the cover sheath.
When inserting or withdrawing a sharp device such as a surgical needle, be careful not to catch the needle tip in the bending section cover sheath.
YES Do not grasp the bending section with the grasper, etc. Always use the positioning lever.
Tear caused by ultrasonic coagulation/cutting scissors
NO
YES
The ultrasonic instrument may come into contact with the bending section during output mode.
Do not grasp the bending section. Check the laparoscopic image during output so that the probe does not come into contact with the laparoscope’s bending section.
INTRA-OPERATIVE HAZARDS Slack, sag, or rollup of bending section cover sheath Slacking of cover sheath can cause an increase in the external diameter at the localized area.
Reduction in the angulation of the bending section Insufficient angulation of the bending section.
NO
NO
The bending section was withdrawn from the trocar without straightening, resulting in damage to the bending section.
The laparoscope was inserted into the trocar with a valve that was not open.
YES • Turn the angulation lock to the free position and maneuver the bending section until it is straight. • Carefully withdraw the laparoscope while observing the laparoscopic image. • When using a trocar with a valve, keep the valve open during withdrawal. • Never use the laparoscope when its cover sheath is turned over. • When using a trocar introducer with a valve, keep the valve open while inserting or withdrawing the laparoscope. Neglecting to do so may damage the bending section of the laparoscope.
NO
YES
Angulation was attempted while the bending section was inside the trocar.
Be sure that the bending section is completely inserted through the trocar before performing angulation. Insertion Length Index indicates how far the insertion section is inserted into the trocar tube. Insertion Length Index
SENSITIVE AREAS Light guide connector
Universal cord
Bending section
DAMAGE CAUSED BY IMPROPER HANDLING DURING REPROCESSING Tear caused by improper handling & storage
NO
NO
An instrument such as a grasper or scissors may grasp or come into contact with the bending section and damage the cover sheath if stored/handled incorrectly.
YES
Incorrectly placing the laparoscope in a sterilizing package may cause it to move inside the package, resulting in the light guide connector or other sections hitting the bending section.
Rupture in cover sheath caused by failure to attach sterilization cap Rupture indicated by tear along the length of the laparoscope.
YES Always attach the sterilization cap before sterilization.
INSPECTING THE LAPAROSCOPE BERORE USE Before each case, prepare and inspect the laparoscope as instructed in the instruction manual. Inspect other equipment to be used with the laparoscope as instructed in their respective instruction manuals. Should any irregularity be observed, do not use the laparoscope.
Inspection of components
1. Inspect the objective lens and light guide cover glass at the distal end of the laparoscope’s universal cord for scratching, cracks, stains, or gaps around the lens or other irregularities. 2. Inspect the surface of the universal cord for cracks, dents, bulges, or other irregularities. 3. Inspect the cover sheath of the bending section for sagging, swelling, cuts, holes, or other irregularities. 4. Carefully run your fingertips over the entire length of the universal cord. Check for protruding objects or other irregularities. 5. Inspect the control section, light guide connector, and video plug for excessive scratching, which may allow debris to accumulate. 6. Inspect the boot and the universal cord near the boot for bends, twists, or other irregularities. 7. Gently hold the midpoint of the bending section at a point 10 cm from the distal end. Push and pull gently to confirm that the border between the bending section and the distal end is not loose.
Inspection of bending section
Perform the following inspection while the bending section is straight:
Do not stack the laparoscope and instruments during transport or washing. When carrying the scope by hand, wind up the universal cord and use one hand to hold the cord and control section, and use the other hand to hold the video connector.
Irregularities in the bending operation or bending shape Irregularities in the bending section. A slight increase in force is required to operate the angulation control lever.
NO The sterilization cap was not attached prior to sterilization.
Keep the sterilized pack horizontal during transport.
YES
1. Move the angulation lock to its neutral position, then move the angulation control levers all the way in both directions and confirm that they move smoothly. Slowly move both levers back to their neutral positions. Confirm that the bending section straightens out completely. 2. Engage the angulation lock and confirm that it works properly.
Storage
The storage cabinet must be clean, dry, well-ventilated, and maintained at ambient temperature. Storing the laparoscope and accessories in direct sunlight, at high temperature, in high humidity, or exposed to x-rays and/or ultraviolet rays may damage the laparoscope or present an infection control risk. Do not store the laparoscope in a carrying case. Use a carrying case only for shipping the laparoscope. Routinely storing the laparoscope in a humid, non-ventilated environment such as a carrying case may present an infection control risk.
Precautions
Before sterilization, remove the trocar introducer from the laparoscope. Attaching the trocar introducer to the laparoscope inhibits sterilization. Do not discard the trocar introducer. Follow product instruction manuals for proper sterilization instructions and the use of proper sterilization methods. If the laparoscope is dropped or the distal end of the laparoscope receives an impact, the laparoscope may be damaged even if a crack or chip of the lens on the distal end is not noticed. In this case, do not use the laparoscope. Contact Olympus.
NO The insertion section at the distal end was damaged during reprocessing or transportation.
YES Do not contact the distal end of the bending section forcefully during reprocessing or transportation. Handle all instrument sets with care.
WATER LEAKAGE TEST PROCEDURES After pre-cleaning, perform a leakage test on the laparoscope to ensure that it is waterproof. If the laparoscope is damaged, water will be able to penetrate its interior. If a leak is located, remove the laparoscope from the water and contact Olympus. 1. Fill a basin with clean water. Use a basin that is at least 70 cm by 70 cm (28" by 28") in size and deep enough to allow the laparoscope to be completely immersed. 2. Align the leakage Leakage tester adapter 2 tester adapter’s slit with the venting connector’s pin on the light guide connector and push. Turn the adapter clockwise until it stops. 3 3. Confirm that the pressure release lever is closed. 4. Press the hand pump until a pressure between 19 and 27 kPa is indicated on the pressure display. The pointer must be within the green area on the pressure Pressure release lever display. To 4 detect a slight leakage of water, pressurize to approximately 27 kPa. After pressurization, it takes several seconds until the pointer is stabilized. Read the pressure when the pointer is stable. CAUTION: If the pointer continues to fall toward 0 kPa, the laparoscope might have a serious water leakage, or the leakage tester may be damaged. Stop the leakage testing immediately. If there is no pressure inside the laparoscope, water may enter it while it is immersed. As a result, problems other than leakage may occur.
5. Confirm that the pointer is stable. With the leakage tester connected, immerse the laparoscope in the water and observe for approximately 30 seconds while angulating the bending section. Confirm that 5 there is no area from which a continuous series of bubbles escapes. 6. Remove the laparoscope from Angulation lever the basin. 7. Press the pressure 7 release lever to let the air escape from the laparoscope. 8. Detach the leakage tester from the laparoscope’s venting connector by turning the adapter counterclockwise. 9. Thoroughly dry the leakage tester.